


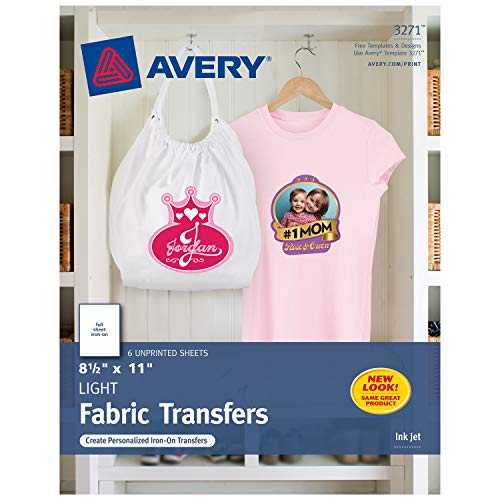
- Quality results for a professional, fashionable look
- Use to personalize your T-shirts, hats, aprons and even bags
- Designed for use on white/light-colored, 100% cotton/poly, cotton blend fabrics
- Color shield formula means colors stay bright, even after being washed
- For more information go to avery.com/transfers
-
Information
-
Twitter
-
Pinterest
-
Youtube
-
Facebook
Reginaldo Guerrero
Does what it intends to do
These worked really well for what we needed them for. We don’t expect them to last or wear well, it’s an iron-on after all! I bought this and the ones for “dark” colors to experiment as there was very little detail as to what the diffenece is, even after reading everything. Basically it’s this: Light Color Transfer: You have to be able to reverse the image and you should cut around your print, leaving a small border. When you iron this on, the backing is clear and basically seals your image to the shirt. I wouldn’t expect the image to wear off as much compared to the the dark color version, but be forewarned, it’s thin and see through. Look at my photos for comparisons. Printers can’t print white so keep this in mind. Dark Color Transfer: The backing IS white, and everywhere you would have no printed image, or it’s clear (see through) WILL have a white background. You will need to trim right up to the edge or you will have a white border. It’s darker and better image quality then the light shirt color version... however, the ink from the printer is always exposed. I would expect the ink to scrape or wear off over time. Before you start, remember slow and steady wins the race! Don’t be too egger to peel off the backing or top sheet before it has a chance to cool. Don’t rush heating and let it sit for 24 hours before washing or handling. It was fun experimenting and again we achieved the results we were looking for so in the end we are very happy with the products!
Phea Roun
Worked very well for a Christmas gift we made for neighbors
Worked very well for a Christmas gift we made for neighbors. Bought small canvas bags on Amazon (Augbunny 100% Cotton 8- by 10-Inch Muslin Bags) printed the iron-on and placed it on the bag.
Aaron Dunning
They came out great! I have been wearing these shirts seven days ...
I used these transfers to make t-shirts for my business. They came out great! I have been wearing these shirts seven days a weeks for over a month. Only one shirts has lifted some on the front, but I feel it was due to faulty application, not the quality of the product. I have gotten many compliments on my shirts!
Harsh Mishra
Easy to use and good quality
These were super easy to use. We made personalized bags as part of our wedding favors. The directions say to make sure that you cut rounded corners and to keep the iron on it for 3 minutes if using a full-page image, focusing on the edges and corners. And make sure you print in mirror image, otherwise it will go on backwards. It also says to wash the garment before using, but since I don't anticipate the bags ever really being washed, I didn't bother. If I had made a shirt, I definitely would have. Overall, I'm very happy with the quality of these, and I'm so excited to give these out as favors at our wedding! I now have other projects in mind using iron-on transfers.
Sudeep Yadav
Works great
I used these to make goody bags for my son's birthday party and they worked great. The instructions are also easy to follow.
Rahman Baba
Time tested good product.
I'm a graphic designer, coach various kid teams & always seem to be making shirts for them. I began using the Avery transfers in 2010 & have some shirts that have been through the wash countless times since then. Never had a problem & the colors seem to last amazingly well over time. Other than using only white or light grey fabric & a good quality shirt, my tips would be: 1) pre-wash the shirt (I've used cotton & 50/50) & tumble dry. 2) Plain paper final review: ALWAYS look at your design through the back of the paper (hold it up to a window or bright light) & make sure all of your text has been mirrored & the design looks good. 3) Print the final design using the best quality your printer can output. 4) Trim close to the printed parts but leave a bit of a margin - 2mm'ish. Don't cut so close that your design falls apart or warps while you are ironing. Round off points, if even a little. 5) For fine designs that have been cut to the flimsy stage, cover with a sheet of parchment paper in the beginning of the ironing to get it stuck down. The parchment can be removed to finish the ironing. Baking parchment will not stick to this stuff & can get pretty darn hot. Do not use waxed paper or regular printer paper: they do not like to get hot. 6) Follow the package ironing instructions. Simple as that. I use a cutting board on the floor so I can apply good pressure. For sleeve designs, my hubbie made me a little block of wood that fits inside. He cut a small groove on the bottom for the seam so the wood lays flat. 7) After I peel the paper off I lay a piece of parchment over the whole design & give it a final hit with the iron. This seems to really set the transfer into the fabric & gives the most natural feel. 8) If you can plan ahead, it's good to give them a final rinse with a bit of vinegar in the water to set the dye. Line dry & tumble on low to soften the whole shirt. I've never had the nerve to do the full heat dryer before the 'event' but that's my own weird thing. My worst experiences have come from using a cheap, lightweight shirt, using transfers that were too old or had been exposed to moisture (they did work though, just needed some extra tlc), or using a shirt color other than white or light grey. Love these things, just ordered 18 more. Buy them, have fun.
Vivian Silvera
Awesome for labels for handmade goods!
After trying many ways to make my own labels for handmade textile items, I finally stumbled across a tutorial on how to use transfer paper with cotton twill ribbon. I had been using a special setting solution and printing my labels directly onto fabric but the results were not crisp and saturated. I wish I'd thought of using transfer paper sooner! My labels look FANTASTIC now! Incredibly saturated color, crisp lines, just awesome! I get so many labels out of just one sheet of paper (and a large spool of cotton twill ribbon) that it's very cost-effective. For other crafty types, these would also be perfect for ironing onto sew-in labels (my next project). I can't speak to how they stand up in the wash yet, but I also read that if, after they've cooled, you iron again with just a piece of parchment paper on top, you'll remove a little of the excess "plastic-ey" coating and also set the design/colors a bit more too, but I haven't done that yet.... Either way, I love my new labels made with this transfer paper. They look very professional and polished!
Janelle Williams
DIY'er!
This is my first time using heat iron transfers! I wasn't sure what to expect so I read the directions carefully. I'm making tote favor bags for my daughter's Frozen Fever themed party and I think they came out great! I will definitely be using the transfers for lots of other projects!! I ironed these onto tote bags I also bought on Amazon. They are Kangaroo canvas tote bags, 18 pack size 12x12 inches.
Chad Boise
Work great but requires some understanding on how to get the best transfers
I've been using these Avery T-shirt transfer sheets for a few years now with great success. T-shirts, mouse pads and coasters all have worked fine and last a while. You can use a desktop cutting tool to cut around the edges of your design to make them look very clean. It seems people give these sheets low ratings when they don't work right for them, but in reading their comments I can't help come to the conclusion that it is user error. For instance, whey the instructions say not to use an ironing board they really mean it! The goal during the transfer is to soften (partially melt) the transfer media and fuse it with the t-shirt material. This requires a good amount of pressure against a hard and smooth service. The idea is to get the bond between the transfer media and material to be stronger than the bond between the transfer media and backing sheet, all without burning the media itself. As another reviewer mentioned, it really is best to use a waist high table in order to use your upper body weight when pressing. I made a couple of less than optimal transfers earlier on but quickly learned how to get it right.
Dana Sue Veach
TIPS FROM A PRO FOR PERFECT RESULTS!
The first thing you should know before using these great Avery T-shirt Transfers for Inkjet Printers, is that the results you get can be perfect, when you know how to apply these like a pro! I've used these transfer sheets for years, after being in the T-shirt printing business many years ago, and they are great for beautiful personalized items. Before you begin, you should know that it's helpful to have a photo, art or printing program that will reverse your image, called mirror image or flip image. You have to print the image in reverse or flipped to come out correctly on your shirt or other cotton item you are printing on. Once you have a program to flip your photo or art on, it is also important to know that making your picture as bright as possible for printing will result in a more vivid, colorful print on cotton. Any photo or art program will do this for you, when you use more contrast and brightness to make your photo or art stand out. Once you have your photo or art nice and bright and flipped, you will want to print a sample on plain paper before printing on the transfer sheet, to see what it will look like. It will look backwards and if it isn't bright enough, spend a little more time with contrast and brightness before printing a test page again. Remember to work with COPIES of your photo or art in case of mistakes, you can always make another copy off of your original. Prep work is everything when working with art projects. Once the photo or art looks perfect, in reverse, you can now get ready for your transfer. (If you need help with your image, Avery has free templates, tips and software on their web site.) For the transfer, you will need the following: White Cotton or Cotton/Poly Blend T-shirt or fabric. Make sure it is smooth and flat, if not, press it smooth and flat before transfer. Waist high smooth surface for applying the transfer. I use a portable PXB drawing board, which I can place on my ironing board or any waist high table. I picked up a board at my local Office Max years ago, and the $20.00-$40.00 price is well worth it, as I use it for drawing as well! It has a white clean smooth surface- perfect for transfers! Clean pillow case- pressed very smooth. Iron set at highest cotton heat setting- no steam ever!(My Black and Decker Irons have always been 1500W maximum heat irons, if your iron wattage is higher, like Rowenta's 1700W- LOWER your setting to 1500 so it doesn't burn!) Inkjet Printer- the best for color photos, art and transfers. Now that you have your cotton fabric or T-shirt, PXB board on a waist high table, pillow case, iron and printer with your flipped photo or art you want to transfer, you are ready to begin. You will first print your art or photo flipped on a plain piece of paper to make certain it's correct, then on the Avery transfer sheet. Trim the picture leaving the tiniest edge around it. Round out all the edges, as squared edges lift easier during wear and washing. Place your PXB board on a waist high table or ironing board- I've even done it on a low table, close to the floor to get maximum pressure from my arms. Place the smooth pillow case on the board, then the smooth T-shirt or fabric on top of the pillow case. Now when your iron is very hot, never use steam or have water in your iron- you will press as smoothly and HARD as possible for 3 full minutes.(3 minutes is for a full page- time is less for smaller pages, and have a clock nearby to watch the time.) Pay special attention to use just as much pressure on the edges as you do in the middle. Go top to bottom, side to side and around making sure you press really hard. After 3 minutes, let it cool and see if the paper starts to remove easily from an edge. If it doesn't- go back to ironing another minute and cool, then try removing it again. It should remove easily, so don't force it, just keep ironing with pressure, then cooling until it removes easily. Usually, 3 to 5 minutes should do it, but I've had to use the iron with all my strength for even a couple more minutes sometimes. When the transfer sheet edge finally does pull away easily from the fabric, remove the transfer SLOWLY, because if something is still sticking- you need to iron that spot again! Once your project is finished, remember, if it's washable, don't wash it for a few days and when you do have to wash, wash it inside out in cool water and hang dry to keep the transfer looking great for a long time! I've used Avery, HP, Epson and Burlington transfer sheets over the years, and these top name brands all work great! I have an HP inkjet printer, several photo programs- my favorite being Microsoft Digital Image Pro and the best art program- Autodesk's SketchBook Pro 2011- you can draw and color anything with this software! I've transferred art and photos onto T-shirts and used plain cotton fabric to transfer images onto, that I've then cut out and used Tacky craft glue to paste onto purses, totes, hats, any cloth accessories, cloth Christmas ornaments and my favorite- Christmas stockings! Over the years, I took photos of children or pets and then transferred them onto plain white cotton, which I cut out and glued onto stockings, adding their names with cut out letters made of felt. The secret to great secure gluing is I use a toothpick for tiny surfaces or popsicle stick for large surfaces dipped in the glue bottle, then spread on thinly on the entire gluing surface. Even, thin gluing keeps your image beautiful! The happiness these sentimental, personal gifts bring, are worth every penny spent, and with these professional tips I've left you with, your gifts will turn out just beautiful and be treasured forever!