
- N/A
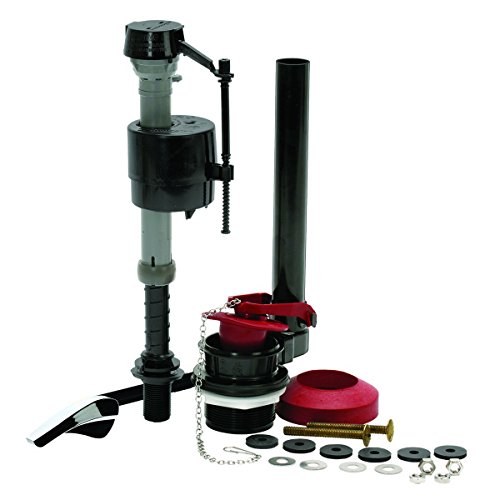
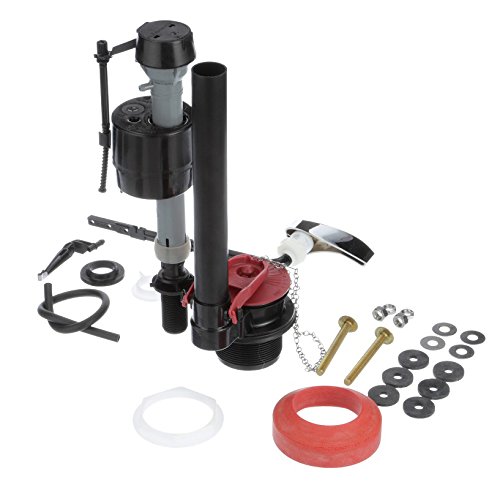
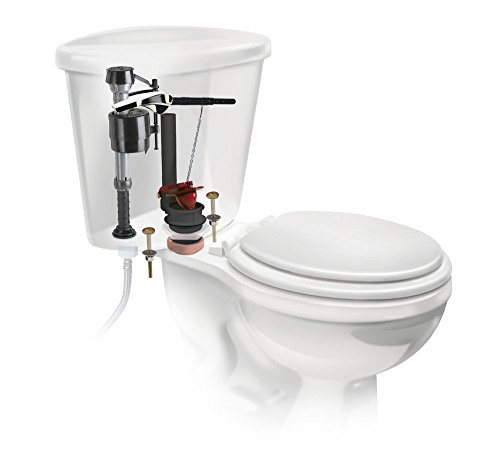
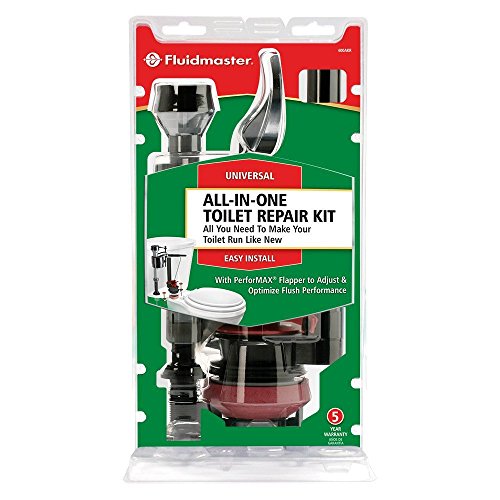
- Everything needed to make your toilet run like new!
- Easy-to-install, simple instructions included
- Universal design fits most toilet models
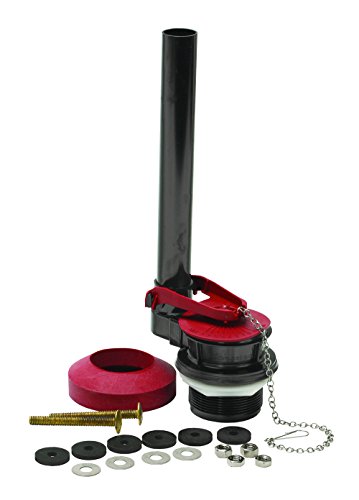
- Fits 2” flush valve toilets
- 400A toilet fill valve adjusts easily from 9” – 14”
- PerforMAX 2” Adjustable water-saving toilet flapper included
- Replaces inefficient fill and flush valves, leaky flappers, and broken toilet handles
- 5-year warranty
- Engineered to restore or increase overall toilet performance
-
Information
-
Twitter
-
Pinterest
-
Youtube
-
Facebook
Hadid Huda
Just what I needed and worked the first time, Yippee !
I was curious if this Kit would work on my old 60's vintage toilet but it was great and everything worked perfectly the first time I tried it. I must admit to watching a instructional video on YouTube and it prevented me from making common mistakes but after that installation was a snap. The one item I had that helped was my pair of very large channel lock pliers. The jaws can open to almost 3 inches and made tightening the flush tower nut very easy.One thing I reused from my old install was the brass wing nuts that held the tank on the toilet. I found it much easier to tighten the wing nuts than the standard nuts that came with the kit. Since the old wing nuts were brass, they will not corrode like the steel nuts provided with the kit and are the only thing I would suggest be changed in the parts provided.in the kit. Bottom line: No more leaky toilet and I did it myself saving a ton of money.
Hannah Fatunase
Good kit plus some install tips for newbs
I installed this kit on 3 of my toilets, replacing an 8 y/o builder special. The directions are mostly good, but the first install took me 3 hours of swearing. I'm pretty handy and an engineer, but have no plumbing experience. The second install took about an hour and the final install took about 30 minutes. Good kit and everything works really well. Husband loves that the flow level is adjustable so now there's a good flush that doesn't leave anything behind. Quieter than the builder special systems, no leaks, and no continuous running. Does its job well. Some install tips I learned (for newbs): 1. After shutting off water and disconnecting the water line, skip to taking the tank off completely (use a 13mm ratchet) and removing/installing all internal components (per directions) somewhere comfortable. I used the kitchen counter/sink and put a towel down to avoid scratches. You can reattach the tank as a final step before turning the water back on.. 2. There is a big white plastic screw hidden under the red gasket of the provided flush valve. I didn't realize this until the second install, previously using the old part and swearing at a pipe I thought was too short to attach properly. Had to go back and redo the 1st install. Save yourself my pain and remove the red gasket, then the screw, and put the red gasket back on. 3. For those whose handle is at the top of the tank (like me), here is some simplified measuring: - Fill Valve Height: Raise it to about .5 from the top of the tank. - Mark the overflow valve to 3.5" from the top of the tank. - Minor adjustments can be made afterwards on the tank water level screw. 4. Using a Dremel to cut the overflow valve made life much easier and provided a cleaner cut. 5. Loop (or remove) the extra length of chain from the flapper to handle. If you have tons of extra, it can get caught in the flush valve and cause the toilet to run. I looped mine back onto the handle clip. 6. All parts I needed (except one) came with the kit, so I was able to throw away all the old parts. I would suggest picking up an extra tank-to-bowl gasket for under the tank, since that did not come with. You can do it after the fact, but it's more convenient to replace during the install. Good luck!
Aabroo Fatima
Did what it's supposed to do at a good price
WARNING: Before you order make sure that you know what system you have and what repair kit you need. I did not do this and only found out after I had taken our tank completely apart that the repair kit was the wrong one. There are 2" systems and 3'" systems. I had ordered the 2" repair kit. Actually, I only needed a replacement for my broken flapper. A two inch flapper will not fit a 3 inch flush valve. So, with the help of some chewing gum and some duct tape I repaired the old flapper and since the flush valves are the same for 2" and 3" I installed the new flush valve. After I had put everything together a miracle happened: it worked and nothing leaked. The instructions are excellent and comprehensive; though, at my age I prefer large print
Hurraam Khan
Fast shipment. Excellent product. Easy DIY project.
Received this product today at 3 PM, and am complete at 3:50 PM. Uninstalling the old hardware was much more difficult and installing the new. I read in some of the reviews that this product made the tank louder than before, but what I found was that it was much quieter. It should also be noted that I am only using half the amount of water I was before to flush the toilet, due to the water saving adjustments available on this product. My only advice to anyone replacing the hardware in their toilet, is to put down towels in the floor when removing your tank. The only problem I had it all was that the old orange seal between the tank and the toilet pedestal created three orange stains on the carpet in the bathroom. The stains were easily removed, but a little for thought on my part would’ve prevented the stands. Excellent product, would recommend to anyone.
Nusrat Suchi
Worked like a charm
My tank constantly had running water. I tried flushing out debris first, hoping the quick fix would work, but it didn't, so I got this kit. This was my first upper toilet tank rebuild, and it went perfectly smoothly, and fixed the problem (even improved performance). The kit has everything you need, except tools. I used a wrench, ratchet, small bucket, flathead, and some rags. Everything else was provided. The instructions were clear and ordered properly. Not only is the problem fixed now, but the toilet works better, as it has a water volume adjustment. I cranked it up all the way up and now it really flushes (and hasn't clogged since)! When I proudly showed the wife, she replied, "Great! Can you do the one upstairs next?" [Repair time: about an hour, taking my time, and doing it for the first time]
Robert A. Patterson
Saved me from the damages of a cheap drop in cleaner
So I had to buy 2 of these because of a stupid purchase of a dropin cleaner. Ok so I bought two of these for 2 of my toilets that were working perfectly fine before I bought these. I thought I would help out the maid by adding some extra cleaning. Afterall nobody likes cleaning the toilets. After dropping in 2 toilets heres what happened. And maybe it’s a coincidence but not on 2. First after a week my spare bathroom started leaking from the seal in the flushing assembly. Then the handle broke. I purchased a whole new replacement kit from amazon and replaced all the parts to do with the flushing assembly. I kind of thought it was weird that it was working fine before I dropped this thing in the tank. Then 2 weeks later the same thing happened to my main bathroom. So I couldn’t use it for 3 days while again I ordered the replacement kit. So here is my review. I purchased 2 of these drop ins and had to replace the guts in both of my tanks with in a month. And the blue flush lasted 3 weeks at best. First really blue then barely blue. This product has made me replace the guts in two tanks. Don’t buy at any cost unless you want to replace all your toilets insides. It has gone so far to destroy my wax seal in the bottom of my toilets. So a simple $12 cleaning kit has cost me over $200 in damages. I finally took out the pods and through them away after many headaches and damages. I am currently seeking to sue this company for damages.
Chetan Anand Singh
Easy to use and fits just right
At first, I was a little concerned because if you look at the pictures, there are some things in the tank that are not with the new kit. After I finished the first of 2 toilets and did not reuse the old parts, I can tell you that it did not matter and the replacement parts that came with the new kit, did the same job! Just to let you know, when I was removing the tank, I noticed that the old parts were not installed the same way you need to install all the new parts, but that is OK, because everything fit the way it should and both toilets work fine and no, NO leaks!
Derek Hall
Easy Install and Universal
Let me preface this by saying I am one of the least handy people I know, but I can YouTube DIY with the best of 'em. A couple years ago, I got the bright idea to change out the toilet guts in both my bathrooms to the low-water kind. I went through three sets of those- they all malfunctioned and broke within a short period of time. So. I purchased one of these kits to redo my master bath close to a year ago. The first one took me about an hour. I finally got around to replacing the one in my second bathroom today. I was seriously done in maybe 20-30 minutes. My toilets are American Standard "The Line" models, and I believe they're 20-30 years old. All the parts in this kit were a perfect fit.
Maryam D Bello
Not as hard to put in as one might think––but it does take some dedicated focus of attention
I, myself, am not a toilet master, but I am sort of a handyman. I bought one of these at the local Ace, and it went in nicely––rather slowly and methodically, but it did go in with no hair loss. There's a need to cut a plastic tube during the installation, and I used my tube cutter gizmo and got a perfect result. The toilet flushed and did not leak. I bought a second kit from amazon and save a couple of bucks, then put that one in to the second toilet after it began running (I swear) within a day of the installation of the first. That second go was a lot easier, and went a lot faster. That one too does nothing wrong and all things right. I call this kit a big jump in toiletworks technology, and I feel so proud to have been able to do a total makeover of the old toilets and to have made them be literally better than new.
Hoymond Louie
easy to install
This kit includes everything you could need to fix your toilet tank. I had a slow leak from my tank, and noticed that everything inside was looking in rough shape so I bought this to replace everything. This set includes a new fill valve, flush valve, flush handle, all gaskets, and 2 tank bolts. If your tank has three bolts you will need to reuse one or buy another. The instructions are easy to follow. Take note of the tools needed (can see on the picture of the instructions). I didn't have a hacksaw or a large enough adjustable wrench, so it took me extra time as i figured out how to do without those. Even with missing those tools, it only took me under 2 hours to do the repair, and I have never fixed a toilet before. Now it works like new with no leaks, flushes properly, and the new flush handle looks really nice.