


- Photo emulsion is best for creating detailed or photographic type stencils for screen printing.
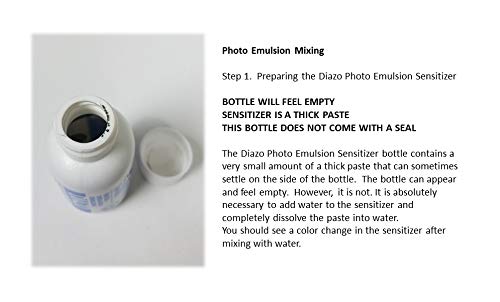
- Speedball’s Diazo Photo Emulsion is a 2-step process where the photo emulsion needs to be “activated.” To activate, the photo emulsion, sensitizer needs to be added. The sensitizer is a very thick oil and needs water to create the right consistency for adding it to the photo emulsion. (The sensitizer bottle will feel unfilled, but don’t worry it is not empty!)
- No need for a light safe environment or darkroom! Mix photo emulsion under normal light conditions.
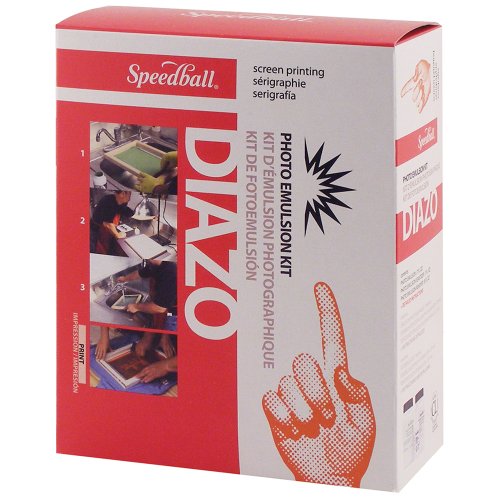
- Set contains 1 each of the following: 6.6oz (195ml) Diazo Photo Emulsion; 2.12g Diazo Sensitizer; 8oz (237ml) Diazo Photo Emulsion Remover and Instructions.
- Conforms to ASTM D-4236.
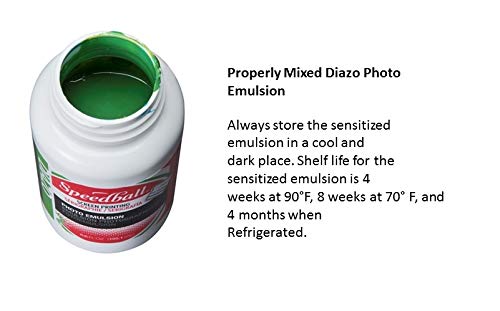
- The jar contains a dried solution. Please add water and shake so that the dried material dissolves into water and turns green.
-
Information
-
Twitter
-
Pinterest
-
Youtube
-
Facebook
Michael Catuiza
Perfect!
Best emulsion out there hands down. For a first time screenprinter I used another emulsion first and had all kinds of issue with it not fully drying after an entire night, all of it washing off after exposing the design... very frustrating so I bought this and it is perfect! You don’t need to be in the dark when you’re spreading the emulsion which is huge! It dried quickly and everything worked flawlessly!
Gia Papiashvili
Great Product
I purchased this at the recommendation of a DYI site. This was very easy to use and for a first timer I had no issues at all. Great product.
Bishandassgupta
Makes stencils easy
It had been years since I dragged out the silkscreen to print some t-shirts for a special occasion. I knew there were better ways to make stencils but this was a cinch to to get a real nice end result. This product really made it easy to turn my design into a good printing screen. I followed a youtube suggestion or two and read a little bit on the internet about others' experiences. Once I got my confidence up, I turned a shop light and a photo copying stand into my light exposure table. First try was great. The laser printer transparencies I used worked really well to block the light where I wanted the emulsion to wash out. It produced a highly detailed screen design after washing with the garden hose sprayer. Just followed directions. I can't wait until I get inspired again to do some printing. I probably should get right on it since I've got most of the jar of emulsion still left over in the fridge.
Booter Collins
Reliable Results from Trusted Brand | Kit contains all chemicals needed
I'm a hobbyist screenprinter, and basically just print once a year to make t-shirts for my family's annual reunion. I used to struggle with emulsifying and exposing correctly, but since I switched to this Diazo Kit last year I've been very happy and have had minimal problems. The kit comes with the photosensitive agent that must be mixed with water and added to the emulsion, which very easy to do and is not light sensitive during the prep, (which is a huge plus!) It says you can even coat the screen in regular light - although I haven't tried. Working under a yellow safe-light bulb, I've gotten good results and even coating with the Diazo. The emulsion itself is easy to work with: goes on very smoothly, dries quickly, and exposes evenly and pretty accurately to the included time guide. Also included in the kit is a large bottle of screen cleaner, which works exceptionally well to clean out screens that have been left emulsified even up to a year! I always run out of emulsion before screen cleaner - it seems like they could balance the proportions of the two components a little more evenly. My only complaint about this product is it's a little pricey compared to buying in bulk or purchasing the chemicals separately. I can get about 2-3 full screen coverages per emulsion bottle which is great for a hobbyist not printing often, but may use up quickly for someone printing more. Speedball Diazo Photo Emulsion Kit
Jerry Wickizer
I always buy the kit because it tends to be ...
I always buy the kit because it tends to be cheaper than buying the elements separately and this kit is my go-to.
Brittany Lea Raley
Great product - Unclear directions. Get clear before starting.
Works really well. Really happy with the prints I got out of the product. The instructions could have been a little more clear. I was able to get through them okay, but it was tough. Other tutorials online were more helpful. I also didn't know what kind of reflector I was using (they didn't have pictures describing the difference between a pie-pan vs. shop reflector) so I ended up badly overexposing my first screen and it was basically unsalvagable. That's on me though, for not being crystal clear about directions before starting. Overall, the product works really well. Just make sure you really clearly understand the directions before starting.
Melissa Longuet-Higgins
Always buy the speedball brand!
I went with a cheaper off brand screen kit for the last screen I made, never again. speedball just knows how to make this and always has a reliable product!
Maria Vallejo
so far so good
I power mixed the emulsion with a drill and got a lot of air bubbles - IDIOT. Next I had some trouble spreading the emulsion, but, that was due to my test screen not having near enough tension, and, it was just my first try. After my little mess with the test screen, I coated my production screen, A professionally built and screened aluminum frame. That came out pretty good. You need to be able to fully spread the emulsion and then screed off any excess quickly. I made a nice clear plastic spreading tray but ended up using a 3" plastic bondo spreader with a sharp point to finish spreading and then screeding off excess emulsion. I am making smaller screens though. Spread front of screen, then screed, spread back, then screed. Inspect your screen, spread more, then screed off excess from front side and back side. Press the screed into the screen pretty hard, if you are getting a proper thin coat, you wont get any lines from making multi spreading and screeding passes. I will tell you this, watching youtube videos with pros spreading emulsion with a single front and back pass is pure fantasy. You are probably NOT going to be able to do this with one perfect spreading pass in front and one perfect spreading/screeding pass in back, so don't even worry about it. Be ready to do multiple passes front and back, but be ready to get it done quickly. This process works 100 times better if you got a professionally done and screened frame with the screen stretched super tight. I stretched my first frame myself and found it tough to get high enough screen tension, then I bought a cheap but good aluminum frame with pre-streatched screen and OMG, it was so much more easy and better. Spread and screed off your emulsion quickly, as if you take too long the emulsion starts to thicken up and then it gets very hard to screed off the excess. Thankfully, I found this out on my first test screen so I got right to it and finished quickly on my money screen and it came out PERFECT. Nice even thin coating and when it fully dried it was exactly as needed, no more thickness then the screen itself, and, that is exactly what you want. If you get excess thickness on your coated screen you will have problems with excess paint loading when doing your screen printing. Excess thickness was the problem I had with my first screen, not made with emulsion, but with a sheet of sticky vinyl with letters cut out. It worked OK, but was hard to get a nice prefect thin layer of ink/paint on my products as the vinyl, seemed thin enough but in reality, it was thicker then it should have been and when the screen thickness was added, it was laying down to thick a layer of screen printing ink [paint]. I'm so looking forward to using my screens made with this emulsion, screen printing should work so much better. ~
Generex Tabile
Works well
There is a little bit of a learning curve for using this correctly but once you get the application and use per directions it works great!
Arun Bantawa Rai
Just like a pro uses
This was identical (other than color) to what we used in a professional screen printing shop. Moderation is key or you will have quite a mess on your hands... and screen, and floor, and anything else you are near. I used this with the YUDU printing machine. It worked well for the small jobs I did. I just used the ink squeegee that came with the machine. It probably would've been easier with a better squeegee but I was just doing one or two screens at a time and it didn't require a lot of precision. If you have a smaller design, you can put emulsion only across where your design will be to conserve. Just be sure to tape it off well. You can spread this stuff pretty thin too. I think I made 10 or 15 full screens with this bottle. It's the consistency of white glue and smells pretty similar. If you spill, it's easy to clean up with a wet cloth/paper towel or wait til it dries and peel it off. This is easily removed with the YUDU emulsion remover.