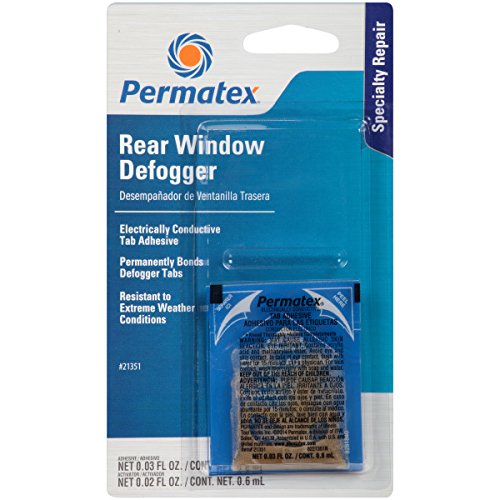
- Quickly and easily bonds defogger tab to grid on rear window
- Provides a low-cost, high-quality repair for damaged rear window defogger tabs
- Complete kit for a quick repair
- Resistant to extreme weather conditions
- Suggested Applications: Rear window defogger tabs
-
Information
-
Twitter
-
Pinterest
-
Youtube
-
Facebook
Connie McCord Determan
Be thourough, read the instructions, watch a few videos, this works great!
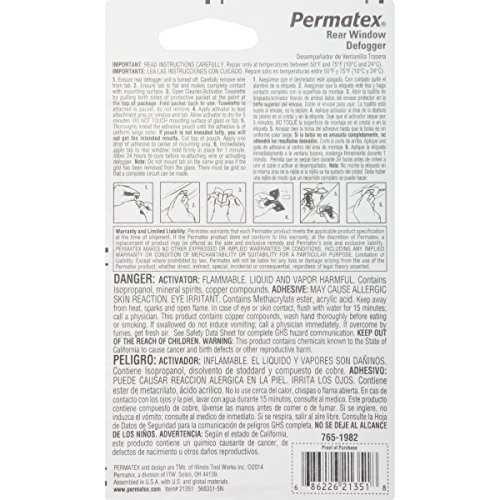
You have to understand what you are doing for this to work properly. Anyone who has given poor reviews did not follow the instructions. In come scenarios the metal where the original tab was mounted is pulled off with the tab. You must lightly sand the finish off a new area to expose the metal and attach at this new point. Also, the tab must be clean of the old raw material. You can do this by holding the tab with a plier and sanding the contact area until it is smooth and clean. Once both surfaces are ready, clean the window are with the cloth, I like to clean the tab as well using the same cloth. WAIT TWO MINUTES for the cleaning material to dry/evaporate. squish the contact epoxy around a lot before opening the package. once it is thoroughly mixed, open and apply a dab about the size of the tab. immediately press the tab onto the dab and hold for about 10 to 15 seconds. This is especially important when you are attaching to a vertical surface. leave the tab to cure for 24 hours. After 24 hours connect the cable.
Jana Šavlíková
Permatex 21351
I was hesitant to buy this product based on all of the bad reviews, but this product works as designed. Prep work and temperature is key in order to get the epoxy to cure properly and be electrically conductive. Attempting this repair in the middle of winter in your driveway will not get you the desired results. There is a great how-to video on Permatex's website that has additional steps that need to be taken that are NOT listed on the package. It pays to do some research on your own instead of blaming a product. I used my Dremel to sand down the epoxy off of the tab and rear glass. Prepped the surface with the provided wipe, applied the epoxy to the surface of the window as well as the tab, and held in place for two minutes. Then secure the tab with masking to keep constant pressure on the tab for 48hrs. Remove the masking tape, hook up the wire connector, and check for across the grid lines. You have voltage then the repair is a success. The first tab that I repaired with this product was 6 months ago and the tab is still solidly attached to the rear window. I had to buy another kit because the tab on the other side of the rear window broke connection.
Linda Poodledog Taylor
Follow the directions... make sure it's warm out.
I read the reviews... seems like most people are in too big of a hurry, or it's too cold out, or they don't prep the surface properly. This stuff works great if you take your time and do it right... YOU REALLY ONLY GET ONE ATTEMPT at this, so do it right the first time. The glue consists of a two-part chemical reaction although there is only one glue element. The second chemical is present in the preparation towelette they provide you.... the surfaces must not only be clean, but prepared and sterile!... dust, finger prints, film from cleaning... these will contaminate the process. Follow the directions EXACTLY and you will have no issues.
Nancey Ali
Follow instructions and watch utube video and take your time this works fine
MY Mustang rear defroster plug came off defroster on rear window. I watched video on line utube from manufacturer and step by step instructions. You must really clean clip and window defroster with cleaning solution in kit, It says also 1 drop of well mixed adhesive on cleaned clip and press it to new cleaned area on defroster on window. If you put more then one drop it could be a mess and slide around . One drop pressed solid and held for 1 min is all you need and it will stick and hold. do not do anything like hook wire to clip till 24 hours later as it will cure and really bond. The adhesive is a blend of metal liquid and epoxy which transfers the voltage through it. If you dont follow you wont get this to work. I even did mine in a cold garage and it worked fine and held and I added wire next day turned on defroster and works fine.
Ester Jamisola
Worked fine for me...
It worked fine for me, although judging from the other feed-backs, I am in the minority. I could also see metal defroster connection material remaining on the window below where the tab was pulled. So it wasn't a big gap I needed to bridge. I have used Permatex products, and have been happy with them, so I figured I'd give it a shot. Maybe it was because I did something different..? Here is what I did: -Cleaned the broken tab with a powered wire wheel to get a nice clean solder/shiny metal surface. A piece of sandpaper would probably do the same job. -Cleaned both the tab and the spot on the rear window where it goes with Mineral Spirits as I had no "alcohol" handy as the directions suggested. -Soaked the tab with the activator, and let it sit. -While I waited, I kneaded the copper adhesive until it was completely mixed while waiting almost 5 mins for the activator. I probably did not wait the full 5 minutes for the activator to dry. -I put a good size blob of adhesive on the window, and kind of mashed it into the spot with the edge of the tube, as it is a bit runny. -Pressed the tab, very very firmly into the goo, and held it for over a minute. -Went back later, and saw the goo had run down the glass a bit, and was surprised it was not solid, so I wiped up the drip, and was pleasantly surprised the tab was pretty solid. I did not test HOW strong yet. -Went about other projects, and a few hours later, I attached the wire. -This morning I tired the defroster, and to my surprise, it worked. Hopefully it will continue to work. For the under $10 this costs, it was worth the gamble for me.
Brittany Lea Raley
Works but need some additional instructions and tips to secure success
Worked as directed. Solid connection. Meter reads .1 ohms. Tips, 1. Don't use old tab location. 2. Lightly sand off the black paint covering the new area to be used. 3. Clean with alcohol and let dry. Prep with activator and wait at least 5 min. 4. Warm glass with hair dryer or heat gun. 5. Follow instructions to mix glue and adhere tab. Keep pressure on tab to allow it to set. I set my heat gun aimed at it providing constant temp about 140 degrees for 30 min. This cures the glue. No issues months later and mine has a coil cord attached to flip glass that tugs at the tab every time it is opened.
Lonnie Heath
The stuff works fine..
....too bad I didn't do quite as well! So I actually read the instructions; warmed the car with a heater in it in the garage for an hour before using the stuff; cleaned the contact area and the tab with steel wool, then rubbing alcohol; kneaded the heck out of the packet; and, it stuck PERFECTLY! Now it's just too bad I didn't get in quite the right place, or this would have been great.
Hadid Huda
Follow the directions
I followed the directions and took some of the pointers from other reviewers. Lightly sanded the grid area I was reattaching the tab to, used the activator and let it set like you are supposed to, thoroughly mixed the electric conducting epoxy. I did use more than 1 drop to cover the tab. I placed it and held it there until it stuck on its own. I did not touch it again until the next day to give it the full 24 hours to set up. Did the multimeter test and 0 resistance to I connected it up and it worked just like new.
James Rippingale
Worked great the first time. Took 5 minutes to perform (plus cure time.)
Works!!! I had my doubts about this but it works. Follow the directions (there is even a video on youtube.) Sand the tab, use the cleaning activator pad (and don't touch it with your fingers, use the provided wrapper.) Knead the conductive adhesive, apply one drop on the tab. Hold for one minute and let go. Now I believe that the instructions said let cure for 48 hours (maybe it was only 24) however I let it sit for a week just for good measure. After that plugged the tab electrical connector back on and fired it up and it works great. I was a little worried at first because of some reviews (mostly of the loctite product offered.) So use this Permatex product with confidence.
Tracy Carrier
Works and sticks
Like some others have commented. You must follow the instructions exactly. I made sure I used the activator on the tab and on the exposed metal part of the window. I also made a new contact point on the window and made sure that the tab was flat (sanded off old solder). After that, I use a small drop of adhesive on the tab and then stuck the tab on the window. Held for a minute and it stuck (and stayed stuck) to the window. I waited 24 hrs before attaching the wire. Do not use too much adhesive.