

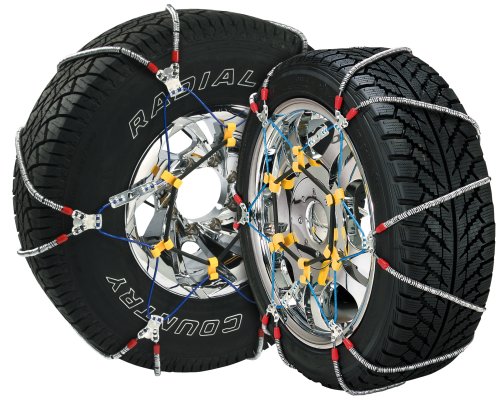
- Designed for cars, pickups, and SUVs with very limited operating clearance around the drive tires
- Fast easy installation with no need to move the vehicle
- Designed-in rubber tightener means there is no need to stop and retighten after installation
- Better all-around traction performance than conventional tire chains or cables
- Better compatibility with anti-lock brakes, traction control, all-wheel drive, and other electronically monitored control systems
- please refer Application Guide under Technical Specification for fitment details.
-
Information
-
Twitter
-
Pinterest
-
Youtube
-
Facebook
Ella Baesso
From Minivan to Snow Beast!
So we recently got a Honda Oddysey and were about to head to the Sequoias for a mountain adventure in the middle of March, so we were expecting some serious snow. After reading some of the other reviews and comparing between the others, SCC seemed like the best to go with. Well, we were NOT disappointed! I tried them on before we left and it seemed to do ok on the asphalt, but definitely felt the bumpiness as expected. Fast forward to checking in to the first ranger station where chains were required, in the middle of a snow storm, and I had them on in 10 mins (quicker than any of the other cars around us). I immediately felt them grabbing into the ice/snow on the roads, which turned out Odyssey into an all-terrain vehicle! In all seriousness, we had to get an escort to our lodge due to the snow storm, and we were out-performing the all-wheel drive vehicles in our convoy. It was great to have these cables as well, as the transition between the asphalt roads and snow covered roads throughout the trip made it very easy for driving. I would highly recommend these cables for any vehicle, just make sure you check the SCC recommended sizes and not what Amazon recommends for your vehicle, as it seems to differ quite a bit.
Jennifer Long
Everything you need to know about traction cables...
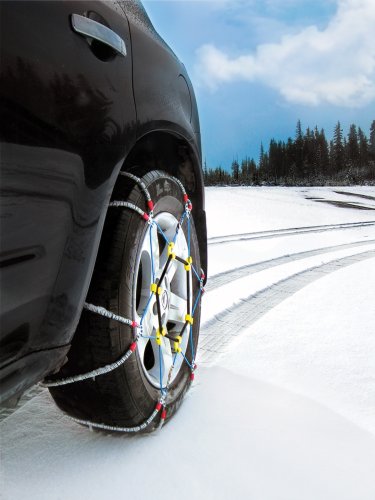
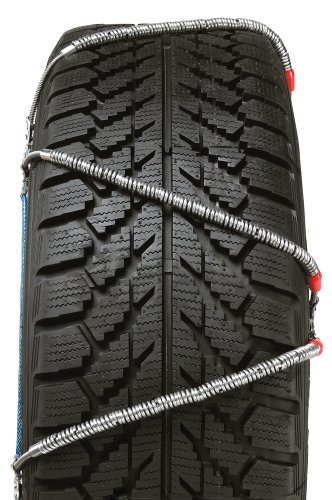
There are a confusing array of tire chains/traction control devices on the market, and even this particular company makes so many different models that it's hard to tell which ones are the best. Here's what you need to know about chains and traction control devices, and why I like the ones made by SCC. I also include some installation hints at the bottom of this review. There are two broad types of traction control devices: Tire chains and traction control cables. Tire chains are actual chain links. Traction control cables are long pieces of metal cables, covered in a plastic coating, and designed to form a Z-pattern over your tires. The plastic coating is then surrounded by hundreds of tiny, round, metal springs. Cables are generally regarded as better because they are easier to install, last longer, are less damaging to roads, and work better with vehicles equipped with ABS. Also, according to SCC, you can safely drive with cable devices up to 30 mph, even on roads with no snow, without damaging them. You should normally install traction control cables on your drive wheels, i.e. the wheels that actually push or pull your car forward. If the snow is really bad, though, you may have to install cables on all four wheels. Read your vehicle's owner's manual for more details on where to install your cables. In any case, it's a really, really good idea to have TWO sets of cables in your car at all times. That way, if something breaks (murphy's law), you won't be stuck. Within the traction control cable category, there are two general types of cables: Self-tensioning cables tighten themselves using a tensioner (which looks, feels, and operates like a rubber band) that you install when you put the cables on. Manual tensioning cables are tightened by you, and have to be re-tightened after you drive for a couple hundred feet or so. I've heard that emergency vehicles tend to use the manually adjustable models because they are allegedly safer at speeds above 30 MPH, but driving above 30 MPH for any non-emergency personnel is illegal with any kind of traction control device. There are several advantages to the manually adjustable models. They tend to have more slack, which can make installation easier. Also, the tensioners (i.e. rubber bands) on self-adjusting cables can and do break (it happened to me today) and if they break, you can't use the cables. So, if you get a cable that has a tensioner, get extra tensioners, or better yet, an extra set of cables, just in case. Here's a breakdown of SCC's cable products: Z-Chain- Manually adjustable Traction Control Cable. Easy to install, but must be retightened shortly after you start driving. Very easy to install because they come with lots of slack. Often used by police and fire personnel. Shur Grip Z/Super Z LT- Self adjusting cable. Tensioners can break so buy extras. Less slack, so can be harder to put on the car, but generally easier than Z-chains because you don't have to manually tighten and re-tighten them. Super Z6/Z8- Newest Self adjusting cable, designed for vehicles with very little sidewall clearance. They have all the advantages and disadvantages of the Shur Grip Z. In addition, however, the connectors are a little harder to work with on this model because of their low profile. The Z6 and Z8 models are SCC's latest models. They are designed to handle smaller clearances between the side of the tire and the car than their older models. As a result of that design, they are hand crimped during the manufacturing process (instead of machine crimped), and that results in a slightly higher MSRP. SCC's representative tells me that the cable size and metal springs are the same size as their other cable-based products, and so the only reason to not to get the Z6's over the older models (Super Z's) is that the Z6's are slightly more expensive (usually only a few dollars). I've noticed that the Z6 connectors are a little harder to work with than the Shur Grip/Super Z LT model. On all of these models, the metal rings are made of a spring-like material, SCC says that you don't have to remove the chains as soon as you reach a paved road. Rather, as long as you drive under 30 MPH, SCC says that you can drive with the traction control cables on your car, even as you switch between plowed and non-plowed roads. Because each of the hundreds of little springs are separate pieces, even when one breaks, it just falls off, and the others work to fill-in the void. The Z6/Z8 models also come with a very nice cloth bag that is sized properly to hold the cables. The older cable-based SCC models come with plastic containers that are too small to easily lay the cables in. Installing the cables is relatively easy, and I'm definitely not a hands-on kind of guy. It took me about 15 minutes the very first time, and now that I've done it several times, I can get it done in under a minute per wheel. SCC has a video on their web-site that explains how to do it. You should always do a test-installation of cables before you need them to make sure that you purchased the correct size and know how to install it. It's also very useful to have some waterproof gloves handy and a towel with you, as it is often wet and cold when you need to install chains. A good choice for gloves are the long wristed rubber gloves that you can buy at the grocery store for washing dishes, or some disposal latex gloves. After you use the cables for the first time, fold each cable separately and then use a trash bag tie to keep each one together. Otherwise, the next time you need them, they'll all be tangled together. Here are some hints on how to install these chains. 1. Read the instructions from the manufacturer and pay close attention to the safety instructions. The basics of the instructions are (1) stay safe, (2) position the cables correctly, (3) connect the upper rear connector, (4) connect the upper front connector, (5) connect the lower front connector, and (6) connect the black rubber bands. The instructions are quite good, but they leave out a few helpful hints, which I will now share with you. BEFORE YOU START, MAKE SURE YOU HAVE THE CORRECT SIDE UP! There are markings all over the cables which indicate the correct orientation. Look for them! 2. Put on some rubber dishwashing gloves and lay a towel down wherever you're going to work, or you will get very, very dirty. 3. When you slide the cables under your tires, start from a point between your front and rear tires. Slide half of the chain under your car, and then reach around from the other side of the tire to pull the cable around. Although the instructions describe a swinging slide motion, I've never seen anyone who could do that without twisting the cables up. Just pull them and things will be much easier. 4. Once the cables are around the tire, DO NOT pull the bottom connectors that hold the cables together at the bottom of the tire towards one another. Keep them as far apart as possible. If you pull them in tight, you won't be able to pull the chain high enough in the back to connect the rear upper connector, which is what you are supposed to do first. 5. When you are connecting the rear upper connector, if you can't get the rear upper connectors up above the tire so that you can see them, push the part of the cables that surround the bottom of your tire backwards and under your car a few inches. This will create slack behind the cables and allow you to pull the cables up in the back. 6. Once you have the rear upper connector connected, hooking up the front upper connector may be difficult. Try pushing the rear upper connector back so that it is laying against the inside sidewall of your tire and then pull the front upper connectors towards you as hard as you can. Don't try to pull them towards each other. While sitting, just pull them straight out, towards you, and the rest of the chains should fall into place. Then they should be easy to connect. 7. Gently pull the parts of the chain that criss-cross your tires down towards the ground so that they aren't all bunched up at the top. Look at the chain and make sure that the parts you can see, and especially the blue cable, is evenly distributed around the tire. 8. Then pull the bottom front connectors towards you (out, but not up or down) to create slack. Then connect them. Again, don't try to pull them towards one another as that makes it almost impossible to create slack. 9. On these particular cables, the upper front connector is BLACK and the bottom front connector is SILVER. When you're ready to take the cables off, if you get the wheel lined up so that the BLACK connector is on the top, it will be much easier to find and remove the rear connector (which will be opposite the black connector).
Hannah Fatunase
Security Chain Company SZ429 fit P225/60R18 tires!
Vehicle and tire size: 2015 Honda CR-V Touring with P225/60R18 tires (stock size tire on the Touring model). NOTE II: Be sure to FOLLOW INSTRUCTIONS and use some sort of WD40 type product to spray down the used and dried snow cables to minimize rust. Duh! NOTE: This Amazon website does NOT correctly ID tire cable size (SZ429) as a fit for my vehicle. However, after speaking to Steve at Security Chain Co. (SCC) for the best fit, he confirmed that the SZ429 model was the right one if I wanted low profile snow cables. His verbal matched my findings through the provided SCC tire fitment guide pdf link found within every SCC listed snow chain/cables offering here on Amazon. I took his confirming word, ordered on a Wednesday morning for a Friday delivery using Prime 2 day shipping. Item arrived on time and off we went Friday night in our (relatively) new Honda CRV to Sequoia NP where up to 6 inches of a snow was expected the next day. I own and use SCC snow cables on my '04 Dodge Durango SLT so I know how much easier these cables are to put on versus standard snow chains that I used to battle with in my younger days on many different tire sizes. This new set didn't dissapoint on use #1 that covered about 100 miles of snow/ice covered national park paved roads and not so paved back roads. They held up just fine, as expected from SCC, without any of the negative things that other reviewers claimed went wrong with their SCC purchase. Incorrect cable size purchase and/or installation error is what I gather affected negative opinions the most. The installation directions could have been titled, "Snow cable installation for Dummies/Idiots" it was so straight forward. The chains were installed in about 10 minutes total on a flat, icy parking lot surface. The 2 provided rubber tensioners were just as idiot installation proof as well. Dora asks, "Can you follow picture instructions? You did it!" I'll be honest in stating that I did not read the cable removal instructions but that did not hinder my reverse installation process a whole lot as the cables were off in about 10 minutes (will be maybe 5 minutes next time after I read how to formally remove them). The cables came in a blue nylon bag with the added bonus of a purposeful long handled window scraper (use it to reach under and around the tires to pull the cable ends to you and of course to clear snow from your windows), clear plastic disposable gloves to assist with installation (I use mechanic gloves), the aforementioned two rubber tensioners and the clear instructions. I don't see the nylon bag holding up long but it's a good starter. I generally just carry the cables in sturdy reusable cloth grocery bags. Easy in, easy out instead of time wasting pack to fit in the mfg bag. I really just posted my feedback so others with my tire size know that SZ429 is a match because I could not find a confirmation here without calling SCC directly. Happy, safe snow/ice travels to all while wearing these easy to use snow cables. P.S. I was traveling in that inclimate weather with my wife, daughter and a niece (both young teens), so my trust in another SCC product used to keep the most precious cargo safe was rewarded with a safe round trip. Thank you SCC!
Jeff Gray
Works in icy road and snow!
Took it to Reno. I did not watch the video but paid those on the side of i-80 when we reached placerville. I have a busted shoulder and in a car full of girls. Anyways, fast forward...Stopped by sierraville on the 89 to a hotspring and we removed the chains on the way there since I got tired of only going 30mph. After leaving the hotspring, snow started falling and thought it was the most beautiful thing and mesmerizing while driving so me and my companions decided to stop and take pictures. We live in San Francisco. So we get back in the car and I step on the accelerator and nothing was happening. We were officially stuck. This is not a very busy road. A couple trucks passed by while looking at our group. A nice gentleman in a Subaru was nice enough to stop and help us as we were struggling to install. He installed the cable in under 3mins each tire and his technique was better than the one on the video. He lives in the area so he's used to the snow. Us city girls learned how to install and remove as it can get costly after a while and you never know when you'll need to install them. So, after 3days of on and off use in the Sierra's/Nevada I can say that this product works as advertised. I found the included tightener works. The plastic gloves not so much, you need leather or thick gloves you don't mind dirtying up. I brought pliers but it was not necessary. As me and my friends are not professional snow cable applicators we thought we did great once we figured out how to put them on. Removal was easy. If your not a pro, then assistance is great. When I got back home from the trip I greased it up before storing as it was already getting rusty. After all it's made of steel and was subjected to abuse. Snow, rain, and steel don't really play well with each other. I saw other vehicles with chains/cable pass me up when I was going 30mph the maximum speed for these cables but I did not want to risk it. And note that just because you have these cables don't mean you no longer slide and you need a longer stopping distance so just slow it down. Until next season. P.s. I read someone suggesting to pre stretch the rubber tightener. While it might seem like a great idea for wimps and lazy folks umm remember that it's called a tightener for a reason.
Jacqueline Norris
Drove through the worst, never lost control
Never lived in climate where I needed chains until recently. I now live in Washington state and decided to take a mini vacation to Leavenworth, WA just prior to Christmas. Had to pass through Snoqualmie pass and one other lesser pass. I chose these chains solely based off reviews, primarily them being better than traditional chains and also ease of installation. I received the chains in 2 days (I love Prime) and did a dry run on our FWD SUV. The first tire took 10 minutes following the directions. Once I understood the sequence, the second tire took under 2 minutes. I packed everything back up into the convenient carry case and off into the Cascades we went. Conveniently, a massive winter storm just dropped 18 inches of snow across Snoqualmie Pass 2 days prior to us going there, and it was still snowing when we went. In the snow/slush on the side of the road, I was able to put these chains on without getting dirty or wet by only wearing gloves. Even more important, i had both wheels done in under 2 minutes per wheel. Performance wise, I could only go <30 MPH but I never lost traction. Vibration from the chains is minimized by sustaining a 25ish MPH speed, but at slow speed the vibration is brutal. Either way, having complete control over austere terrain was more than comforting. The chains gripped the surface like it owed them money. I felt in control, and not once did I lose control. On the return route, another massive winter storm dropped even more snow and this time it was less plowed and a lot more accumlation on the roadway. Again, I got the chains on in under 4 minutes and I was going up and down the pass without once losing control. They aren't miracle workers, but if you drive as you're supposed to in inclement weather you will not lose control of your vehicle. Both times when I traversed the pass, I stopped the vehicle, took 15 seconds to disconnect the 3 connectors, laid the chains out, backed up, and stacked and rolled both chains in under 5 minutes. I put them back in the bag and was off on my way. Once home, per instructions I took the chains out and gave them a heavy coating of WD-40 and let them dry out including the bag (rivets in the bag already started rusting after this one trip). The chains have thousands of teeth, and I drove primarily on slush with the chains and only lost a handful of teeth. They will certainly last a while and I only recommend buying an additional set of rubber tensioners as they seem to be the most likely point of failure. I did order a second set as the chains are useless without them and they easily fit in the chain storage bag. Simple review is below: Pro: -Once the sequence is understood, the chains are incredibly easy to put on. I never watched the video and just looked at the included instructions for a few minutes. -Can't compare traction ability to traditional chains, but I never lost control. You can see the deep grooves the chains make in snow and ice though. They grip exceptionally well. -Both chains roll up neatly into an easily transported package and the included carrying bag is sized appropriately where it is easy to put the chains back in plus extra tensioners if desired. Cons: -They do cost more than traditional chains, but after watching dozens of others fight with traditional chains while being snowed on the cost difference is justified. What took others 10 minutes took me half the time -- and I never got dirty (so long as you wear gloves). -The tensioner is a solid rubber ring with 6 plastic clips. As previously discussed, I feel this to be the single point of failure for the whole system. Rubber loses elasticity in the cold, and most people dont use chains in warm weather. During extended wear I could imagine the rubber hardening and eventually snapping from the pressure. Fortunately, additional tensioner packs are available and they fit in the carrying case included with these chains. TL;DR: These chains are absolutely worth the additional price. They grip exceptionally well and they are simple to put on and remove.
Sophie Cigleris
Fits 2011 Outback Premium
My 2011 Subaru Outback Premium with 225/60R17 tires doesn't have much clearance between the fender wells and the tires or the suspension struts and the rims so normal chains won't work. The Subaru dealer recommended these "traction cables" and they seem to be the top pick in the Subaru Outback forums. The cables were easy to install (at least in a dry garage) and there seems to be adequate clearance on both front and rear wheels. I bought sets for all 4 wheels which is probably overkill for traction, but the Subaru AWD is very fussy about all 4 wheels being the same. Note, Outbacks come with various size tires depending on which option package you bought. The Amazon fit check is for the base option and recommended the SZ139's, but those are too small for the Outback Premium which needed SZ143's. Check the size on the side of your tire and use the SSC fit guide to find the cable size you need.
Pankaj Kumar
Life saver
or at least skiing-day saver... I just came back from ski trip to ski santa fe resort. I've used the snow chains twice on two days following a night of snow. The road up was 15 miles long and I've used the chains for about 8-10 miles of those. At the start of the road, my 2WD Toyota Highlander did just fine without snow chains on the part that were cleared beforehand. However after slightly skidding few times I've decided to put on the snow chains. The process took about 10 mins only and was very easy following the instructions. Following that riding was very easy and safe without losing traction at all. It was really magic. I've counted six other cars that literally fell down the road trying to make it with 2WD only. See picture of one of them, and a picture on the white road I was easily driving with the snow chains. I highly recommend using snow chains and not risking it due to cost. This is simple solution and cheap comparing calling a tow truck or paying for fixing a damaged car. This is assuming no bodily injury.. few tips: 1. use working gloves in the process of installing and removing, to keep your hands warm and clean. 2. securely tight the hooks together, otherwise they may snap while driving. Don't worry, the chains will not fall of the wheel due to one lose hook. Just stop on the side and hook it again. 3. You may practice beforehand, to make it easy in real time conditions which may be less comfortable for you. 4. while removing the chains, you may turn the wheels sideways to easily locate and unhook the back hook.
Nerissa Gnocil
I thought otherwise, but these were definitely needed...
Got the SZ143 for a 2017 Toyota Sienna with tire size 235/60-17 for a trip to the snow, I was trying to be cheap and was hoping that I would not have to use them, but the snow was so bad very quickly within 1.5 hrs that I had no choice but to use them for 20+ miles to get out of the area, otherwise, I would've been stuck in the snow for the next 20 days, starving to death and having to eat my kid to survive. I did not install them as a trial prior to actually using them, but I did watch the installation vid, which was pretty straight forward. When it came time to actually installing them, it was just as easy as the vid, but my fingers were cold as ice, which made it difficult. Once we got passed the snow area and removed the chains, even the next day or two, the chains are not oxidized, unlike some others may have stated, they can be reused again several times at least. Without the chains, there would've been no way of getting outta there with a two wheel drive. Don't be cheap, get some type of snow chain to be safe. Only Rambo do not need these.
Mattie Mahon
Chain Sizing Table Not Completely Reliable - But Good Customer Service
Following the chain-sizing table provided by Security Chain Company (Peerless Industrial Group), I purchased SZ143 for my rear (255/40-18) tires and SZ139 for my front (225/45-18) tires. All tires are Bridgestone "Potenza" run-flat models. When initially installed (and before moving the car), the chains appeared to fit adequately. However, upon driving the car for a couple of blocks and then rechecking the fit, I discovered that the chains were so loose that the elastic tensioners were about to fall off. I contacted Peerless. They told me that sizing is not an exact science because of variations in the dimensions/tolerances of different tire manufacturers. At their recommendation, I reduced the SZ143 to SZ139 (the next size down) and the SZ139 to SZ137 (also one size down). The new, smaller, chains were a snug but good fit. My take-away lessons from this experience: (1) regard chain-sizing tables as approximate only, (2) test the fit of your chains before you actually have to use them, and (3) when testing the fit, be sure to drive the car a short distance after initial installation and check the fit again. The fit may be different after the chains have a chance to settle into place. By the way, Peerless was helpful in answering my questions about fit. And they agreed to send me one free set of chains because the initial mis-fit was partially the result of the imprecision of their chain-fitting tables. I appreciated the good customer service.
Alma Agulto
Reliable, dead simple to install
I've been using these chains on my Prius C for the past 3 seasons in Lake Tahoe and Yosemite and have put over 500 miles on them. They have been incredibly reliable, easy to install, easy to remove, and decent to drive on. I was compelled to finally write a review after putting yet another 60 mile day on them this past weekend during a significant storm and once again, I had complete trust in my traction device, even as one of the few tiny cars on the road. When I'm driving with chains, my biggest concerns are not my own traction, but instead the traction of the AWD vehicles around me with all-season tires, thinking they are invincible. Installation is so simple, you won't believe it. When I stop at chain control and see all the people struggling to get their chains on, I feel bad but also a little smug because mine go on so easy and smoothly. As with any set of chains, PLEASE practice once at home in your dry garage or driveway or street or something. You will thank yourself. Do this once a season before heading out for your first trip. When you get to chain control, it is likely wet, cold, and gross out so you want to get the chains on efficiently. Driving with the chains at first feels weird, but you will quickly get a feel for it. They really do add a crazy amount of traction. A 2WD car with chains is in better shape in poor weather conditions than a 4WD with all seasons. I generally do not take these over 35 mph, and it is rare that I feel the need to go that fast, but it definitely happens. Keep a safe following distance and use low gears downhill (or if you are in a prius like I am, use the "B" drive mode, it will provide an engine brake when you are coasting). Enjoy the snow!