


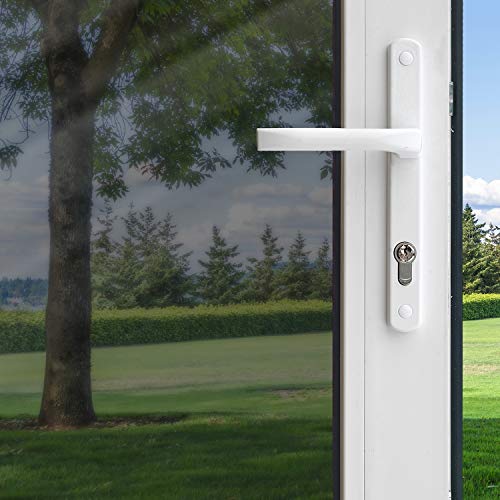
- ENERGY EFFICIENT: Rejects up to 71% of total Solar Energy
- PROTECTS INTERIORS: Blocks up to 99% of UV rays, helping to keep your interior from fading
- INCREASED COMFORT: Reduces glare up to 69%, making interiors more comfortable
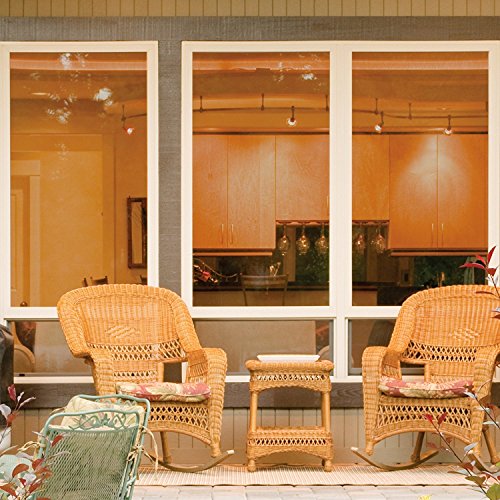
- DAYTIME PRIVACY: Mirrored exterior appearance provides daytime privacy (when the sun is down and lights are on inside, film no longer conceals views)
- EASY INSTALL, LASTING RESULTS: Durable adhesive material is easy to handle and firmly sticks to windows for ongoing benefits
-
Information
-
Twitter
-
Pinterest
-
Youtube
-
Facebook
Samantha Vernon
Found some YouTube vids and tips online I felt comfortable doing the install and I was successful
Being my first time trying to tint anything, I thought it went well. Found some YouTube vids and tips online I felt comfortable doing the install and I was successful. It is really about prep work and a clean window. I put it on my front storm door and since it was a large piece having an extra set of hands to get the film on right was good. You dont want to crinkle or bend it before laying it on the door. Keep it wet seems to be the key to a good install. The film itself is great I think. I used it on my front glass storm door to keep the heat out from afternoon sun. My front door is black and with a glass storm door the heat is intense. Secondly the film is very reflective and during daylight you cannot tell if my front door is open or closed. At night, with lights on inside you can see though inside. The view from inside to outside is very clear and tinted lightly. I wish I had done this sooner.
Ni Ca
This stuff Rocks BUT...
This is not a project for people who will not read and follow directions exactly and lack patience. If this is you do not buy. You'll waste your money, waste your time, be mad, and write a crummy review about a wonderful product. First, the installation kit is junk. Fortunately for me I got a good look at one locally before I purchased. Get a spray bottle, add a cap of baby shampoo and fill with water. Get a good quality utility knife with a new blade. Plastic 4" wall knife. Long handled squeegee. Squeegee was 2.50 @ sam waltons house of discounts, wall knife was 98 cents at the hardware store, if you lack a utility knife one up to the job is 3 bucks including a few blades. Enough baby shampoo can be had to make gallons and gallons and gallons and gallons of solution can be had at the dollar store for, you guessed it, a buck. You should also have a few single edged blades for scraping the window. You could use the excess blades in your new utility knife but I would recommend a decent quality scraper handle and the associated blades which is a couple of bucks. If you have to purchase everything on my list the bill will be less than 15 dollars and you will have a MUCH better time with your installation. One spray bottle Baby Shampoo Squeegee Wall knife Utility knife Scraping blade Windex (optional) Old cotton diaper Yard Stick Read the directions. Go to Gila's website and watch the how to video. It has tricks that you will be very grateful for. [...] CLEAN CLEAN CLEAN. I used windex first and then followed up with solution. Your new squeegee will be very handy. Then I sprayed with solution again and meticulously scraped every inch of window with a single edged blade. You want this to be the cleanest window you have ever cleaned in your life. Buff the streaks out with cotton diaper. Soak your squeegee when done to remove all traces of windex if you opted for this step (recommended). You will also want to remove any bubbled out sealants/caulk on the edges of all panes and PARTICULARLY in the corners if present. MEASURE MEASURE MEASURE Use the old carpenter's adage "Measure Twice, Cut Once". You'll want a nice smooth table to lay out on. You absolutely want a helper for this step as the film is tough to manage alone. I used a 9 year old and it worked very well. You REALLY want a perfectly straight cut to avoid wasting material and to make your life easier when you go to install. You'll want a half an inch extra on all cut edges assuming you make nice, straight cuts. Make your mark, check it twice, and use a yard stick for a straight edge guide. SPRAY SPRAY SPRAY Hose the window down, then spray it again. Trust me. Use the tape trick outlined in the directions. Trust me. Hose the film down as you remove the backing then spray it again. Trust me. While you might be able to manage this alone your 9 yr old will come in very handy here too. Film will virtually leap on to the window but, because you have hosed down both surfaces, you can play with it for 30 mins if you need to to get it lined up the way you like it. I worked L to R and aligned the factory edge accordingly. If you dont like what you see, peel it back, hose it down, and do it again. I had a gnat get trapped in the middle of one of mine and I removed the entire sheet and reapplied without the first problem. Work all the big bubbles out and then move on to your next window. Come back in about 30 mins and trim all your edges. Hose window down again and then work it with your wall knife repeatedly until you can make a pass without seeing any bubbles being pushed ahead of the knife. Keep the window wet as you do this to avoid scratching your film. This is not a slap it up project. The first window will take about an hour, each succeeding one progressively less. Once I hit my fourth one it was taking about 20 mins as I'm now pretty good via practice. READ THE DIRECTIONS. WATCH THE VIDEO. DONT SHORTCUT. USE LOTS OF SOLUTION. [...] Be patient, use lots of solution just like the video instructs and you can have PERFECT results. I will admit the first window I tackled was not perfectly trimmed (but it was virtually unnoticeable) but even that window had not the first bubble or crease. This is when I discovered the let it stand for 30 mins trick. If you do make a slight screwup the next day come back with some scrap pieces if you are as anal as I am and the only person who ever know your trimming was less than perfect will be you. My other panes were virtually flawless. I bought this for a kitchen nook that faced the rising sun. Real nice @ 6:00 am, hot as hades by 10 and the HVAC was struggling to keep up. First day the results were simply remarkable and I'm logging on to buy a 100 ft roll to do a bunch more of my windows as the specs claim year round savings and I now believe them. I'd give this stuff 6 stars if I could... READ THE DIRECTIONS. WATCH THE VIDEO. DONT SHORTCUT. USE LOTS OF SOLUTION. [...] ************************ Followup 4 years later March 6, 2015******************************* I logged in to buy another roll to install in my granddaughter's room and discovered my review has been helpful to many, glad I could help. 4 years in all my windows look just like the day I installed the film.No cracks, blisters or peeling. The only thing I am doing to maintain them is I use the baby shampoo installation spray to wash and rinse with a 25% white vinegar and water solution to clean as I had concerns that ammonia based products might strip and/or deteriorate the film. Not sure if this matters or not but better safe afterall. I can really tell the difference summer and winter; can't feel hot or cold drafts from the windows transferring energy anymore and my HVAC unit runs half as often as it use to. I'm getting the same results from installing this product on all my windows I'd have gotten from installing 5 grand worth of triple pane windows. 5 years ago I started trying to reduce my energy footprint by adding a couple of hundred bucks worth of do-it-yourself blown insulation in my attic (home depot will give you a free blower with purchase), installed a cool roof system on my home, applied a case of caulk to every crack around doors and windows inside and out and installed this film on every piece of glass in my house. Did all the work myself as I'm a tightwad with weekends off so the expense was about 1800 bucks and 6 or 7 days worth of busy but not backbreaking work. I reduced my footprint 30% in the process which allowed me to recover my investment in a little over a year and now pays for a week at the beach with my grand kids. Gila's product has been a big contributor to these savings.
Jerre Neeley
Finicky but fantastic
This film is amazing. We have several east/west windows that let in a lot of heat during the day and we noticed an almost 5 degree F difference once we had it up. We liked it so much that we bought enough to do our whole house. It took about 13 minutes per window, regardless of size. A few things we learned: 1) Buy the application kit. We did one window with what we had around the house and then decided to go whole hog and buy the kit. So glad we did. It helps tremendously. 2) The spray is your friend. It helps the film go on cleanly and minimizes scratches on the film as you smooth it on. Don't be afraid to over spray, under spraying is a problem. 3) Applying this stuff is a two person job, especially with larger windows. Our largest are almost 4 feet wide and 7 feet high and we had a lot less difficulty with both of us smoothing the film on. 4) Temperature matters. A lot. Below 70F is ideal. Between 70 and 80F will work but it will start giving you problems. Don't even try over 80F. The bubbles you get will blow your mind. Try not to apply the film if the window is in full sun for the same reason. 5) Work as quickly as you can. You don't need to rush it but bubbles get harder to remove the longer it sits. 6) If your film arrives crinkled, especially if the box is bent, send it back. Wrinkles are the enemy and will make hanging this stuff loads harder. A bit of wrinkle around what will be your window edges is ok, but avoid that if you can. 7) Always smooth side to side or down. Smoothing up will move the liquid up and it will come back down and make bubbles. It works best if you're always going downward. Getting bubbles out is easiest going to an edge, usually to the side. Once you get them there hold the squeegee in place for a bit to let the liquid drain out. 8) When you start trimming, start with the corners. Then do the sides, then the top, then the bottom. Using the squeegee to help hold the film down can help too. 9) Trying to peel the protective film off while hanging, as is recommended for doing larger windows, is a disaster. Get the clear film off all the way, you may have to stand on a stool or a ladder to do it but it's worth it.
Syed Masrequzzaman
the better to make the film easy to manipulate
This product delivers. Applied to westward facing second story windows and felt significantly less heat in between the blinds and the windows. The temperature stayed more even from night to day and the room AC condenser cycled on less to maintain the temperature. I worked on a table a foot wider each way than the film. I used a spray bottle with tap water and a couple drops of Dawn dish detergent. I bought a household squeegee at Target, used a medium width plastic putty knife wrapped in microfiber cloth to remove the last of the water around the edges, and a single edged razor blade holder to trim close to the frame once applied. You can buy the application kit if you don't have those items lying around. The secret is drenching wetness. You can't spray too much solution, the more, the better to make the film easy to manipulate. Cover nearby flooring and furniture and have a bunch of rags handy to sop up overspray and drips. Watch a couple videos on YouTube before you try this for the first time. I freaked when lots of little bubbles appeared during the first 24 hours, but they resolved as spontaneously as they appeared. The film doesn't restrict my view or the amount of light in the room. It is almost unnoticeable from the outside. I definitely recommend this product.
Channea Rebecca
Great efficiency upgrade
I just installed these yesterday,with a helping hand of my girlfriend, and let me start by saying that it's definitely a two people job,unless you've done it before..Like everyone else said,you get better as you go..I followed the directions from Gila's video's, on how to install,and how to make your own solution using a cap full of baby shampoo (yes,they recommend it,it's not something someone made up),and I messed up zero window's..We made only one mistake,and that was cutting one too short,other than that,if you are careful, spray liberal amounts of fluid on both film and the window itself,and use the squeegee just like they show in the video,it's literally a piece of cake to do...We did 13 panes,in under 5 hour's ..I chose to cut them to fit before putting them on,so some edges don't look quite perfect, but nothing too bad.Now,for the efficiency claim,I have a IR Thermometer I purchased to chase gaps around my new house,and low-e claim is spot on..After applying it to one pane,I checked the temp on the one with and one without the film and I was sold..Will try to upload some pic's to show what I'm talking about. .Color me impressed.
Wint Sandar
I like it, cat does not
I installed this by myself on three 3'x5' windows. Getting the backing off without creasing it was a bit of an adventure, but my husband was busy, so I did it myself. Aside from four cat hairs down near the bottom that he says only I can see, it looks fine. Not, "I'd want this on the front of my house" fine because reflective film isn't pretty, but our house faces east, so the filmed windows are on the back. The first day, it looked like old wavy glass, but once it cured, it was fine. If I can get a 20 degree difference in the temperature of the floor (I checked) for 35 bucks, I'm giving it five stars. The cat gives it one star; his sunning spot on the floor isn't 102 degrees anymore.
Merouane Mimou Maskri
Take your time, and don't be OCD (written by a perfectionist)
I have now bought a total of 3 rolls of this window tint film, and am planning to buy at least 1 more to complete the windows in my house. After reading some very informative reviews on this product, I decided to take the plunge and ordered 2 rolls to start. I ended up copying/pasting and printing the most helpful review for this product and used it as my instructions for installing/applying this window tint. As that review stated, this product is not for the impatient or someone unwilling to go the distance and take the time to do some thorough prep work. It did take me approx 30-60min per window, but I paced myself across different days to break up the time investment. Also, I would recommend applying this tint when the window is not in direct sunlight. It makes it easier for several reasons. Another thing, don't be a perfectionist (writes this perfectionist) about the finished application. Certainly, you don't want large chunks missing from the film when it is on the window, but don't get hung up on minor mistakes that can't be noticed unless you are scrutinizing it. As long as the tint is in place and covering the window to the edges (as best as you can), then it is a successful installation. If that isn't good enough for you, then start saving for a professional to do it. If you have it available, making cardboard cutouts that fit inside your window can expedite the process for cutting the sizes for your window tint pieces. If your cardboard pattern fits just inside your window, your window tint should be cut 0.75"-1" larger on each side in order to ensure you have enough when applied to the window. So, you could actually take the measurements of your windows, add 1" to the length and width, then take those measurements to your cardboard and make your pattern. Skip the applicator kit and just get a bottle of baby soap to mix a cap's worth of soap to a spray bottle full of water. Don't be afraid to soak down the window and the sticky side of the window tint (as peeling off backing). It's easier to dry up the baby soap stuff, than wrestle with a lightly coated window tint. Definitely watch the instructional videos on the Gila website BEFORE doing anything. I repeat, GO WATCH THE VIDEOS ON THE GILA WEBSITE BEFORE DOING ANYTHING:) At the end of the day, I give this product a 5/5 because it is well worth the time and smaller monetary investment. My wife hated that we had to have the curtains closed during the day in order to cut down on the heat that would keep the A/C running nearly constantly. We just had our first child, so we wanted to be able to have some natural light without the accompanying heat. This window tint has provided the solution for us, and we have been very pleased with the results. There is another window tint product out there that gets very good reviews, but it is applied to the outside of the window. I wasn't quite sure how it would hold up to weather, etc. compared to this film that is applied to the inside of the window. Another part of me is curious how it would work if you used both :P
Andrew Springer
This stuff is crazy good, and easy to install
This product will keep your space much cooler. You can feel the difference as you install it. I placed a digital thermometer on the window sill in direct sunlight before the tint and after (same time of day, same amount of sun). Before: 113 F. After: 91 F. This stuff is crazy good, and easy to install. Can easily see out through the tint. It is impossible to see in from outside, and it does not glare like a mirrored surface. I applied it in direct sunlight and had no problem. Be sure to get the window AND film soaking wet with a surficant (water with a few drops of dish soap, or the spray from the tool kit). Also be sure to buy the separate tool kit from the same brand. The squeegy tool and razor tool are perfect for this job. It's well wort the $9. The photo taken from inside the room: Left pane tinted, right pane untinted. Exterior photo: After the job, lights ON inside the bedroom, direct sunlight on windows.
Zoraez Siddiqui
The Bad and the Good about this product
I installed this in my house in Nevada. While the windows are dual pane they are older and made of metal and glass and are at least 20 years old. The Bad and the Good about this product. Bad: Now about the installation… I found it very annoying and the time it took to make it look even semi decent was ridiculous and I can say that I am a very patient person. Also I can say that even having help if you are trying to do a patio door or larger window this stuff can be a bit of a nightmare to work with. Now having bought the 48 inch wide due to the patio doors being 44in by 72in peeling the plastic coating off was difficult and unless you have callouses to grip the slippery plastic you will also find this tricky. If your roll falls off your table it will cause wrinkles and leaves the fine lines on your windows no matter what you do. Good: Now the good thing is that as long as you have liquid behind the film as you are putting it on it is very forgiving and can move around semi easily and if you mess up a corner you can peel back and respray and put back and work with your squeegee to get rid of extra liquid and air bubbles. Be very careful about your cuts because it will tear where you don’t want it too. I left about .75 to an inch on each side to cut off so that I didn’t have to fight it as much. My smaller panes of glass were very easy to do… 22 in wide was so much easier to pull the plastic coating off and not wrinkling the film. Once I was done I pointed my temp gun at the window and while the window itself was just as warm as before or warmer there is about an average of 13-15 degree difference between the window and the window ledge after about 30 min. My tile floors in the shade and then in the sunlight was only a degree different. I am waiting to see if the summer heat is a bigger difference or how it handles the temperature. So far I am impressed with it. It also truly blocks allot of the glare in the afternoons.
Nikola Mandov
Very good purchase
First of all there is a difference between platinum and titanium, basically from my understanding is the titanium keeps only the suns heat out. The platinum keeps the suns heat out during the summer and the heat inside during the winter. Feel free to research on your own, but make sure you order the right one. Second is to clean the window good then use a razor blade to clean it. I saw that tip here I believe and I was surprised at how much more it cleaned it making a real smooth surface. Make sure you have two people . The worst part of this is getting the pieces apart and getting it on the window without it sticking to itself. Make sure to use plenty of the solution they sell it will make life much easier. Makes a big difference on the heat coming through the window when the sun is beating down on the Westside of the house.