


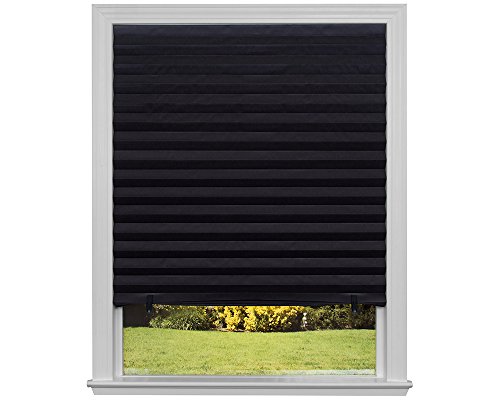
- Trim at home for the perfect fit inside or outside your window frame, then install in seconds without a drill, screws, or brackets- no tools needed
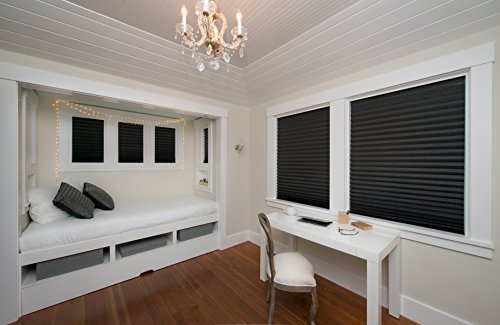
- Block 99% of light for complete privacy, light control, and UV protection for bedrooms, children's rooms, and movie rooms
- No cords for a clean look and child safety - use included clips to raise and lower shade. Light blocking original fabric shades are made of soft, 100 percent non-woven polyester with a heat reflective layer that helps block heat entering through windows
- Made in the USA of durable paper that will not yellow or crack from sun exposure
- Works as a stand-alone solution, or easily layer behind existing window treatments
-
Information
-
Twitter
-
Pinterest
-
Youtube
-
Facebook
Helena Loffelmanova
Better Than Expected
I didn't expect much out of these, they are paper, There were six shades for 20 bucks. I needed to darken a few rooms, the afternoon sun was making the a/c work hard. I have a steel door on my front entryway with a big window and didn't want to put holes in the door to hang a shade. I love these things, really. They have self adhesive tape on them, and it holds very well. Mine have been up for a month and are in excellent condition. I used a good pair of scissors and cut it to size. It has little 'clips' that look like cheap clothes pins at first (to me), that hold the shade up. They were not a pain in the butt like I thought they were going to be. Once the shade is up they are hardly noticeable.I took the leftover piece from what I cut for my front door, and put it over a window strip that runs along the side of my back door. Their color makes them blend well, they darken the room, and are a better quality than I was expecting. These are perfect for where you don't want to drill holes, or for easy installations that you may not want too permanent like an apartment. I would buy these again.
Tara Woods
Excellent if you cut and install correctly.
These really are excellent black out shades, assuming you do two things: 1) cut them super super tight. They should be tight enough to make physical contact with the entire edge of the window. Yes, this means that they are harder to raise and lower, since you have to kind of pull and drag it against the tight fit. But the tight fit is what makes them truly blackout. 2) attach them so the first pleat angles in, not out. When you glue them to the top, you can choose to angle it so the pleat falls out or in. If it angles out, there will be a larger gap between the shade and the window, and this can let light in. If it angles in, toward the windows, the entire sheet lies closer to the glass, so it is darker. We did have them fall a few times so we bought the additional double-sided mounting tape, and it hasn't fallen since.
Booter Collins
Perfect for makeshift nursery!
We needed something to use as a blackout curtain and privacy screen for our 5 month old. We were taking her to our condo in Chicago for the first time, and I was a bit nervous in anticipation of where she would sleep. Our condo is a large studio, and no private bedroom. We decided to block off the kitchen area in order to make it her sleeping space, and therefore needed to make it as dark as possible. The easy part was putting curtains up in the doorway, piece of cake. The harder part was trying to find something to cover up the L shaped pass through. When I saw these, I thought these would be so quick, cheap and easy... and they were!! It took me 10 minutes max to cut these and install these. The ones I ordered weren't very tall, so I doubled them up on top of each other to make them longer. In addition to cutting them, I used hair scissors (that was all that was in the condo), and that seemed to work well cutting a few slats at a time. Installation was a breeze, as you just peel off the sticky end and stick it to the ceiling. The adhesive felt secure enough not to fall down and into our daughters crib. This blocked out the light as best as it could, and made her makeshift nursery work well. She slept like she does at home when she was there, so I was very happy about that! I attached pictures. You will notice I added some duct tape to secure it to the walls a little more only because the shades are a lighter material. The angle from which my husband would walk by the shades created a draft and would make the shades move. When we left the condo, we used the pins that come with the shades to pin the shades up higher. My husband stays there during the week for work, so he can now use the kitchen area as needed. Overall, I would definitely purchase these again!!!
Kerrie Hogben
Works GREAT!!
There are some bad reviews for this and honestly, I can't figure out why. They're inexpensive. They're a non-permanent solution for someone renting. They're completely light blocking. They're easy to use. I had no trouble installing them at all. I just cleaned the window sills and stuck them up. I did add some staples to the ones in my children's room because they tried to rip them down. (Woo ... Toddlers!!!) PRO TIP: If you have large windows I recommend trimming the excess off the bottom. I have very large windows and I found out with the ones in my room that because the blinds so big they are too heavy to hold themselves up. The blinds will relax after a few days and straighten out a bit. I trimmed them a little each day for about 3 days until they seemed to stop relaxing. Trimming the excess off the bottom solved the weight issue and I've had no problems since.
Tracy Ross
like apartment complexes everywhere
My apartment complex, like apartment complexes everywhere, doesn't quite understand the concept of "night", the time when people are supposed to "sleep". It views this whole "night" thing as a problem, which must be solved with nuclear-powered floodlights. This product just a piece of paper, but it's a piece of paper that light will not shine through. Period. Not even nuclear powered floodlights. It has a sticky strip at the top (which actually sticks to things), and some little plastic clips to gather unused excess. It will make the inside of your room look like a cheap college-student dump. But you will actually be able to shut out the nuclear spotlights and sleep.
Jeta Jeta
Awesome!
Amazing. Quick fix for light blocking in baby's room. Completely blocks out light from the two windows in baby's room. The tape is pretty strong as well and it comes with clips to hold the shade up as well or roll it up when you want. Would highly recommend. In picture the window on the left is with the shade, window on the right is just closed blinds during daytime.
Calvin Parkinson
Finally!! Something that works, is affordable AND looks good.
These have been a life changer! I have been doing shift work for over 12 years and I have never found an affordable, effective, yet visually pleasing and convenient option to darken my room for daytime sleep. I've used roller shades, mini-blinds, curtains, room darkening curtain panels, cardboard, blankets, you name it. I've found that the most effective method to block light (cardboard and blankets) is the most hideous to look at. The more visually pleasing options (blinds, shades) inevitably allow glaring rays of light in that always seem to find my face. The past few years, I've let the visually pleasing factor outweigh the effectiveness factor, but I finally got tired of it. So, I went on the search for a solution and came across these shades on several different sites. These shades are paper and marketed as being "temporary". They are essentially a really long piece of pleated, thick, black construction paper with a tape strip on the top that is used to affix it to your window frame. There is no roller or pull cord mechanism, as they are simply folded up/down to the desired level and then held in place by two black clips (they are included and are much like chip-clips). You install them by simply measuring your window opening and cutting the shade with a razor-edge blade, such as a box cutter. The shade is pliable enough I just held it up into to the opening, bending the excess portion of the shade outward, and then marked my cut with a white crayon. I used a straight edge to hold my place, and then with several swipes of the blade, they were cut to size. Remove the strip that covers the adhesive and then you're ready to stick it in place. I attached mine to the metal portion of the inside of the window pane. I removed my blinds, however that wasn't necessary. These shades would have fit just fine behind them. It took a total of 20 minutes to cut and install 3 shades. Now, I will say that part of the reason these work so well for me is due to my color schemes. My bedroom is full of gray, purple and black. So the black shades showing act as an accent to all of that. Had it not been, I would have probably left my blinds up, so the shades wouldn't be visible from the inside. The exterior of my house has gray siding with black shutters, so from the outside it looks like I have black roman shades that go with my exterior colors as well. With regard to the light blocking ability, I have to say I'm impressed. I have one single window on one wall and a double window on another wall. There isn't a glimmer of light visible through my single window. There is a slight amount of light getting through in the middle portion of my double window, however I do have curtains and when they're closed; they seem to trap most of the residual light. I can't speak of the longevity of the shade just yet, but I'll post an update if needed. However, for the job these do and the price (about $6 each), I wouldn't even mind if I had to reinforce the tape or replace them every once in a while. See the attached photos (if I can figure out how to attach them) for further details. The photos were taken minutes apart, during a sunny St. Louis afternoon around 4pm. I had no lights on in the home and no flash on the camera.
Vicky Henry
Just what I need! Now I can sleep :)
I have a long window(68") in my bedroom, and boy, there are five of them with two different sizes! My windows are all facing the street or toward the front entrance to the house, so having blinds is the must. On top of that, I work night shift, so in order to sleep during daytime, it has to block the light good. However, even one room darkening/black out blinds costs 10-20 bucks a piece, and I was not ready to spend that much for the blind... I never knew about paper blinds and I wasn't sure how well it will block the light and how durable it would be. It took me about 15-20 minutes to do all five windows; I measured the window, cut the blind, and maybe cut some more, and placed it on the window. They fit quite well, and definitely satisfied my intent to block the majority of the light coming into my bedroom. Though, since my windows are high, upper part of the blind stretches out a bit, causing the lower part of the blind to get folded and it sticks out as well. I might have to clip the lower part a bit. I don't think I will open my blinds often because of my odd sleep schedule, but I think it would last for years. It was definitely worth of my money, especially getting all 6 blinds for this price! Now that my windows are all blocked well, I can sleep better :)
Steve Alcorn
Works remarkably well to block light
I had some of these in the regular white for tall mini windows that I couldn't find blinds or curtains to fit in. The white ones really help reduce direct light and glare, but still allow light through them. When I saw they came in blackout too, I had to try them. We live in Phoenix, so you almost have to have blackout curtains in bedrooms to sleep. I put these right on the windows behind curtains, and they work great! Blocks an amazing amount of light considering they're just paper. Has lowered the temperature in our bedroom by several degrees just blocking the extra light and heat that was getting through the curtains. If you need good blackout curtains but don't want to pay crazy amounts for them, definitely try these. You can put them behind regular curtains to achieve that blackout effect. They stick remarkably well too - the white ones are still perfectly adhered after 3 years of hot sun on the windows, and I expect these black ones to do the same.
Sarah Missja
Perfect and inexpensive!
We built a movie theater room in our loft but needed to block out the AZ sun during the day. After getting quotes of nearly $1800 for custom blackout shades I found these on Amazon. For $36 and 30 minutes of measuring these made our space look as good as a professional job! On the big center window I overlapped 2 of the shades and used scotch tape on the back to keep them together. Unless you are a foot away you can't tell there are 2 there. Super easy to measure, cut, and install. I can't recommend these enough!