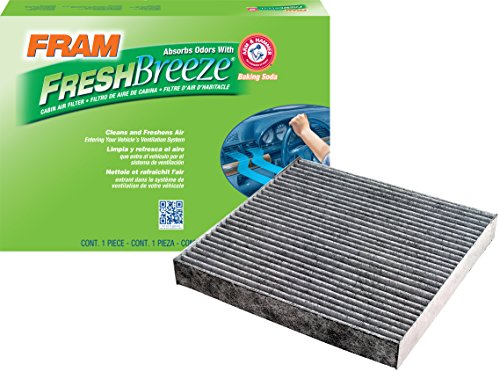
- Filters up to 98% of dust, pollen, and other contaminants
- Arm & Hammer baking soda combined with carbon cleans the outside air flowing through the ventilation system
- Provides more air flow for improved performance and helps prevent musty odors from forming inside the vehicle
- Keeps damaging particles from entering the engine and causing increased engine wear
- Installation instructions are included in every box, along with QR codes to installation videos
-
Information
-
Twitter
-
Pinterest
-
Youtube
-
Facebook
Tonia Willie Caudle
Installs in less than 10 minutes and you save $60 from the Honda/Acura dealership
If you own a compatible Honda/Acura vehicle, replacing the cabin air filter on your own will be the easiest $60 you'll ever save. Depending on how much stuff you store in your glove box, this should take no more than 10 minutes to complete, but probably less. The Acura dealership suggested I replace my cabin air filter during a routine maintenance (oil change for an A1/B1 service) and wanted to charge an extra $70 (parts & labor) to do it. When they showed me my dirty filter, I honestly didn't think it looked that bad, but I declined because I knew how easy it was to replace on my own and how inexpensively I could get the FRAM filter for. As soon as I got home, I ordered two units of the FRAM filter from Amazon--one to keep on hand. Once I received it, I went out to my car and installed it myself in 10 minutes. It only took that long because I reorganized my glove box a bit when I was putting everything back in. The box comes with written instructions for your vehicle, but if you need it, there are plenty of helpful YouTube video tutorials available as well.
Charlotte Arp
Easy to DIY this. Shame on Honda for saying dealer only when YouTube + Amazon + 5 minutes is half the price!
Honda Owners - Do yourself a favor and save some hard earned cash. The dealer wanted $27 to replace this filter. It was dirt cheap on Amazon far less than half the cost with free shipping for Prime. Prime is worth every penny! In my Accord and my wife's Odyssey the filter is directly behind the glove box. You have to pop out the glove box to do this. The glove box has a stopper bracket on the right and left to keep box from opening too far. You have squeeze the brackets and let the box keep swinging forward. It takes all of 5 minutes including time to find your smart phone and search for a how-to-video on YouTube, watch the video and replace the filter. I did it less time than it took to pump a tank of gas. Shame on Honda for giving no help or pointers in the owners manual other than have a dealer do it.
Taylor Bryant
2013 Honda Civic
literally put this filter in while waiting for a take out pizza. just pinch the sides of the glove box to get it to fold down. My old filter was filthy. I noticed almost immediately that my car was less "stuffy" and the defrost worked quicker. I typically only use K&N air filters but i don't like them for cabin filters because of the oil smell. I'll be coming back to Fram for under $10 I will probably replace once a year
Laura Harris
Great filter. I used this in my 2012 Honda CRV.
Toni Sandell
The FRAM CF10134 fits perfectly in a 2006 Honda Odyssey
Perfect fitment for a 2006 Honda Odyssey EX-L. I had recently replaced (4 months ago) the Cabin Air Filter with one of the cheap (non-baking soda equipped filters) cabin air filter, but I kept getting a whiff of an unpleasant odor (smelled like skunk). So I decided to give this filter a shot. In short, I now have a better smelling van - it appears the baking soda does work at filtering out some unpleasant odors (at least for me). I will definitely replace my Cabin Air Filters with this one. FYI, as others have noted, changing the Cabin Air Filter in a Honda is very simple - for the 2006 Honda Odyssey, you just simply "drop" the glove compartment to gain access to the Cabin Air Filter housing which is located just behind the glove compartment (do a search on YouTube for a DIY Video - you will not regret this since it will save you anywhere from $65 to $100 by doing this very simple maintenance task (the Stealership will charge you anywhere from $75 to $100 for this simple 10 minute job)).
Rotica Pickens
It Worked Removing Weird Odor Within the Cabin of my '08 Civic
Bought a used 2008 Honda Civic last year from a family friend and the car was in very good condition. The interior of the car had a weird smell though which I couldn't air out. I tried cleaning the upholstery and that didn't work. Remembered that the car had a cabin filter so I bought this to change it out in hopes that would work. Package arrived on time and I immediately went to swap out the old OEM filter with this. It worked! 48hrs later I didn't smell that odor anymore. This Fresh Breeze cabin air filter is not supposed to add a scent but is supposed to remove any odors from your cars interior while blocking out dust, pollen and other things from outside when you have either the heat, air or AC on. I would purchase this again when it's time to replace the cabin air filter once again, just wish it was cheaper.
Qazitahseenshafique Mahesar
Keeps my car decent even when in a super dusty and smelly environment
I work for a feedyard. It is always windy, dusty, and smelly. So my car is always that way as well. It meant I cleaned it a lot and in a week it was back to being pretty rough. Air Fresheners really only added to the odor. Then I started changing my airfilters every 6 months or so with these. It severely cut down on the dust in the cab, and helps with the smell quite a bit. I don't have to clean nearly as often, and what does get in is mostly due to the doors being opened and closed. When I take out the old one, the filter is usually quite full of dust and dirt that it's kept out.
Steve Morrin
Less Noise, More Air - Finally,Gush of Fresh Air
After installation, I experienced cabin air gush (running the AC fan full speed) I have not experience since having the vehicle 7 years ago. I can actually feel the air gush in my face sitting relaxed back-to-seat (running A/C fan full speed). However, from the dirt in the filter, I conclude the filter has never been changed since original 10 years ago (See the pictures). BTW, I never know there was filter underneath the dash - I found this out from Amazon recommendation (Thank you Amazon! Where has my mechanics being - they never mentioned the filter!?)
Stephanie Blair
Easy installation on my Acura MDX
I didn't realize how nasty the old filter was until I put this new one in. Replacing the filter was a breeze (pun intended). My 2011 Acura MDX (like many vehicles) places these in the glove box (actually behind it), and all I had to do was empty everything out, squeeze the semi rigid sides in a bit and let it drop all the way down to open up various hidden things, including the cabin air filter location. Do note that these filters are directional, so note the dirty side of the old one and make sure the new one points away from what was the dirty side. My car had arrows on the frame which helped too (if nothing else, the air usually comes in from between the windshield and hood and goes down from there). My frame had a place to slide the outer bits of the filter to prevent air from bypassing the filter, so look for that. 5 stars for the filter and it's very easy to do. 0 stars for Acura having the manual not show how to replace this (merely tells you to go to the dealer, who charges $75 to replace this).
Jamie Tracy
Fits perfect on my 2003 & 2005 Accord V6 Sedan. Awesome!
Great Filter, well built, and fits exactly. Fitment: Fit exactly both my 2003 and 2005 Honda Accord 4 Dr Sedan V6 EX. almost no gap is seen. Note: You have to make sure the air flow direction is correct. Easy to install: Open glove compartment and depress both sides of the compartment, unhook the latch on the right and the glove compartment will swing down. Depress both sides of the air filter holder and slide it out. Make sure the harder side of the filter is are facing the side and the air flow is Downward matching the arrows. There is also a small piece of plastic sticking out from the filter holder. Which you need to make sure the first film of filter slides on top. And it will make a perfect fit with almost no gap. See pictures. Smell: After replacing my old one, the dog poop smell was gone! Also, this filter gives the same empty space smells as my Home air purifier ($150) with HEPA filter. Thanks to the video they provide, otherwise I probably will never change it. See my OLD filter on 2003 Accord. The cleaner filter is from my 2005 Accord.