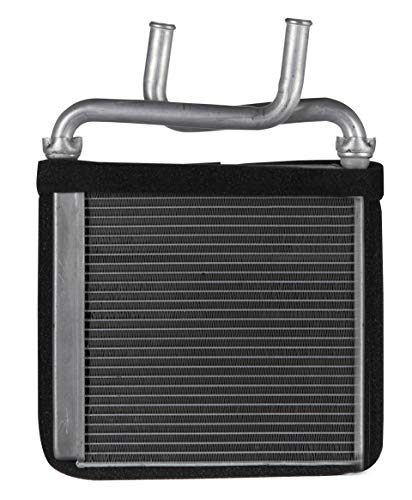
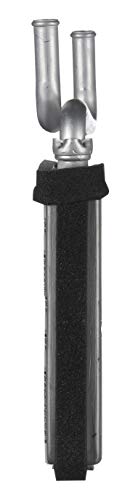
- Engineered to meet or exceed manufacturer's specifications
- Designed for exact fit in the vehicle’s original equipment heater casing
- Drop in fit for easy installation
- Fully brazed aluminum design
- 100 per cent leak tested
-
Information
-
Twitter
-
Pinterest
-
Youtube
-
Facebook
Veronica Changed Brown
2006 Dodge Ram 1500 - Perfect Fit & No AC Discharge Required!
Update: As of February 25, 2018 this heater core is still functioning properly with no leaks. ---August 31, 2015--- Application: 2006 Dodge Ram 1500 Quad Cab 3.7L V6. Extremely well maintained low mileage truck purchased at a heavy discount back in March 2015. I started noticing the typical sickly sweet smell of a coolant leak sometime in April, then observed coolant dripping from the lower heater ports and firewall discharge tube. Since we were starting our South Alabama summer, I simply bypassed the core and waited until the temperatures started dropping. Just a tip: Use your phone to take plenty of pictures before starting and during disassembly. This will show routing of cables, bolt types, location, etc. and a heck of a lot faster than taking notes. I started the project Friday August 28, 2015 around 2:30 PM CST. The service manual and a majority of folks state to remove the front seats. While this will certainly provide additional access, it is not a requirement. Disconnect battery before doing anything. Carefully begin removing the dash upper trim, and LH/RH trim panels and the LH/RH hand grip trim pieces, glove box and lower console trim (depending on your model and trim level), and knee panel. Remove 4 washer-nuts allowing steering column to lay down (no need to remove). Then remove the variety of bolts holding the dash module in place. Once loose, roll back from the passenger side. I secured the dash to the headrest tubes using straps, and this gave plenty of room to access the air box. Most folks will tell you that in order to "do it right", then you MUST go through the process of discharging the AC, replacing the condenser, accumulator and all that jazz, then have the unit recharged. Keep in mind, the service manual is written for dealerships and mechanics who are on the clock, therefore it must be "the right way"... I'll offer up my 30 years of experience in the automotive supply chain as an Engineering & Quality Manager to tell you that the "right" way is often due to built in design limitations. This is one of those times where accessibility was an afterthought. If you're careful, and willing to spend an extra 30 minutes, you can do this job without discharging the AC and replacing all of the related components. This is strictly a decisions that must be made by the owner based on mileage, years, and condition of the system. In my case, this truck is well below 100K miles. A well maintained AC system will last twice and sometimes three times that, so I opted not to open up the system, but again, that choice is yours. Go under the hood, remove the coolant lines, get the ECM/TCM out of the way & access the airbox retaining bolts. Loosen the bolts on the AC accumulator but do not remove the clamps. All of this will allow you to pull the airbox into the cab & away from the firewall about 4 to 5 inches. Then remove the perimeter screws and lift off the upper airbox. The heater core comes with it. Now you can gently lift up on the AC condenser coil and roll the lower airbox out. Once out, spray it down with detergent and hose out the old coolant (or you'll smell it forever). I soaked down the AC condenser with a mild detergent and used the shop vac to clean out dust and any mold growth. This is a good time to check the air inlet port to clean out accumulated debris and/or ensure no rats have taken up residence. Most of the foam gaskets around mating surfaces have turned to dust, and will eventually blow into your cab, so I took extra time to completely remove and replaced with new weatherstrip. My OCD cleaning and new seals added to the reassembly time, but I just can't help myself. Install the new heater core, reassemble the airbox, (yes, every screw), reinstall to the firewall, then reassemble everything. Taking my time, the job was complete around 11:30PM CST for about 9 hours. If I had to do it again, knowing the connection points and such, I could likely shave 3 to 4 hours off of the job. As anticipated, the AC still works perfectly, and we have a working heater, all without having to discharge/recharge the AC system. Feel free to comment/message if you need any assistance. I hope this helps!
Pauline Rayno
Great price, fast shipping
Received this very fast and was an exact replacement for my 2003 dodge ram 1500. It's a pain to replace because apparently no engineers at dodge speak to one another and you have remove a million things just to get to one simple part. A mechanic friend suggested cutting out a piece of the firewall to easily replace it if it goes again, which with a dodge seems to be a reoccurring problem. As of the inlet & outlet pipes moving, they are supposed to. Otherwise you wouldn't be able to hook them up. After I got it in place and the pipes about where they needed to be I coated the connections in a silicon sealant to hopefully prevent any leaks from there in the future. My old one leaked at the connection point, not the actual core. I would buy again, but hopefully won't have to! Couple tips if you buying this and doing it yourself. Buy a new brake light switch. They can't adjusted and mine broke when disconnecting and the brake lights just stayed on. Buy the a/c coupler disconnects from the auto parts store for $6. Have a friend help. A lot of the work can be done separately by 2 different people. I took apart the hvac housing to clean out the coolant that had leaked. remember where the doors were positioned. I messed one up and now I can blow out on the floor & face or just face. I can easily fix it later, but something to consider.
Christala Valdez
Fixed Dodge Ram broken heater core and blend door problem permanently. I hope.
Fit perfectly in 2003 Dodge Ram 1500. I removed the dashboard and changed the heater core, evaporator, and all 4 broken blend doors with metal heater treater doors. Recommend changing everything if your going to go through all the trouble of pulling your dash. Previous owner just looped the heater hose back into itself to bypass the old leaking heater core. I rehooked all the hoses and found the soaking wet passenger side floor board the next morning. I knew the heater core was bad and replaced it with this one. Costs about $40 less than my local auto park store.
Hadid Huda
excellent product
Same as OEM. Fits perfect and now I have heat. Easy to install if you know what you are doing. Skill level mechanic knowledge and abilities would be intermediate. A beginner would have a hard time taking everything apart just to get to the heater core.
Felicia Ellis
😎
Easy to install after you remove the dash and air box
Whitney Suzanne Junelle Brooks
Worked great for my 2003 Dodge 1500
I replaced my heater core myself. Yes it was 12 hrs of dis-assembly and 3 hrs of re-assembly. But I saved a lot of money and it wasn't that hard just tedious. Just pay attention to what you are doing and you'll be fine. You will need a auto shop to remove the Freon from your cooling system b/c you will have to remove the cooling core too. Plan on replacing the cooling core while you're at it. Taking apart the front of my truck was all the fun I can stand. This core fit perfectly
Christopher Fawcett
heater core
fit perfect very nice and great quality no leaks great heat again
Jessie Green
Worked great on my 2003 Dodge Ram truck
Worked great on my 2003 Dodge Ram truck. Just remember to change the evaporator at the same time for you have the whole dashboard off already. I did a lot of video research, then I was able to tackle the project with my son. Just do your research and take your time.
Janet E Mountcastle
Good quality
Works great
Aida Cunanan
Fast service
Driver dropped package off the wrong house. Fits so far so good