


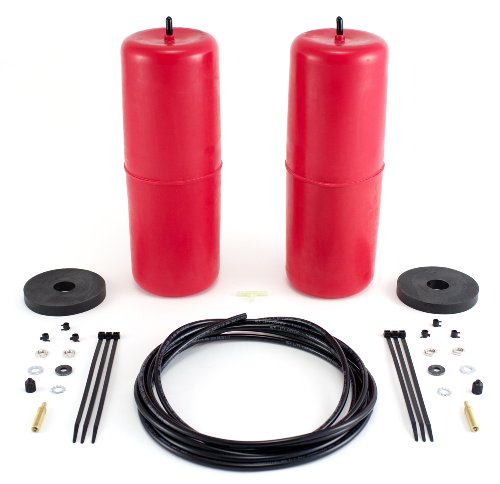
- Fits most open coil springs on the front or rear.
- Replaces P-30/32 OEM Front air springs.
- Air adjustable to custom-tune the desired ride.
- Easy to install using common tools!
- No drilling required
-
Information
-
Twitter
-
Pinterest
-
Youtube
-
Facebook
Leslie Roland
Top knotch product and easy install
I originally purchased the air lift 5000 or my 2017 ram 1500 crew cab, but I did not realize I have to make permanent changes to my frame to put them on. I didn't feel comfortable doing that to a truck with 200 miles. I returned those and purchased these so I could tow my 31ft travel trailer with a tongue weight of 640lbs. I also carry 200lbs of weight in the bed when we go camping. Shipping was fast and all items arrived in good condition. I read a lot of reviews for the install and they were mixed on how to install the bags. I like most don't have a lift to put the truck in the air, but I found that there is no need to use a lift. installation: The first thing I did was remove the rear fender liners, there are about 9 screws and the liners come right out. I then took my wheel chocks and chocked the front wheels. The I took my 3 ton jack, and () 1ft piece of 4x4 and (2) 1ft piece of 2x4, but you can use whatever you have available. I stacked all 3 on top of each other and used the jack to lift the rear by the hitch. I lifted the rear all the way up right before the tires were about to come off the ground. I placed my jack stands under the truck fro safety. I compressed the first bag so it was flat and tried to install from under the rear, but couldn't get the bag to go in. I then attempted to go from the top and was able to slide the bag in and pull the cap off in less than 30 seconds. After installing both bags I connected the tubing to the first bag and ram the tubing through the frame to the tow hitch. I did this for both bags and installed the T behind the hitch running the last line to one of the holes that face out from the hitch towards the rear of the truck. TIP: when putting the hoses on the nipples of the bags and T use a little silicone spray so the hose will slide on easier. Also if you have a long bed truck you will need to get more hose. The kit comes with enough to do a 6 foot bed, I have 14 inches left over after the install. I aired the bags up to 35psi like the instructions say and let it sit for 3 days and the bags were at 33psi. I drove the vehicle 40 miles and went back to check the psi and still at 33. I have left the 33 psi in it for a week and let the truck sit there and it has only dropped 1 psi and that from me checking it 4 times I think. I purchased the Viar 88p air pump with these air bags and everything works great. Total install time from start to finish doing this by myself was less than 2 hours. I hoped this review helps.
Katie Jo Moore
Levels out my truck while towing!
Install was a piece of cake! Once I had these installed on my 2016 Ram Ecodiesel, I filled up the bags to 20 psi, hooked up our 6000# trailer, then towed it over to storage. These helped tremendously with sag and sway from the hitch weight of the trailer. I installed the valve stem inside the fuel tank door to keep it hidden. In the pic you will see that I drilled the hole for the valve stem right above the DEF cap (see Pic). If you don't have an ecodiesel, yours will look a little different. Turned out really nice. Highly recommend.
Mylene Mylene
Very Easy to install. And works better than I had hoped.
First off, I was a little Leary. But I went ahead and purchased these air bags to see if it would help. I have a 2010 Dodge Ram 1500 Laramie, and the springs are relatively soft to give it that Cadillac of trucks ride. I also have a a 30ft. 10,000lb travel trailer. With just under 1000lb tongue weight. The stock rear suspension held it up, but was sagging really bad. Didn't like hauling it really long distances like that, so I did research and read a lot of reviews on a lot of different products. Decided to go with the airlift 1000 series. These were actually really easy to install, even for a guy whom just had shoulder surgery not long before I purchased them. And after they were installed I was elated at how well they actually worked at keeping the truck level, they leveled out my truck at only 25lbs worth of air in them. I didn't even have to max them out, which is what I thought I was going to have to do. Pulls my trailer a whole lot better, and I'm not looking at the clouds doing so. Now unloaded, DO make sure you deflate them, otherwise your ass end will bounce all over the road. That's my only word of advice.
Nikhil Murali
I was reluctant to buy the air lift at first because I wanted to keep the car like ride and not a stiffer truck type ride but ...
I was on the fence about purchasing these for my 2015 Ram 1500. I was reluctant to buy the air lift at first because I wanted to keep the car like ride and not a stiffer truck type ride but I'm glad I did. This really makes a difference and levels my vehicle. The install was pretty easy and took about 90 minutes. I watched the video, read the reviews and read the install instructions. I installed the airbags with a combination from all three. I installed one side at a time with the second side taking only 30 minutes. I lifted one side at a time using a floor jack and then putting the truck on jack stands and removing the wheels. Before the actual install I compressed each airbag and zip tied them so they would slip in the coils easier. That worked great and I didn't have to use anything else but my hands to get the airbag into place. I installed the clamps with the air lines and zip tied the air lines to the frame. Drilled two holes in the back by my license plate for the air valves. Inflated each airbag to 30 psi checked for leaks and took a test drive. It definitely changed the ride and was stiffer but I pull a 7000 lbs travel trailer and the sag and squatting are gone. I have sway bars for the trailer but this also helps with sway. So I get the car like ride back I deflate the airbags to about 5 psi. For me the hardest part was putting the clamps on the air lines and running the air lines along the frame. I recommend these not just for pulling trailers but even if you have heavier payloads they're great. Well worth the investment!!!😎👍🏼👍🏼
Abby Weatherford
Seems like a good product
Going to start off with a 5 star rating and the reason why to follow. I’m a mildly handy person with some good tools. I put these in my 2017 Ram 1500 to assist with sag while pulling a 27 foot camper and help with sway while loaded up for tailgating college football, five large men and a days worth of tailgating equipment. It was a warm day out and I let the bags sit in the sun for 20 minutes while I removed the wheel liners. The rest of the truck was jacked up by the hitch, allowing the axel to remained grounded and to stretch the coils. The bags went in with some work from the top of the spring and seated pretty good. The hoses were work to get in entirely, but the clamps blow. One was broken and the rest were hard to work with. Finally got the lines connected and zip ties out of the way. Put the schraeder valves through the existing holes already in the hitch. They took air and appear to hold it. Had some bubbles from one of the connections at the bag after checking it with soapy solution, but some fiddling with it seemed to seat the hose better on the barb. Total time was 1 3/4 hours and I wasn’t killing myself. I researched a few different ways to install and decided to remove the wheel liners after seeing a video on YouTube, this allowed me to do about 80% of the work out from under the truck and to install the bags from the top half of the spring. Only time will tell if they hold up, but here’s to hoping that this an $90 solution.
Jade Jones
A must for any RAM owner that tows. Super easy to install!!!
I have a 2012 RAM 1500 and tow 2 ATVs across the country to go riding with my son and my Dad. Most of the time, I have to put one ATV in the bed while I tow our kit and the second ATV. Us RAM owners know that this means -- my truck sags quite badly because of the coil rear springs. They're great for driving around town with an empty truck, but sag terribly when anything more than a pillow is put into the bed of the truck. The Airlift 1000 air spring kit seemed to be a simple solution. However, I was nervous because there are numerous write ups on line that state you have to take off your springs to install the unit. That is simply not true any more. I called Airlift and they have changed their design so that the top 'puck' now fits between the coils. Installation of this unit was very, very simple and incredibly fast. In fact, it took me longer to lower my spare tire to make room to work under the truck than to get the bags into the coils. a) Removed my spare tire b) Jacked up my truck so that my wheels were 6" off the ground. c) Inserted 2 Jack stands under the frame as far to the rear as possible (just in front of the two link arm mounts) d) Released pressure on the scissors jack e) Let the axle "hang" (the tires will now be about 3" off the ground) f) Put 2 Jack stands under the axle FOR SAFETY! g) Took off my rear tires h) Folded the two bags into 'hot dog buns'. Take the cap off the brass fitting, kneel on it, fold, kneel on it some more and replace cap (see Airlift's on line video) i) Slid them into the coil springs. Expected a fight, but it was amazingly simple. Went in by hand with no need for tools. j) Took off the cap, poked and prodded the bag as it filled up and seated within the coil k) Installed the first air hose and clamp l) Put the air hose through the puck and slid the 'puck' between the coils so that it sits on the top of the bag (air hose goes through the center hole) m) Routed the air lines as instructed n) Connected the air lines together with a brass 't'. I didn't like the plastic 't' that come in the kit -- was worried that it would break in winter weather. You can get the brass 't' at a hardware store -- the same brass 't' that would be used to connect water hoses to refrigerators. o) Installed the fill valve on my hitch and connect to the brass 't' (there are two holes at the base -- I used one of them) p) Re-installed my rear wheels q) Dropped the truck r) Re-seated my spare s) Added 30 PSI to the units and checked for leaks (follow instructions for leaving in air overnight and checking next morning) DONE.... Using the air bags: a) I'm still experimenting, but I have been riding with 5-10 psi on normal days. Doesn't seem to affect the ride and extends the life of the bags b) Pump the bags to their max (30-35 psi) before loading the truck. c) Load the truck and connect the trailer d) Load the trailer e) Let a bit of air out (until truck sags A BIT) f) Purchase an inexpensive 12V compressor and carry it with you when traveling.
Amy Owens Burbol
The Air Lift 1000 is a Great Product at a very reasonable Price.
AIR Lift 1000 is a Great product. I'm very happy with the performance and ease of installation of my lift kit. One consumer suggestion, Do buy the Air Lift push-pull compression tee, an extra item on Amazon. Much easier installation and much improved connector. One company suggestion, Air lift needs to include 2-90 degree elbows, one for each air bag and the same connector for the Schrader Valve inlet, also include the tee in your kit. Loose the barbed connectors altogether!
Malinda Zaldivar
Skeptical at first, but now I'm sold! They're GREAT!
I was a bit leery about these at first, but thought I'd give them a shot. Installed them on my 2010 Dodge RAM 1500 4X4. Here is a tip that will save you a LOT OF TIME and FRUSTRATION: get a set of spring compressors (they loan them free at O'Reilly or Autozone) and raise your truck up, pull the spring out (VERY EASY), and just slip the air bag right down in the spring with no effort, connect the air line, and reinstall the spring. I cannot imagine doing this the way they show in their instructional video. The material is a lot thicker and stronger (especially when cold) than it appears in the videos, and would have been almost impossible to feed through the spring in place. At any rate, these work GREAT! Very pleased!
Ross Ariffin
Easy install method detailed
Great deal and easy install. I have a 2013 Ram 1500 I use to tow a 32' travel trailer, 6500lbs with 800lbs tounge weight. I bought these along with a Blue Ox SwayPro Weight Distribution Hitch to help with sway and sagging. These work amazing! Less than 1" sag with these combined with the WDH. These took me about 2 hours to install. I did not remove the wheels or the wheel fenders like other have done. Instead, I put the rear end on jack stands as high as I could. Then I lowered the spare tire and removed it leaving me with tons of space under the bed of the truck. I was able to sit upright with room to spare. I then compressed the airbags and folded them in half. I got all the air out and replaced the air cap to keep them from re-inflating. I then used 3 zip ties to keep the folded shape of the airbags. I slid the airbags into the coils through the lowest point. I did this with ease and didn't even need a pry tool like others have described. Once in place, I cut the zip ties off and ran the lines. I ran the lines through the frame to protect them. I used a T connection so both airbags are inflated at the same time. I found an exsisting hole in the frame located between the tailgate and rear bumper to mount the air stem. This makes the air stem a little hidden and not exposed to being broke off accidentally. It's a little cramped for finger space so if you have fat fingers, it would be hard to get to the valve stem. Overall the install was very simple. Use the zip tire method and access the coils from under the bed by removing the spare tire. Don't waste your time removing the tires and tire fender liner. It's a waste of time and more effort than needed.
Axad AR
2013 Ram 1500 SLT 2WD
After much research and deliberation I opted to forgo the Airlift 5000 (when will I need 5000#s of lift?! or even half that in a half ton?!) and the perma-mount process of cutting out the bump stop. I went with the Airlift 1000 to offset some tail droop from my 29' TT. Paired with a weight distro hitch my truck now sits perfect, no droop. Here's the specs with a 7000# TT: 4" of drop with trailer only, 3" of drop with w/d hitch, 1.5" of drop with w/d hitch & Airlift @ 35psi. I got 1.5" back from the Airlift bags and when you're dealing with a few inches, that's huge. AND it stiffened the rear suspension so major reduction in sway and porpoise. More importantly the front end felt more "pinned" to the road by w/d hitch pushing weight forward so steering handling was much improved over the panic inducing sway as trucks passed! Thanks to so many reviewers sharing install tips!!! I took out the wheel wells and spare tire to free up room and install was easy. It took me 3 hours but I'm slow. So far no leaks after a month but watch the pressure changes with temp changes, altitude changes. Overall, I highly recommend this product!!