
- This can remove many moderate to heavy surface imperfections. Works on all colors
- Works like a compound, a polish and a cleaner
- Eliminates surface imperfections
- Wax and silicone free
-
Information
-
Twitter
-
Pinterest
-
Youtube
-
Facebook
Enelrahc Nahilaam
Excellent Product
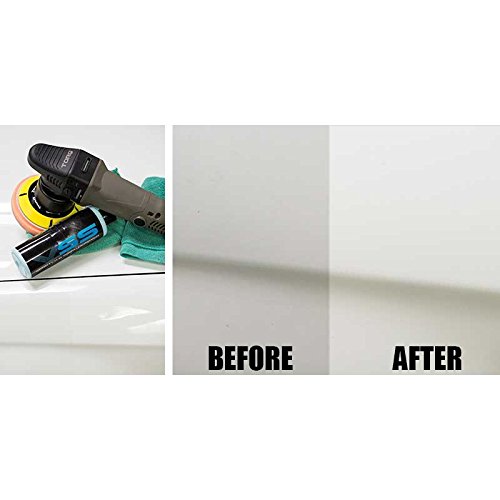
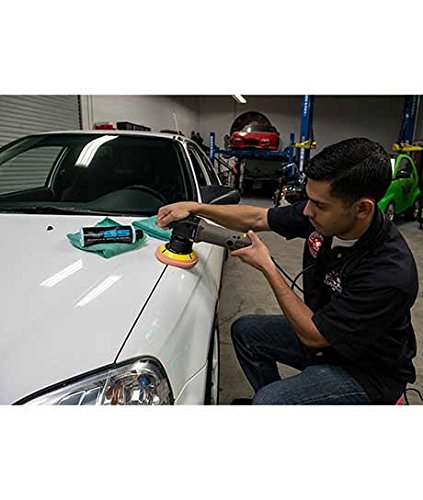
With the proper prep and technique this is a wonderful product. If you're nervous about hurting your paint, study up and go slow. Paint correction takes patience and preparation. I've had nothing but wonderful results, albeit with a beer break or two. Photo shows one pass with this product with a cheap polisher, below the stripe is the before. This was on a 16 year old civic.
Dawud Basharat Yaqoob
Nervous
So at some point I must have scrap my garage.. it let a ugly scratch on my 2016 pilot. When we applied this product I was a bit nervous .. it goes on thick. But my husband watched the chemical guys video on how to apply it.. follow the video step- by -step! The product is think and gritty. I was impressed it got the whole scratch out..
Freelanc King
Excellent for what it’s marketed for
First attempt at doing any kind of paint correction and this stuff seemed like the ticket for my swirlmarked, water spotted, and scratched truck. I bought a cheap Harbor Freight DA polisher, a 3 pack of Chemical Guys HexLogic pads, and this polish. Overall this polish seems to work very well at getting rid of swirl marks, water spots, and light scratches. Had some deeper scratches on the roof of my truck from the previous owners and after one pass with this polish they weren’t completely gone, but they were greatly knocked down to the point that they were much harder to see. Water spots and swirl marks are completely gone. The deeper scratches definitely require a more heavy-cutting polish to completely remove, but the VSS did a great job to disguise the scratches.
Joel Olry
Removed paint damage I doubted could be removed. Happy!
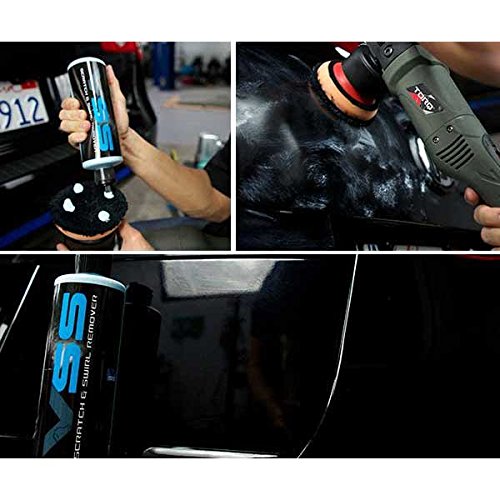
There were two areas on our car with medium damage to the paint. The hood was especially dull probably from jillions of random microscratches in all directions. I sort of wondered if it was even a bit oxidized or even with clear coat worn off. One side panel had scratch damage from something that rubbed that area several times. I clayed the hood before I polished with this stuff. I used a clay "bar" or "pad" on the hood that left a lot of new, directional scratching. I used my Torq 10FX random orbital polisher to work this stuff over the paint. I was Wowed when I wiped it off! Check out my before and after pictures. Pretty obvious which are before and which are after. I tried a tiny area, doing it by hand rather than with the random orbital polisher. Not near the same results and possibly leaving some new light scratching. Maybe that was due to my technique. I removed using this stuff and my RO polisher.
Wendy Gali
Absolute believer
I have virtually no experience doing this. I am however rather tenacious and eager to learn. I contacted Chemical Guys and they gave me great recommendations on what I can do as a novice wanting to detail my vehicle. The scratch which appeared after what I believe is someone dragging something along my door and I really wanted it gone. I bought the Scratch and Swirl remover along with the Torx10x buffer. I followed the YouTube videos of which they have a plethora to learn how to remove the scratch. It was very easy and as you can see from the pictures. I am very pleased with this product and plan to do the rest of my truck using their polishing products. This particular product is an all-in-one as it has mild abrasives that break down as you buff it in. The other products require you to step through progressively less abrasive compounds to get similar results. I had every intention of trying those if the scar was not satisfactorily removed with this one. I was told by a most helpful Robert when I called Chemical Guys that you can use this without a powered buffer but it will of course require considerably more time/elbow grease.
Airic Aie
First scratch remover I've ever had to work.
Applied V-34 and then a layer of this. It removed most of the scratches.
Katie Jo Moore
Great polish for swirls and scratches.
My brother bought a 2000 Sea-Doo. The Sea-Doo was very neglected and restoring it, I thought, was going to be a difficult process. We washed the Sea Doo with some dishwashing soap. I evaluated the paint to see that it was heavy in scratches, oxidation, and neglect. I thought for sure this was going to be a compound, polish, and wax project. I decided to give the Chemical Guys' V- Scratch and Swirl Remover a try. I used a Meguiar's Dual Action Polisher, yellow hex pads, and the Chemical Guys' Scratch and Swirl Remover. We found nice, shiny, and beautiful yellow paint! The rest of the watercraft was polished using the same method. Some spots did need some compounding, and for that, I used the Chemical Guys' V Line 32 Extreme Compound. My brother was pleased to see a shiny machine in front of him. Once the Chemical Guys' V-Scratch and Swirl Remover process was completed; the next choice was what to use to protect the machine. I decided to use Jet Seal since that has excellent UV protection and lasts a long time. My thinking is that the Sea-Doo will be in the hot sun, during the summer, and it will need the protection. We applied one coat on Saturday afternoon and then another coat on Sunday morning. The results are in the pictures. My brother and I were surprised that the Sea-Doo came out so shiny and glossy. Next weekend we will top the Jet Seal with Butter Wet Wax.
Julie Ann Hadoc Torio
You will not be disappointed! Take your time with it and it will work
I must say that after watching the Chemical Guys videos and a few others from reputable detailers I am pleased with the results this S&S provided me. It is a sweet smelling, easy to apply, easy to wipe off product. I used about 1/12th of this bottle for my entire car. I can imagine that those with severe swirls and scratches will need to use a heavier polish in conjunction with this product. I must also state that I did a once over only. It got out most of the swirls and scratches, but I will have to do a much more meticulous detailing in the future. All I can say is that you should take your time with this product, let the paste do the dirty work for you, and all will be good. I wish I had took my time with it a little longer. I used the HEX-Logic foam pads to apply this and they worked extremely well (highly recommend them). All in all, I would use this product again and I plan on using it on my gf's volvo, and the other cars in the garage. In the meantime I am always staring at my car in the sunlight. You will not be disappointed.
Dana Faust
Glass Like Finish, Does Exactly As Advertised, Very Worth It
This review is also coupled with the other products I used as they all helped to get to my final finish. Products used in my setup: Chemical Guys VSS Chemical Guys White Light CarPro Cquartz UK 3.0 Torq X Polisher with Orange Pad for Cutting and Blue Pad for spreading the White Light. Meguires Claybar 200g Griots Garage Iron Remover Mothers Magnesium Polish Used Provided Microfiber clothes from Polisher (from chemical Guys) Now I did not take a picture at each step in the process as the end result is what truly matters and it saves 30 photos being uploaded here. I did inspect the paint at every single new stage and can report for each step. I will do my best to be descriptive with my findings to help all those who come after me. This work is done on a 2016 Summit White Camaro with 34,000mi on it and I got the car at 21,000mi from previous owner. I have about 3/4 years experience detailing but that is not needed to get amazing results, just time spent on the work itself. The first owner did leave scratches and swirls from improper washing but this was all on the surface. My process took my 9 hours not stop start to finish including all curing times and standard waiting period. This work was done on a vehicle stored in a garage overnight at a constant 65 degrees thanks to three heaters. 1. I have the vehicle a wash with My standard soap setup and I don’t believe this had any effect on the end result as it was a simple car shampoo with zero additives but it was ph neutral. I wash my car weekly even up in Chicago winters so I don’t need a strong soap. 2. I proceeded to use the iron remover on all surfaces of the vehicle with little agitation after the dwell time and proceeded to wash off with a spray bottle of water and a microfiber towel. 3. After drying the vehicle I then claybarred the entire vehicle on every painted surface and used regular water as lubricant to avoid introducing extra oils or substances to my finish. After this step the paint was incredibly smooth and contaminant free as I spent pain staking time going over each body panel to make sure every single spot was touched and fixed up. It took awhile but it is all in the prep work when polishing and then ceramic coating as that final layer locks in all your work, and imperfections if you’re not careful. 4. I then took some rubbing alcohol and lightly went over the entire vehicle to ensure a sterile surface and I didn’t feel the paint at this step as I did previously and this was entirely about keeping it contaminant free. 5. I then took out my polisher and VSS and began taking off my scratches and swirls. There are tons of videos on YouTube from chemical Guys to teach you how to properly do this so I will skip the lesson, I did use the Orange Hexlogic cutting pad. After working in small areas and taking my time very slowly I worked panel by panel and I was happy with the little fatigue I experienced from using the machine. At the very end of the day it didn’t feel like I used the polisher for the 5 hours that I did total, very impressed. I bugged off the Polish per the instructions and wait time and was left with an incredibly glass like surface that eliminated all of the imperfections of the paint. This took the longest off all steps and was close to how long my clay service was but I wanted to leave no swirl behind and I spent very long. (A desk chair with wheels or anything to sit that rolls makes your life thousands of times easier than standing for so long) 6. I followed Up the Polish with the WhiteLight and using the polisher to spread the glaze was incredibly easy and a little goes a long way. You use way less than if you did it by hand and it spreads very thin and I used speed setting two for this with no pressure but the weight of the machine to apply. After this step was complete I checked the finish and it was like a mirror, cool to the touch and silent when touching with the back of my hand. I was very impressed and I went into this thinking there was a placebo effect that it’s for white cars it’ll make it pop but I’ll only think so after pouring hours into it and wanting to see a difference. I got two outside opinions from the start of the day to this step and they noticed a massive difference and compared this to a car on a museum showroom it was perfect. 7. I then followed up this process with applying my ceramic coating and this was a very easy process with incredibly fast flash time and the spreading was incredibly easy and a little went a very very very long way. I barely used a quarter of the vile and it always had an even coat that I checked constantly under light to make sure I wasn’t running it too thin. I have a plastidipped black roof and rear section of the vehicle and I tested a small spot first and when there wasn’t a reaction I also coated the plastidip as the box said it’s ph neutral and safe on nearly anything. After applying I noticed the plastidip had a slick feel and was very glossy (I had 3/4 coats of gloss on mine as I wanted the gloss level to match the OEM white) and I was very impressed. The pictures provided are after I finished the entire day with my vehicle, although this was the last step the paint saw. 8. My last steps were using mothers metal polish for my exhaust tips and what an incredible difference it made. I later cleaned my windows and interior and followed up with my engine bay and then my tires. Finished the day with Meguirs Tire Gel and then let the vehicle sit before I drove it for as long as I could that the time of day would allow for. Overall the combination of the products worked incredibly well and each one used for the paint would be amazing by itself and in combination with your other favorite products, I just gave my list of products used to help others as I love reading in depth reviews for these important topics and the amount of products out there. My pictures provided aren’t of the highest quality as I can’t take quality photos and it was a long day and I was just happy to drive my car after. I would entirely recommend the products and the others mentioned and the biggest thing is the prep it takes to get the paint entirely clean and then having the time in the day to devote to this job. I haven’t tested the ceramic capabilities as it has to allow 24 hours before contacting water at all and then it still cures over the next 5 or so days, but it feels and looks amazing. I recommend 100% and I am in love with the look and feel of my vehicle.
Ennixam Ame
Great new product. Has a specific use un offered before
I’m 50 plus years old been detailing my cars for 25 years. There are no miracles products more money won’t bring more shine or more protection. With that out of the way found what this product is supposed to be and do being the perfect fit for this cars first full correction by me after purchasing with 2500 miles as a dealer demo . Truck means a lot of time from wash clay compound finishing wax or sealant or both. I hate that dealerships wash cars the way they do when new they always put some nice swirl marks in the paint you can’t even just take it home and wash and seal . This product is the only one on the market that it only starts at one light cutting compound and works it’s way down to a finishing polish when the product turns clear and water like then disappears . Which for those who are scared to use a heavy cut compound or compound at all not knowing how long and how much pressure this is great to learn with and great for a newer car that dealerships put three tree own crappy old car washes that swirl every car on the lot then park it outside in the elements always needing a good clay unless you buy the one inside showroom. . I applied this with a microfiber 6 inch black polishing dish no cut values to keep the heat down while using a quality da orbital rotary. After seeing the amount of correction with minimum pressure applied your easily able to see just how much more pressure to use . This is for light swirl and scratch removal ! Unless you want to waste time and effort doing two or three passes over the entire car wiping product inbetween which is sence less. But anyway this being bmws black sapphire metallic not a plain black this was a winner as soon as I saw the light metallic pop from the first area I went to work. Chemical guys have a great product here for those who have light swirls and scratches . I followed this up with there ceramic hybrid one of the easiest products to remove and apply and works great as a slight ceramic base coat because I use a spray ceramic after washing and leave a great deep wet gloss the sheets more than it beads . There v series products would be the same as using there last two light to polish numbers I believe it’s 36 and 38 well this is both in one bottle one application. I appreciate a good product and this is exactly what they claim with a little less cutting then they claim so adjusting your pad to a more citing property would take out some deeper scratches which I did in two areas. 5 star nothing wrong with being new at detailing this is a great product to use even more so watching the product disappear tells you your done with your pass.. great shine pictures are all from night and cloudy days. So you can see the depth not the silly picture most take of the Mira of the blue sky when you can se the pair itself is more helpful which I hop some find the review I took the time to right with the time saved us using this product. Had a week of rain on the east coast and the car that would look filthy if products weren’t applied still looks great even with a few raining drives .