
- If your projector Does NOT have a focus motor in it, then this is the kit for you.
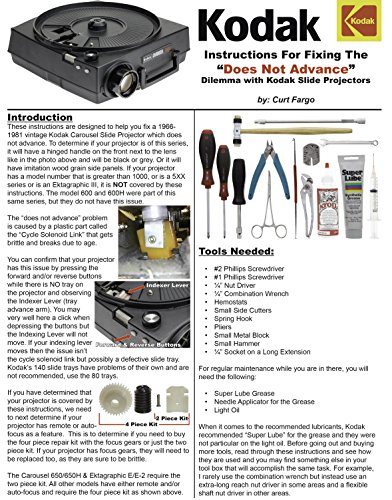
- Most common cause for failure of the slide tray to adv. or rev. is the breakage of the small link.
- OEM Kodak Parts
- Works on all Kodak Carousel Projectors.
- Projectors with Auto-Focus or Remote Focus will need gears too.
-
Information
-
Twitter
-
Pinterest
-
Youtube
-
Facebook
Kath Lyn Dichosa
Good part. Tips to make this repair easier
This replacement part seems to be made of a very stiff but flexible rubber, which made it easy to push into the slot for the bottom plate that the solenoid actuator attaches to. It seems to be much better design than the original part and will likely outlive the machine. This job can be made much easier by simply cutting the metal frame directly above the solenoid to gain access. Structurally the frame is still plenty strong and will save you hours in tear down just to get to the solenoid. Here are the steps I took: 1. Remove bottom cover by removing the 4 screws in the corners. 2. Locate the solenoid and solenoid actuator link (the part you are replacing) 3. Cut the metal frame to allow removal of the solenoid assembly. I used tin snips as I didn’t want metal parts from a Dremel cut flying everywhere inside the machine. 4. Use a 1/4 wrench or socket to remove adjustment bolt or the lower of the 3 bolts. Slide out the solenoid assembly and remove the broken plastic bits from the actuator. 5. Replace with your new part and insert retaining pin. 6. Gently press the repaired actuator link into the bottom plate. A flat blade screwdriver helps. 7. Align the solenoid actuator with its solenoid slot and return the solenoid assembly to the original position. 8. Zip tie any wires that were moved in the repair. 9. Replace cover and test the repair. For the money this part cost, it was well worth it to be able to restore an older carousel in order to digitize many family photos. Good luck with your repair!
Alecia Rakes
Fixed the advance on my Kodak Carousel slide projector! Not for the faint of heart, however.
This is EXACTLY the part you need to repair a Kodak slide projector that no longer advances slides, and it comes with great illustrated instructions as well. That is the good news. The bad news is that it takes quite a bit of dexterity and mechanical skill to do the repair. I am a former computer repair tech so this was not too bad. It still took me 15 or so minutes to get the fiddly bits in place. If you are comfortable with such mechanical things go for it! If not, consider ordering the part and asking a mechanically inclined friend to do the actual repair for you (suitably rewarded with an adult beverage perhaps?)
Tanika Armstrong
Correct part for my 650H. Unfortunately discovered all my 40 year-old slides really suck.
Installed this the hard way (without cutting away the plate covering the solenoid). After fiddling with the solenoid adjustment could not restore an acceptable reverse capability. Perhaps I got the link too tight on the plunger so maybe it would improve with use and more adjustment attempts. But it's not going to get a lot of use unless I sell it because, after reviewing my 600 or so slides after the repair, it turns out I was a really crappy photographer 40 years ago. Self-awareness can be a hard mistress. Anyway, the part worked (mostly).
Billie Tyer
Perfect part
This part saved my Kodak 650H projector from the scrap heap. I almost gave up hope and was going to scan my hundreds of slides to digital. This was a little challenging, but the instructions were spot-on and I was able to get my projector working like a champ again. Worth every penny...even my kids watched my 40 year old slides. Kudos
Jacob Yeet
Easier than I thought it would be
After watching several replacements on YouTube, I thought this might take hours, but actually finished in an hour. Having the recommended tools is important -- 1/4" nut driver, 1/4" open end wrench, small pusher or springhook. The hardest part was mashing the pin that secures the new link to the solenoid plunger; a small pointed punch worked for me.
Pinky Quiban
Easy link and rivet installation, now my Carousel 650H is working again!
I followed the instructions from reviewer OP100 and now my Kodak Carousel 650H is up and running again! I used tin snips to remove the metal covering the solenoid, unscrewed the two screws attaching the solenoid to the mounting plate, and pulled out the solenoid. I did not have to move the adjustment plate at all. Take your time, have good lighting, and you can do this too. The printed instructions and videos are helpful for finding your way around the many different parts inside the projector. Thank you Micro-Tools for providing the parts for these machines!
Hani Jasmin
Assembly of dozens of parts is complicated.
Link and rivet set worked perfectly and included instructions were helpful. However, installing the link requires extensive disassembly of the slide projector and it should only be attempted by mechanically inclined and methodical people. It took me 5 hours and many re-assemblies before I got the installation sequence correct.
Bobby Degina
Part is a life saver
This little part is a life saver and the included instructions make the repair doable but not easy. The repair was easier for me since I have an older 650h without the auto focus.
Angelica Grammann
Good part. Came with excellent instructions and I would ...
Good part. Came with excellent instructions and I would have been done in about an hour except a wire came off of the solenoid which caused me to search and find a long hidden soldering iron but alas, no solder! Trip to the store and I was back in business. Agree that some mechanical ability is needed. I have another projector with the same problem and now that I know how to do it, it should be quicker.
Christine Jay Taaca Damasco
Kodak link and rivet set
replacement part fit perfect, requires alot of patience. Micro-tools sends detailed instructions with photos. Also they have a great video on u-tube. With both of those you can do it.