


- Lumber not included
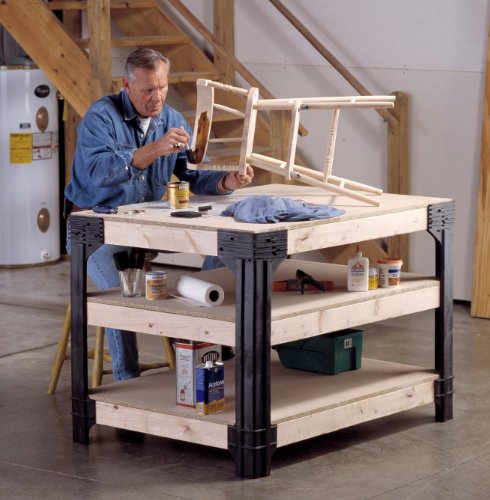
- Includes 4 workbench legs, 6 shelf links
- Brackets made of heavy gauge structural resin
- Customizable workbench and shelving
- Only straight 90 degree cuts, no miter or angle cuts necessary
-
Information
-
Twitter
-
Pinterest
-
Youtube
-
Facebook
Beck Connor
Awesome Bench!
Love it! As a female I was a little worried about building my own gunsmithing bench, but this kit made it a breeze! Took me a few days, but I'm extremely happy with the results. I bought an extra set of shelf links to make the side shelves. Final product is super strong and solid!! So glad I bought this, and so is my kitchen table! :)
Joel Olry
Love this bench!
I was encouraged by the large number of positive reviews as well as the customizing options this kit allowed for. I had an idea of what I wanted going in and this kit provided for that. I cheated a bit by having the folks at the big orange box store cut all my wood for me (big shout out to them for cutting nearly perfect cuts). I used upgraded 2x4s and also used a sheet of 3/4 ply overlaid with another piece of 3/4 sanded birch ply. I wanted a cleaner top look so opted for the two layers. This also allowed for a better grab on my bench vise once I installed that. I also added a rounded piece of 1 1/2'"moulding on the front of the bench to cover the front edge as well as the two different layers of ply visible from the front. More for aesthetics than anything else, but it's a nice look. I had to cut away small areas on each side to allow for the plastic legs braces as the ply sets in behind them slightly. I chose to go with one long top shelf for storing power tools etc. I like the one smaller shelf on the side for smaller tools, bits, etc. I used a Miniwax stain conditioner (highly recommend, especially for birch), and a Miniwax stain and poly as well. I applied 3 coats, as I am going to use my bench primarily for gun repair/assembly and wanted to avoid fluid stains, etc. I don't suspect I will be beating or scraping the crap out of my top, so the poly works for me. If you're doing carpentry, metal work, etc you may choose to avoid the poly. I added some galvanized pegboard also found her on AMZ and a few small storage buckets and hardware containers. I added a shop towel holder on the side for clean ups and of course had to add a bottle opener on the front. I added a nice LED shop light across the top and at 5000 lumens, it provides more than enough light. I will add a magnifying glass lamp at some point for the detail work. Overall, love this bench. I probably spent more than I would have if I'd just gone out and purchased a complete bench. But I wouldn't have it customized the way I like it, and would've missed the fun of building it myself. Highly recommend to anyone even remotely handy. If you get the wood cut elsewhere, it's very easy. As others have mentioned, get a nice power drill and a few Irwin Quik Grip clamps if you're assembling yourself. Can't do it without those. Enjoy.
Krystal Mincher
Easier than building from scratch...
Made a nice little reloading bench out of mine. It's 48" x 27" and built this size since the short side 2x4's were cut at 24". Only problem with a bench this small is there's no room for the top shelves to mount without taking away most of the bench top. Sturdy and strong and the shelf spacing allows you to place your feet on the bottom shelf when loading. Mine isn't bolted to the wall either but is still very rigid and secure. Truth be told I could have probably bought a nice pre-made bench for what this one cost as built but I wouldn't have the satisfaction of building my own except for the legs. If I ever move I don't think I'll go this route again.
Kyle Harris
I love My Table
Really easy to build with a design that self tightens the frame as you go. I really liked that. I had Lowe's cut the plywood for me because I wanted a really straight edge. They cut it out of square and I used a 2 x 4 that had a 10 degree twist in it and the table compensated for these screw ups as I assembled it. I prepainted the wood before assembly and it really dresses it up nicely. The shelving can be added at any time, if needed as well as a 3rd table top. I am impressed with the ease of assembly and how an amateur can look like a pro with this table. Another great feature is how light it is and how easy it is to move. The strength and tightness really impresses me. I think I did a pretty good job for the little time I put in this project. I love my table. Update: I added a 2 x 4 from the front to the back leg on each end of the table. I then attached a set of four 2" wheels to the 2 x 4's. It rolls like a Rolls Royce. The addition did not impair the table strength at all. I just had to be careful where I drilled the holes in the bottom of the legs.
Gail Conley
New bike shop work bench, A++++
I was able to buy the lumber, cut and build this in about 3-4 hours. I spent the rest of the weekend staining and wiring in lights. I am very impressed with the results, very easy and simple build. This is my new workbench for my bike shop, now I am ready to replace the old benches in my garage with this system. Super sturdy, just a great product in my opinion.
Marisa Salas
great concept, great product makes a great work bench in my case
Great concept, simple to put together and some many ways you can put it together and use it. I used it to build a very solid work bench in my garage and while I could have bought 4*4 for the legs this just was easier and made the workbench easier to build and leveler. Was amazed at how fast it went together. Also had enough extra to make another shelf and then used extra 2*4 to make more shelfs actually this is an update. on 7/8/17 I liked the first one so much I bought a second one. to build. I used peg board as a back on both of them and on 1 I wanted to be able to sit down somewhat at so I didn't run a front 2 by 4 across at my feet but back 1 foot. I used the top as a guide as I had it cut at home depot. I also used led lights from amazon to light up the work benches I installed them on under the upper shelves. Lastly I used a Belkin 12 plug in, 12 foot cord switch to use to plug in all tools etc. I already had them but they came from amazon originally. It worked out really nice. I did use 3/4 birch plywood for the top of the bench and 1/2 birch plywood for the rest of the bench and then stained it and am sealing it with several coats of sanded poly so its nice and glossy with a very hard thick finish.
MD Rana Usman
Incredible system!
I ordered two of these systems and was pleasantly surprised at how easy it was to assemble. I built two separate bench types, one mainly as a storage rack and the other as a workbench. I made both benches out of 3/4" MDF and standard 2x4x8s. I sent the tops of the benches and shelves to a local truck/van conversion place and had them LineX the wood. It really turned out looking awesome. I took the time and bought bins and numbered each bin. I created a chart that identifies what each bin contains (batteries, light bulbs, etc.). The bench system is much nicer than the shelving system. It certainly serves its purpose but not as perfectly as the bench system.
Anmol Khan
How many ways, to customize this bench?? Keep counting!!
Wow, where do you begin to review? I researched this product, before I purchased and I have not been let down. There are so many great configuration for this bench, so I though I would add my own. I needed the work top to be 4 feet by 2 feet, to fit the space I needed. I pre cut and painted all the pieces before I assembled, per suggestion of a previous reviewer, which made the painting process less of a hassle later. I attached 4" wheel casters, which clears the bench to roll. I should have purchases at least one locking pair. Oh well, works great for now. I wanted leg and foot space underneath the bench to place a chair, so if you need wood dimensions for the angled cuts, feel free to contact me. I attached a photo of all the screw, washers and such I used on top of the included hardware. Everything in the pics are included in the Amazon box, of course except the wood. I installed a light switch which is hard wired to the Stanley power strip. The work bench light is plugged into the power strip. I purchased an adjustable Bar Stool from Amazon as well, which was cheaper and more functional than all the other "garage stools" I looked up. Overall, I liked the ease of construction, although it actually took me about four days. I am no carpenter, but my father in law brought over his miter saw, which saved tons of time (to me). I left the top shelf the same size as the work bench to put boxes on top. I think it looks like a pagoda! lol I used all 3/4" plywood on the flat surfaces and 1/2 plywood for the work space backing. Thanks for looking! I hope the photos do it justice. Requested parts list below: For the casters: 4" heavy duty casters. Screwed to wooded angles (I used 2x6 cedar wood, left over from an arbor) with 10 x 1 stainless steel screws and 1/4" washers (see photo). To mount the cedar wood, I used 9 x 2-1/2 Particle Board screws (see photo). The cedar wood was placed where I wanted it and marked (see photo), to make sure my casters cleared the rotation. Then I just cut the wood at a 45* angle above the mark. Not rocket science. To make the lower shelving supports: (see updated photo with measurements). I screwed them together with the particle board screws. Two per each contact point. When I finished making the "wings", I just traced the edge on the loose piece of shelving to mark where I was going to saw my cuts. Once the shelving piece was cut, then I screwed everything together. Bottom shelf, middle shelf, then top shelf, each held down with 6 x 1" Drywall screws spaced about 12" apart. The lower legs and upper 2x4 pieces were all screwed with the stock screws. The Light: From Home Depot - Model # MNSL L48 2LL MVOLT 40K 80CRI M6 Internet #300263608 Store SKU #1002098190 This light has to be wired. No wiring is included. You have to purchase a three prong wiring kit, as long as you need it. I plugged it into the power strip.
Endia Wilson-Evans
BEST IDEA SOMEONE HAD.......
I looked everywhere......Walmart, K-mart, stores all over town and amazon and could not find a good HOBBY DESK to have the space i need for one or 2 3D Printers and an area to put to do my sanding and airbrushing. i did find a few good ones on amazon for $700 and up but i thought that was TOO MUCH. But then a friend told my about the 2X4 basics so i looked it up and saw it was perfect.even came out better than i thought it would. I saw the other guys pics and read up on it and thought what the heck spent $58.99 on the kit.....$74.00 on GREAT LUMBER( could have got cheaper lumber for the desk for $40) and a light kit for $21.00 (Efrank 4 Pack Round Panel LED Under Cabinet Light, 1 Watt Per Light - Warm White) a peg board for $15.00. so spent a total of $168.00 and I believe it CAME OUT GREAT...but like i said i could have went for cheap lumber but it is a hobby desk so i got GOOD ply wood for $30 not cheap ply wood for $5 a sheet and could have got some $10 push lights but got the good one to see good when sanding and using my air brush. I do not do alot of reviews but I had to let people know this is Worth the money.
Jean Tang
Great Design--Flexible but Eliminates Guesswork
A big advantage of this design is it makes it relatively easy to produce a straight & level bench on the first try, since the pre-fab legs do much of the work for you. It’s also extremely flexible and customizable. For my workbench project I needed something sturdy, affordable, and flexible enough to fit the space in my garage workshop. After searching in vain for a ready-made bench in local stores, I ordered the 2x4basics #90164 kit through Amazon. The kit came quickly and was complete (all screws, instructions, etc). I bought a good grade of framing 2x4s and some half-inch plywood. But before starting assembly, I looked for ideas in Amazon’s customer photos and made a few design modifications. For example: a cutout in the center shelf for legroom; omitting the first shelf above the bench; adding backstops to the bench top and overhead shelf; and making the overhead shelf from half-inch plywood vice 2x4s. I also opted not to run the overhead shelf the full length, to allow more uncluttered vise workspace on the right end. The included #8x2” deck screws seem a little delicate, so I substituted #9x2.5” construction screws for better stiffness; the extra length wasn’t a problem, as the screws go in at an angle to pull everything together tightly. For the bench top, I used a 1.75” thick solid-core door with a birch veneer, found (slightly damaged) at HD for $40. It’s screwed down to a sheet of half-inch plywood on top of the whole assembly. It’s heavy and as sturdy as I’ll need, and provides increased work height and an overhang for clamping. I decided to go a little fancy, so I finished all the visible wood surfaces in some sweet-looking blue and cherry Minwax stains. I topped off the stain with multiple coats of polyurethane, then started assembling. The actual assembly went quickly and smoothly with my wife’s help. The directions are pretty good if you don’t mind the comic-book-style pictograms. I added two strips of LED worklights under the top shelf, then placed everything in front of an existing pegboard wall for easy tool access. Overall, this project was fun—I took my time and probably went a little over budget on the niceties--but I’m really satisfied with this bench and think it will provide many years of service.