
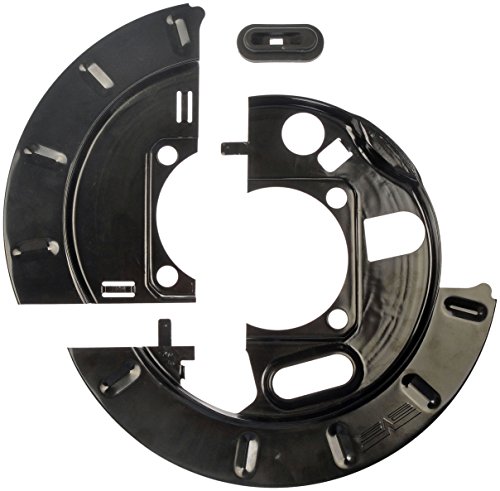
- Time-saving design - the unique split dust shield design reduces install time an average of an hour per shield
- Longer service life - corrosion-resistant steel construction protects brakes from elements and debris
- Precision-engineered - has undergone dimensional verification and salt spray testing to ensure this part conforms to product standards and quality
- Trustworthy quality - engineered and inspected in the United States
- Ensure fit – to make sure this part fits your exact vehicle, input your make, model and trim level into the Amazon Garage
-
Information
-
Twitter
-
Pinterest
-
Youtube
-
Facebook
Kenneth Latham
It's like a mind game puzzle
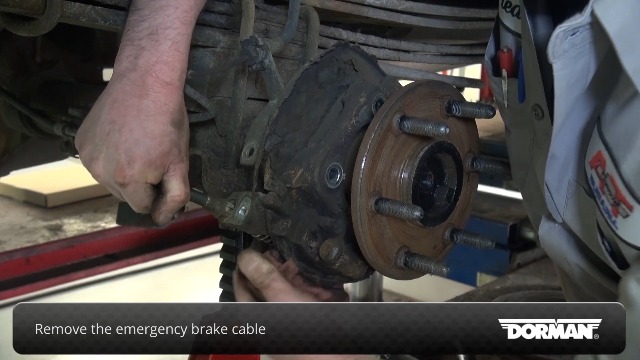
I have a 2000 Silverado with the optional 10-bolt 3.73 ratio rear end. My original shields were completely gone except for what remained of the square flange. Don't take any shortcuts. There are a couple excellent youtube videos by 1A Auto Parts that show the shield replacement and how to remove/install/adjust parking brake shoes. Remove EVERYTHING... Remove the brake caliper and bracket. Remove the bracket holding the brake line. Remove the parking brake cable. Remove the parking brake shoe and retainer clip. Then when you take off the four large bolts you can separate the bracket from the flange on the axle. Be sure to dig out all of the old bracket chunks. If the square flange from the old shield is still there, you'll need to dig that out too and cut it to remove. Blow out the debris with compressed air and make sure the threaded holes are clean. The large half of this new shield is tricky to install. If you just slip it between, you will not be able to get the emergency brake holder through the hole. If you put the emergency brake flange through the hole then you won't be able to get the shield onto the axle. You have to rotate and push at the same time. The shield should not have to bend if you do it correctly. The smaller half goes on next and the two tabs fit into the slots. You can start the four bolts at this point, but DO NOT FORGET to slip the rubber boot over the emergency brake hole first... it gets sandwiched between the shield and the casting. The slot in the boot must line up with the hole in the casting too, so check orientation before tightening. There are two other metal tabs sticking out. REMEMBER to bend these toward the wheel or the disc/drum will rub on one making a terrible noise. If your drum/disc is heavily rusted, clean out the slot with a large screwdriver as this is where the flange of the shield rides inside. You might have a bump of rust rubbing on the shield if you don't do this. Should take a couple/few hours to do both sides. There was paperwork in the box that says not to paint these or re-coat them... that Dorman provides a lifetime warranty on rust-out.
Lady-Lynda Leigh McKie
Works great
I received these quickly and installed them on a 2004 Tahoe. A few things to note. The first side you do will take you about 3 hours start to finish. The second go around, not as long. Here are a couple of tips that will make the job go easier for you. 1. Remove the emergency brake shoe. It comes off with the help of a screw driver, around the hub. I was trying to install the backing plate with the Shoe still on (but unbolted). No can do. 2. Have an 18m wrench. You'll need it to remove the axle bolts. 3. I cut the old one off with a pair or tin snips. Some people on here use a cut off tool which is fine too. 4. Notice the direction of the E-brake lever. If you put it in backwards, you'll have to re do it. Don't lose the pin in the E-brake cylinder when the caps pop off. You'll see what I mean when you remove the Shoe. 5. The new Shield goes right on. If you are forcing it or bending it, you're doing it wrong. The E-brake cable spring is a pain. If you have strong hands, you can pull the spring down and pull the cable out at the same time. A screw driver in the spring is helpful too. This is not a hard job, but it is a little time consuming if you haven't done one. There is a you tube video by Dorman if you need a reference, but it's short and not very detail oriented. Feel free to ask any questions.
Bart Bicknell
They fit My 2000 Chevy 1500 LS Suburban with two hours work
They fit as advertised, but there was quite a bit of work to get these installed. Once the old shards of rust and debris from the deteriorated shields are removed, these will eventually go into place. They must be installed exactly in the correct orientation or they will not seem to fit correctly. They did not need to be modified in any way to fit. The issue is that this is a tight area to work in with several components like the parking brake cables to deal with. I eventually used the parking brake hole as the guide and this made the second one easier to install. I had thought this would take a few minutes each to install, but it was more like two hours. They next time will be quicker. Be patient and these will work.
Ajay C. Arellano
2003 1500 Avalanche Z71
Some comments on the my install of this product: The part is the same for left and right side. It just mounts at a different angle. The photo shows it orientated for mounting on the left wheel (Driver's Side). For the Right side (Passenger) it will be mounted rotated 90 degrees from the image. To install these you will want to disconnect the parking brake cable. There should be a point where the parking brake for the passenger and driver's side come together. It is along the outside of the frame rail about under the cab roughly where the driver sits. There is a nut that can be removed to separate the cables. I mention this because you will want to coat this with penetrating oil before you start so it can soak in for a bit. Maybe hit it a day before you do the work and hit it again a couple times while you are working on the truck. This will have to be disconnected to get enough slack in the parking brake cable to install the shield. Other than that it is pretty straight forward. Takes a bit of messing around to get the shields in place because it is a tight fit but they will go on. Try not to bend them. One of mine (first one I installed) got tweaked a bit when I was trying to get it installed and it caused the rotor to rub on it a bit when I turned Left. The squeel went away in a couple days. Much better option than pulling the axles out as you would have to do in a single piece design replacement part. Also the rotors may be a pain to remove if your parking brake has been dragging which is very common. I really don't like the drum parking brake design that GM has.
Nigel Gorbunow
Great product, not the easiest to install
I give it five stars because it is a great product. BUT the first time around it took me literally about 2 and 1/2 hours to figure out how to place it into the proper spot. Dig in... be prepared...if you swear then you're going to swear a lot if you don't swear then you're going to start swearing. it isn't easy. unless you've done it before. For the driver side it took me about 20 minutes after I done it the first time on the passenger side. I wish I'd taken pictures when I was installing it to help out people that were in my position. all I can say is that you have to have the two square edges of the larger piece of the dust shield that slide into the square bracket in positioned at the same time that you have the parking brake bracket slid into the dust shield. it involves angling each piece several times to get it exactly into the correct position before you can slide it in. It's not easy even if you know. if you don't know then you might reach a point in time when you think that you have the wrong part. I spent a good amount of time on YouTube but there aren't really any good videos out there.
Brenda Gleason
Solution to NOT Having to Pull Axles
I've now used this split piece setup on three vehicle repairs- replacing rusted out one pieces - you do need to do a little finagling to get them in but once you have started they'll slip into place. So much easier than trying to install the one piece and having to do ALL the extra steps especially removing the rear diff cover, running the risk of breaking that small bolt on the pinion to separate and slide out the axles
Travis J Strachan
Tips on installation
I installed on a 2000 Silverado1500. There were no installation instructions included with the product but there are many videos out there. Start with watching them. - All the videos I saw showed to remove the parking brake cable from the cable bracket. I could not get the cable off the bracket so I just pulled the e-brake arm (at the end if the spring) out of the e-bake assembly. - Do NOT force, bend, hammer, or beat the dust shield to install it. It may take a bit of time but just work the angles and with a bit of patience it all of a sudden just pops into place. - Most important - After installation BEND one of the tabs with a flat blade screwdriver - During the test drive there was a significant rubbing sound. As such I had to jack up the truck and remove everything to get the rotor off to inspect the shield. There is a retainer/guide tab that was rubbing against the rotor. See my picture to determine the tab I am referring to. If you zoom in you can how this had been contacting the rotor. I tried a 10 mile drive to grind it off but during turns the grinding noise would continue. We'll see how it holds up in a MN winter but the nice thing is that it has a life time warranty against rust out.
Amanda Jean
It fits, but you gotta finagle it.
The Dorman 924-213 shield fit my 2003 Chevy Silverado short bed 4.3L regular cab. The first one was difficult to figure out how to assemble. Key thing: you have to remove the brake line bracket as well as the parking brake cable to have any chance of installing it. There is a C-shaped notch in the larger shield piece that has to be first fit over the portion of the casting that the parking brake clips through. Then you wiggle the shield back and forth and it magically slips into place. Then you attach the smaller piece of the shield with no problem.
Alex Loredo
fast shipping and easy install -- GREAT PRODUCT
I dreaded the job of installation for a few days but when the package arrived I knew it had to be done. This was my first time working on this particular type and without books or further instruction I installed the new shields in 3 hours - both sides including the removal of the rotten factory shields. they look and feel some what flimsy but after installing them they are even more sturdy then the factory. The only problem I had was forgetting to bend the location tabs over and even that was a 5 minute fix. I love the part and will be buying and or referring these to others
Cyndi Lu
The Split Plate is the way to go for this job.
Excellent quality and perfect fit. But two. First side tool an hour- second side took 10 minutes. Bought OTC 6970 drum puller. Could not budge drums off of the axle. Wrote a review on this tool. I decided to use the the split dust plate as removing the axles to install the replacement one piece plate was not part of the plan. Seriously- remove the axles when a nice, well made split plate is available? This is the way to go for this job. Worst part was removing those less than well placed 18mm bolts that hold the brake hub on the axle. Thanks GM. You could have put an access hole on the brake hub. All that being said, the job turned out nicely as the parts from Amazon fit perfectly.