


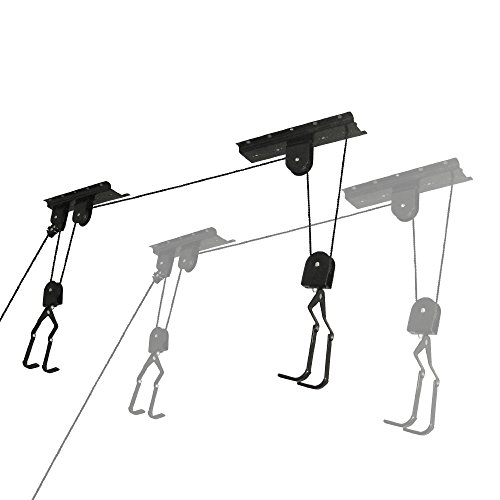
- Hooks are designed with a rubber coating to protect your bicycle from scratches
- Robust engineering allows you to lift heavy bikes-100lbs capacity
- For Ceilings up to 12ft
- Safe locking mechanism prevents accidental release
- Not the same as our competition; we use thicker rope and offer a lifetime warranty
-
Information
-
Twitter
-
Pinterest
-
Youtube
-
Facebook
Ajay C. Arellano
I made mine adjustable
First, the hoists work fine and I think I got them at a fare price. No complaints. The other comments here are worth reading. There are some gems in there. For those with unfinished spaces, this might be useful: EddieT mounted his hoists to his rafters which got me thinking. I mounted mine to a section of 2x10 and put that ABOVE my joists. I needed space for the rope to run so I mounted 2x2 rails along the sides. This allowed the rope to move freely below the 2x10 and above the joists. I cut the 2x10 and 2x2's about 50 inches long, screwed them together and then mounted the hardware so it would fit in between the joists. The bikes I have measure 31 inches from handlebar to the back of the seat so that was perfect for fitting in between the joists (16 on center). I made the whole thing at a work bench in about 15 minutes. I ran the rope through before putting it up above the joists. I took another 5 minutes to put it up and fiddle with the rope to get everything setup correctly. I didn't have to screw huge lag bolts into my joists. I will probably be getting a different bike so I wanted to be able to move/adjust the whole thing without having to unscrew anything (except the cleat). I don't have to worry about it falling and it gets the bike all the way up....the seat is hitting a joist. If I ever move, I could take it with me. If I decided to finish the garage, I could just take it down and then mount it to the bottom of the joists. Anyway, this might be a useful idea for someone so I thought I'd share.
Johnny Banks
Great bike mounting system that uses garage space efficiently
Because of the low price-point, I was a bit concerned with the quality of the hardware but upon delivery, it looked good to me so I went forward with the install. I decided to go with the Rad Cycle install option and use lumber to help fortify the installation and I chose 2x6 to do so as both the bikes I will use on the hoists are cruisers and pretty heavy. I won't go through some of the same information you've read in other reviews but instead, will offer some information that I found along the way. - The screws they provided (to mount hardware to lumber were fine). You just need to drill the correct size pilot hole and adjust your power screwdriver with a low torque setting and take your time. I like to finish the screw by hand but the important thing to do is go slow and easy with steady pressure. Pay attention to the instructions as well. What I mean is that when I mounted the first hoist, I used all the screws mounting the hardware to the lumber. Afterwards I realized that the instructions said to only use four for that hardware and to use the rest for the other hoist and for the string cleat. Doh! No biggie as I had a bunch of wood screws already. - Make sure you cut the rope with the bike in the lowered position. This was my biggest screw-up with the install. After going through everything and feeling great about the install, I cut and finished (melted) the frayed ends (with the bike raised). The next day, I lowered the bikes and discovered that I had cut the rope to short. Luckily, the kit comes with a HUGE amount of rope and the pieces I had previouslycut were long enough to re-string and correct my problem with. I ended up having to re-string with everything mounted but it was really pretty easy and only took about 15 minutes to do so. - I mounted the bikes right above my cars hoods. I feel confident in my install but the part that scares me is relying on the plastic parts and mounting hardware of the bike's seat. As a safety net, I used tie-down straps to hook onto the bike frame and a metal hook. This gives me a back-up in case the seat fails. You may also want to tilt the handlebar end of the bike up a little higher when in the hoisted position because of the manner in which the hoist's hooks are placed under your bike seat. Anyhow, I'll put some photos up and hope this helps future installers...
Maria Louise
Used Them to Store a Couple of Kayaks
I had previously purchased these bike hoists to store a couple of mountain bikes in my garage. I have been looking for quite some time for a way to store two kayaks and found all of the kayak lifts to be too expensive. So I got the idea to order these bike hoists and try to use them with my kayaks. I am happy to report they work great and now I have a way to store the kayaks out of the way. To get the hoists to work with the kayaks, I took an old loading strap and cut it into too pieces, both long enough to go around the kayaks about 1/3 in from the ends. Then I sewed and glued them into each into a circle. Once around the kayaks, the bike hoist arms fit under them to lift the kayaks. In addition, I tied a small rope between the two loops in case the kayaks tilted during lifting. Without this safety rope, if the kayaks tilted, one loop would come off and the kayak would fall. Really happy using these as kayak lifts, and the price compared to kayak lifts was great!
Kenny Brown
Low cost and huge space saver!!!
I purchased the first set of 2 earlier this year so I could hang my son's MTB race bike and my MTB bike making more room in the garage. They are nicer bikes and wanted to protect them when they are not being ridden. After I bought my wife's bike, I ordered the second set of hoists for her bike and my cross bike on order. After reading other negative reviews posted by others here is what I found. 1. People claim their bike slips off the hooks... Move the hooks from the seat to the frame. (I'll post pics of mine) some seats are very thin and do not allow for the hooks to hook enough material, but you should have plenty of frame to attach to. The hooks are bendable and very strong. 2. The complaint that bikes go up unevenly is not the fault of the hoist. Depending on the bike, the weight of the bike can differ from front to back. Buy a balanced bike or as you hoist the bike, hold the lighter end down as you hoist it to the ceiling. If you have adjusted the hooks or hooked the bike securely it will not slip off. The bike will also level itself to the ceiling at the top in the event you are unable to guide your bike up. 3. Ceiling isn't tall enough... Can't help you there. My ceiling is about 9' and I can pull the hood of my wife's full size Dodge Ram truck under the bikes. 4. Hardware that comes with the system is ample enough to fasten to the ceiling joists in my garage. I was fortunate enough that my joists ran in the direction I wanted my brackets. If you run perpendicular to the joist, use a 1x4. It is very easy to use, my 10 yo son can raise and lower his bike on his own. In short, I love this product. $20+ to protect several thousand dollars worth of bikes is easy math.
Sieku Chiri Sambu
Great product and a great price for a 2 Pack. Get it!
Directions were easy to follow. The other reviews here on amazon were helpful. Here are my tips/thoughts for you. 1. Use a 2x4 or a 2x6 to mount the pulleys to. (Get a 10 footer at a hardware store and most places will cut in half for you if you don't have a saw) 2. Throw the bags of screws they give you in the trash. They are terrible and you'll strip them before they are sunk into the wood. Get some deck screws while you are picking up your wood. Also get some lag bolts and washers to mount the 2x4 or 2x6 sections on to the joists. 3. Run the lines through the hooks and the pulleys before you mount it on the ceiling before you mount it. Tie the knot in the end of the front bracket before you mount it to the 2x4 or 2x6. I had to undo mine before I realized this would be easier if done before hand. 4. The nylon line included is super long. With the bike down give yourself a foot or two to use to pull the bike up and cut the rest off. Use a lighter to melt the end of the line where you cut it to prevent it from unraveling itself. 5. The hooks work fine and I did not need to bend mine at all. Just measure the distance between your handlebars and the back of your seat as the instructions indicate and you'll be fine. I can swing my bikes while they are mounted and they are not coming down. 6. The line brake works great but people are right I could see myself replacing the lines after a few years use. 7. The system is easy enough that my mother in law had no problems raising and lowering the bikes.
Willam Tonelli
Great space saver
I bought this to save space in my garage my bikes don’t have kick stand so I flip my bikes on there handlebars and seat when not in use. I used a 1x4 because my ceiling height is only 8 feet and i needed ever inch. My original plan was to installed my bike up right from the tires so I could get the handlebars and seat touching the ceiling. Whiched worked but I had to balance my bike upright until the pulleys started pulling up But when I finished my install I noticed I had ample amount of room to hang them upside down I used a pvc pipe to hold my tires in place as seen in pictures. It’s great. (I didn’t trust the seat method) Now when I come in from a ride I flip my bike over connect the hoist to my tires which give me 2 free hands to operate the pulley system. With the 1x4 and connecting to the tires my bike is about 9 inches from the ceiling.
Jared Hans Atienza
Great space saver and plenty of headroom!
I ordered two sets of these to hold two adult bikes and two kids bikes ranging in sizes. All required parts were included and the set up was pretty simple with clear instructions. I have 10 ft garage ceilings and these fit nicely. I have a 2016 Kona Splice hybrid and at 6 foot tall I am able to just barely walk under it without hitting my head. My garage is walls and ceiling has 3/4 inch plywood sheets so it was easy to mount without having to worry over additional boards or the worry of hitting main beams. The operation is very smooth and even my 9 and 11 years old can do it without assistance. the hooks are adjustable and move with easy to adjust for any size handlebar spread and or seat set up. These are an absolute must for anyone with limited storage space or anyone who wants to use their garage for its intended purpose of housing your vehicles! major plus is where I mounted these towards the front of my garage I can still pull my Ram 2500 in without the worry of hitting anything on the cab. The only advice I have for anyone installing these is to not make the first mistake I made by lifting the bike all the way up, mounting the tie off bracket with several wraps of the string and then cutting the rest so its not in the way. I quickly found out that it takes a lot more string to lower all the way to the ground than I would have thought! Thankfully there is way more string included than is needed for my 10ft ceilings and I reran the string with the extra and just had enough on my first attempt. Lesson learned and not to the fault of the product at all!
Emmie Lou
Great Bike hoist to get it off the ground and reclaim garage floor space.
Great Bike Hoist for my Garage. I had bought two adult size bikes and was crowding up room in front of the car, I have about a 12' ceiling, so this worked out great. A 7ft person can easily still walk under the bike without an issue. I bolted this right into the ceiling joist that happened to be running the way I needed it, if not I wouldve just mounted a perpendicular stud to it first then the hoist brackets to the new stud. Im happy with it. No issues except with no bike on it and if someone (like your kid just tugs the ripe and takes the hoist hooks up, they dont come down on its own, there isnt enough weight on its own, it needs about 5lbs to get down. No a big deal. I think I want to get another set of these for the 2 kids bikes, get them out of the way as well. And it is truly easy enough to use, my 11yr old can do it, so I agree with other reviewers saying their younger kids can lift the bike up and take it down.
Jimmythat Carroll
The 4 Bike Hoist Project!
Bikes were taking up a LOT of floor space in the garage, so, what to do?? My wife suggested building something to take advantage of the free "air" space, and voila, the "4 bike hoist platform" project began to take shape. We wanted it to look "built-in" versus "tacked on", so...details: 1. Build the frame with 2X4's on the ceiling joists. Had to measure, use a stud finder, and confirm with a "poke" through the ceiling that we found the joists, but successfully installed the frame. 2. Added a 3/4" MDF plywood sheet over the frame to mount the hoists on. This was HEAVY...two person lift, but I used "cheat strips" hanging below the frame to slide the MDF on and then screwed it in place. 3. Added 4" baseboard around outside of frame, finished the baseboard with cove molding to "blend" into the sealing, then painted it and caulked it. 4. Mounted the two hoist pieces (for each set) 32" apart, about the standard width from the rear of the seat of the bike to the handlebars.Then mounted each successive hoist and made sure they lined up with the 16" centered frame pieces under the MDF plywood.Marked six holes per hoist piece; ended up buying #10X2" wood screws to mount the hoist pieces...not enough screws to do that many mounting holes included in the package. 5. Threaded the rope through each pulley piece, and lowered the pulley pieces to load each bike. 6. Alternating front and rear facing bikes, lifted the bikes in place. This took about a couple hours of planning work, then about 6 hours of building/mounting work, but the finished product definitely looks a bit more "finished" than 2X4's bolted to the ceiling. I would consider the hoists themselves quite durable and definitely stout enough to hold anything from sleek and light road bikes up to heavier downhill mountain bikes, and everything in-between. Very pleased with the installation...highly recommended!
Xyza Yoradyl De Vera
Easy for a child - stores bicycle and Green Machine
The screws are WORTHLESS and will strip. Use your own wood screws, $1.97 for 50 at Walmart. The cleats provided aren't large enough to wrap the entire rope around, which would be nice just for keeping it clean and organized, but this stuff isn't worth dropping a star over. For the price, you can't beat it. ~$20 for TWO hoists is well worth it. Saved me time from creating my own pulley or rack system. WOULD BUY AGAIN. The pulleys and rope appear to be great. The rope will likely need replacing over time, but that depends on how much you use it. Just like raising and lowering window blinds, a 10 year old girl was easily able to access and put away her bicycle, as well as an awkwardly shaped 3-wheel Green Machine. In the photo of the green machine, the ladder is raised to just over 6ft and there's enough clearance for my Ford Edge liftgate to fully open. As others have said, find studs and secure a 2x4 to the ceiling. Make sure it's secure. Pull on it, with force. Make sure it's IN the studs and won't go anywhere. I cut mine to 30" in length in the picture. Then, attach each brace with 8-10 screws into the 2x4. The instructions provided are simple and straight forward. You need to tie the rope on one end. I went into the 2nd to last hole, tied a knot, then brought it back through the last hole and tied a double knot. If one gives out over time, the other should hold. Not much to it.