


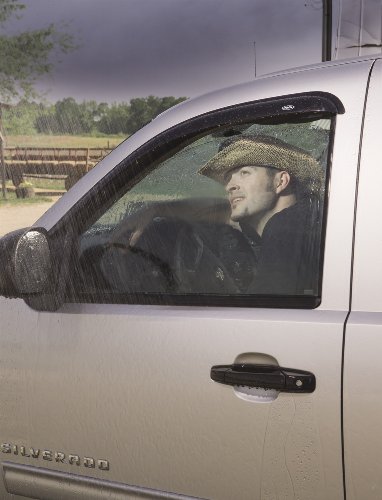
- Lets fresh air in and keeps rain out; Allows fresh air to circulate removing stale air and odors
- Reduces interior wind noise and mirror fogging; Allows window to be cracked, reducing heat build up in parked vehicles
- Precision-engineered and custom molded for an exact fit; Tinted, reinforced acrylic is UV and scratch-resistant
- No special hardware or drilling required, attaches with 3M automotive-grade adhesive
- Proudly made in the USA and backed by a Limited Lifetime Warranty
-
Information
-
Twitter
-
Pinterest
-
Youtube
-
Facebook
Kathy Mumford
Look Great Work Great but do no follow instructions explicitly Guards ...
Look Great Work Great but do no follow instructions explicitly Guards actually attach to Plastic "Bezel Area" and not to painted area as instructions indicate in several instances. It would not be correct to place them on the actual "painted area" but rather you will be placing them on that Plastic bezel area! *2014 Chrysler Town & Country
Nancy Ward
Great product! Missing tape on one visor
I've bought this brand for several of my vehicles over the years. Never had an issue with them coming off. Just bought a new van and ordered these immediately. Took an extra day to get here. (3 days) The other problem I had is that the front passenger side did not have any tape on the visor at all. Completely missing. I had to run to the auto store and buy some 3m tape in order to install these. I don't think this is the sellers fault. Definitely missed in the inspection before being sealed. SMH. FYI. The tape is sold at your local auto parts store for about $8 for 10'. More than enough to do just the one. It's just the point that I paid for a product to come ready to go.
Makenzie Rossman
Perfect fit, great price, looks Great!
These look factory installed. Be sure you THOROUGHLY clean the area you will apply these to. You want a very clean surface when you mount these with the included adhesive. Do ONE window at a time. IE, clean one, then install on that window. Then clean & install on the next one. The included adhesive backing is very strong and will hold these perfectly, even thru car washes, storms, high wind and heavy rain. I have had them on for a year now, going thru an automated car wash 2-4 times/week (Uber Driver). This is some fantastic adhesive. Here's how to properly install, using my overly detailed instructions: 1) Wipe with a clean dry rag 2) Wipe with alcohol (use a different rag) - Don't be alarmed when your rag gets black....the alcohol will naturally remove a VERY thin layer of paint particles. (my van is black, your rag may look red, etc) 3) Lightly wipe again with CLEAN dry cloth 4) Test fit - DO NOT remove adhesive yet! -- Just hold them up and make sure you have the right item for your vehicle. Fit my 2012 Chrysler T&C perfectly. 5) Pull 2" of backing from the adhesive on each end of the visor 6) Place the ends where they need to be - Do NOT press to apply the adhesive yet - Line up the entire visor in the proper position 7) Once placed how you like it, press the middle to get out any bowing, then gently press the ends to hold them in place, then reach in & pull down one end of the adhesive backing until it's all exposed. Do NOT press it all down yet! 8) ***Make sure it's still lined up***, then firmly press down on the entire thing. Start at the ends (the ends are the most important placement visually) then press in the middle, then move along the entire length. Enjoy your new window visors. *Notes* - The bottom end of the front window visor actually tucks behind a plastic panel near the rear view mirror. Don't panic, it does not make the plastic panel stick out and it will not break anything. In fact both of mine were already loose enough and had enough play in them that I could easily insert the end of the visor behind the panel without any effort or prying at all. This seemed to be normal for that panel. - After mounting these you will always need to manually wash the part of your window that is immediately under the visor. Automated Car Washes will leave that part of the window dirty. This isn't a problem, just take a cloth and wipe that part after any automated washes.
Vicky Henry
Works like a charm and looks great.
They look and work great on my 2014 Chrysler Town and Country. I've already noticed a difference in the interior temperature when I leave the windows cracked. NOTE: take your time installing them. The adhesive is sticky (as it should be), so make sure you position them correctly before pressing down.
Marjorie Marie Webb
Great quality product
Fits perfect. I love being able to leave my windows cracked just a bit.....I live in Florida, and you just can't keep your windows all the way up, and expect to be able to get into your vehicle comfortably. But, Florida also has frequent rain showers.....so this is the perfect solution.
Tasha Trix Keyzel
Fit's great and helps keep the interior cooler while vehicle is parked in the sun...
Put these on a 2014 Chrysler Town and Country. Super easy to install (just make SURE to clean the mounting area good, and plan to have some extra cleaning alcohol because the tiny alcohol swabs aren't enough to get the job done). I have these same vent visors on 3 of my vehicles... and would have them on the 4th if they made them for old International Scouts! Definitely helps keep the interior cooler when parked in the sun and I don't have to worry if it unexpected starts raining.
Katherine Rossborough
Fit My 2010 Chrysler T&C Perfectly.
The kit was easy to install. First, make sure to dry fit the parts. The parts will fit fine - just so you know how they indeed fit together. Just make sure the vehicle's mounting surface is clean (wipe well with provided alcohol swabs) and take your time before pressing the pieces down. It took me about 15 minutes altogether. They look fine. One minor thing: Mine seem to have a static electricity thing about them and attract surface dust. I would expect that will go away in short order.
Austin Hughes
I should have gotten them sooner!
I've been wanting vent shades for the longest time & am glad I finally did! They're awesome! I had a friend install them because I don't have the patience for detail work & he's a perfectionist. Also, he'd put this same brand on his car. He said installation was easy & straight forward. Since we both have the same brand, you're getting 2 reviews in one! Great on a car (his) & on a minivan (mine). Get some!
Kaye Hughes
Perfect fit. Best results with 2 people working together
Fantastic purchase. BEST AS A TWO PERSON JOB. So happy I looked at the little lettering on them because they say clearly which visor fits to which door. Just a quick wash wipe down of the frames where they stick and was easier than expected. Really was much easier with my husbands extra large hands to help see the top of the doors to stick the visor. I'm sure I won't flinch at the idea of buying these for my next car
Keith Wages
Great product!
Fits perfectly with our 2013 Dodge Caravan. Does its job. Lets fresh air in even when raining. Enhances the looks of our minivan. Note when installing: Do NOT take the adhesive cover right away. Place it first against the windows to make sure you know where they should be placed before actually installing it. When installing, do NOT press it hard yet. Just let them sit until you have 'temporarily' placed all the visors. Then make sure you have positioned all visors correctly before hard pressing them (permanently installing them). Once you have stuck them it is very hard to take them off if you have made a mistake.