
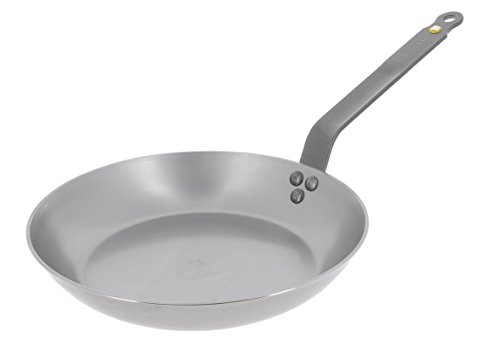
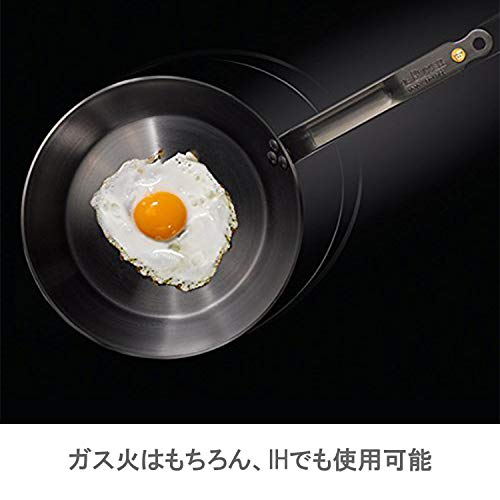
- 100-Percent Natural and 99-Percent Pure Iron
- Guaranteed without PTFE or PFOA and no chemicals added; naturally non-stick after seasoning
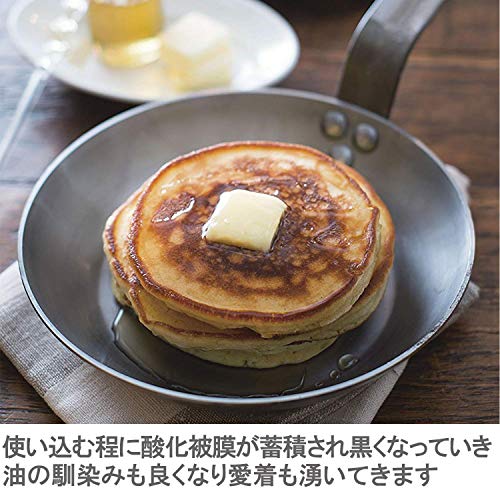
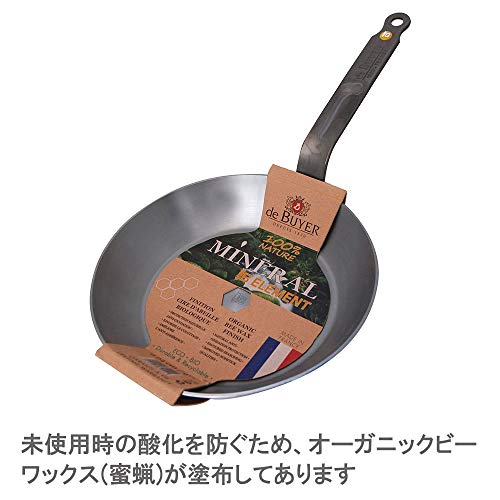
- Bee Wax was discovered by deBuyer as a by-product in nature to help protect these pans against oxidation and assist in seasoning
- Care : don't put it in the dishwasher, deglaze with hot water for washing, use coarse salt for sterilizing
- Made in France
-
Information
-
Twitter
-
Pinterest
-
Youtube
-
Facebook
Senad Mustafovski
Excellent pan!
This pan is IT! I've purchased 2 of the Matfer Bourgeat pans since they had the best rating from Cooks Illistrated, but They both warped and had design flaws that made it hard to season. DeBuyer is wayyyyy better! I love that it's a natural beeswax coating instead of a toxic film. This made it easier to clean off and whatever remained wasn't a concern for me. I used Flax Oil to season with. Admittedly, I've never been the best seasoner, but this is my best job so far and I give the credit to the pan. I also love the helper handle and the fact that the regular handle is precoated. There at e no grooves inside the pan so food glides right off, even eggs.
Laura Harris
Fantastic pan at high or low heat.
These are sturdy and heavy with about half the weight of equivalently sized cast iron. On receiving the pan I scrubbed out the beeswax coating on the inside of the pan with hot water and soap. I then added about 2 Tbs. of olive oil, took the temperature up to 300Fº, and cracked an egg into the pan. It stuck for about 30 seconds then released and made a perfect fried egg. Clean up was a swipe with a paper towel. Today I sautéed ham, onion, garlic and celery for soup. At the end there was the typical brown crust in the pan. A quarter cup of cold water in the hot pan and a spatula swipe or two, the result added to the soup, and the pan was clean after a single wipe with a paper towel. This is not even seasoned yet and I can unequivocally say it is the best pan I have ever owned. My pan collection includes cast iron, all clad, aluminum non-stick, Mauviel copper/stainless and french copper/tin.
Lukas Lintner
Best frypan ever
Best frypan ever. I love my Lodge cast iron, it gives me great steaks, but DeVour carbon steel pan is far-far away better. It is heavy with thick bottom and sides, it evenly holds the heat forever. Lucky me, I've got euro-version of 12.6" pan with 2nd round handle. Somebody said that for US market 2nd handle is available on biggest 14" pan only, and any smaller pan comes with only straight long handle. 14 "must be a beast, but seems like 12.6" is also big and heavy enough to must-have 2nd handle. Anyway, DeBuyer Mineral B Element Iron Frypan is so awesome so I just immediately start looking for smaller version about 7", and flat crepe pan 9". Here are few "unboxing" photos so you may see the quality and style even of the packing materials
Suneetha S
Good Bye Cast Iron, Hello Carbon Steel!!! De Buyer Mineral B Element is beautiful.
Purchased this pan because I own two smaller size De Buyer Carbon Steel pans and love them. They are not Mineral B Element though, so I purchased this one simply to check it out. I am familiar with the seasoning process already but watched the De Buyer video on youtube anyway. Glad I did. There is a French Chef using this pan to sear and cook steak, Julian zucchini and carrots and then make a gravy. My gravy looked more like flour dumplings but the steak and veggies were the best. I used a 2.5 inch dry aged ribeye steak. The trick with thick cuts is to sear on high heat for about one minute on each side and then lower the heat and continue cooking. While the steak is resting, use the pan to sauté your veggies. ( I used butter for fat for the steak and veggies. After seasoning for the first time this steak did not stick and neither did the veggies. Next I will try to fry an Egg. On my smaller crepe pan after seasoning I was able to make the best crepes without any sticking. Way easier to season than cast iron and way lighter. Which makes clean up supper simple. PS. I can not make a comparison to any other carbon steel pots or pans because I do not own any other brand. I do believe De Buyer is the top of the line.
Preethii Kuumaar Patnaaik
7 Steps to Seasoning
First off: If you cannot lift heavy pans, don't get these. Instead, I'd opt for high-quality stainless. And if possible a stainless/copper. With that said, these are truly a lifetime investment item if they are taken care of. Once it's seasoned, you cannot cook a better pan-fried steak. One of the best pans I've used thus far, and I've owned a restaurant. There are a few suggestions for seasoning. The company's seasoning method is fine, but it's more ideal for a restaurant environment where the pan is being used multiple times a day...thereby creating a very quick seasoning layer from cooking alone. I have found though that cooking at home is different, and the maturation can take much longer. So, I want to share with you what I do to achieve the best and most successful seasoning of my Debuyer iron pans without the sticky residue or uneven seasoning. I'm certainly not the authority on seasoning, but I hope this helps. What you will need: Water, 3 potatoes washed well, flax seed oil, sponge, and a spare dry towel(s). Currently, Amazon sells cast iron flax oil - just do a search and you should find it. Otherwise, you can find flax oil in your local Whole Foods or other markets. INSTRUCTIONS: 1. Once you receive your pan, place on burner and fill nearly to the brim (leaving about 1/2" from the top) with water. 2. Next, add peels from approximately 3 potatoes. Make sure the potato is washed really well so that you don't get dirt form around the edge of the water. Let boil for 15-20 minutes. You'll notice the water beginning to darken after about 10 minutes, which is normal. This step helps remove the beeswax that is added before shipment more effectively. 3. Pour out the water. You may notice a black line where the water level was, that's also normal. Use a sponge to lightly scrub the pan under hot running water, focusing on the sides and around the rivets. You are just finishing off the beeswax that was left over after boiling. BTW: If you have dark spots from the potato peels at the bottom of your pan, no worries...it's normal and not necessary to remove completely. Towel dry and return to burner. 4. Turn your burner to high heat, and then place up to 2 tsp. of flax oil (depends on the size of your pan) in the center of your pan while it's cool. Make sure to turn on your exhaust fan if you have one. 5. Rub a very thin layer of the oil around the entire inside of the pan with a towel. Make sure to soak up any excess oil, but don't soak up all of it. This is very important, because too much oil will ruin the seasoning process. And not enough will make the process seem like its achieving nothing. Heat until it smokes oh so slightly. *Since the timing is so different from one stove to the next, I suggest you allow it to smoke slightly only as a visual to know that it has reached a hot enough temperature. *Do not leave your pan on the burner without watching it carefully. Again, allowing the oil to smoke a lot is not a good thing and can ruin the seasoning. You will notice it darkening to a dark caramel color, maybe even a reddish-brown tone, but not yet black. 6. Allow to cool. 7. Repeat steps 4-6 until your pan is nearly black (approx 5-7 layers). Finally, begin cooking! If your pan is really sticky after seasoning, you have added too much oil, the pan didn't get hot enough, or you need to repeat the process. You may have a slight stickiness after seasoning is finished, but that's fine. It's the thick residue you don't want. NOTE: Your pan may not be a perfectly even tone once you're finished, and that's okay. Just cook. It'll be fine. These pans tend to vary slightly from one to the next in terms of their finished color. The only thing you should be worried about is if there are strange smudges in the pan. If that's the case, then you may need to scrub off those smudges and start over. Because over time those smudges may flake off. It means that too much oil accumulated in those spots and caused a truly uneven seasoning layer. BAKING THE SEASONING: I do not find seasoning by baking a good idea unless you are experienced at doing it. For most that aren't it ends up failing. This can cause a lot of unnecessary frustration and wasted time. I really want people to have the easiest experience and not be discouraged, thereby switching to non-stick inferior pans for sake of ease. I also don't suggest switching oils during your seasoning process as some tips may suggest, because it's not necessary when you use flax-seed oil. You have to take into consideration that each oil will have a different burning or smoking point, therefore mixing the oils is not a good idea in my opinion. SEASONING MAINTENANCE: You can repeat one layer of seasoning after each batch of food in the first month or so, or intermittently. This will ensure a nonstick surface that is sure to last through just about anything. The more you use your pan, the more the non-stick surface becomes. Your pan should be completely matured, depending on quantity of use, within two or three years - sometimes less if you use it a lot and properly. BTW: You'll know when your pan has matured when hardly anything sticks to the pan, and you don't have to clean it with anything other than a paper towel after cooking. Sometimes you may have to use hot running water and a soft sponge if you cooked something sticky. Other than that, the pan is very low maintenance once it has matured. And as with all pans, just watch the outside of your pan making sure that it doesn't get a thick layer of buildup. This outside buildup affects the heating aspect. It can cause uneven cooking in some cases. So, just be mindful of that. You can clean the outside of your pan with Bar Keeper's Friend if necessary. ***Always remember to oil your pan after each use*** LET'S COOK! Your first batch of food should be a meat as this will speed up the maturing process. Most will start with eggs to see if the seasoning is working. This may be disappointing if you don't allow a crust to form on the eggs before flipping, so just be mindful that it may not act like T-Fal initially. And remember the seasoning hasn't fully matured yet. The maturing process takes time. However, once it's achieved your pan should be completely non stick only requiring a paper towel and maybe some hot running water to clean it up. DEEP FRYING: Deep frying food can quickly season the pan, however there is a possibility that the seasoning will begin to flake off around the middle of the sides of your pan if you deep fry often. This is caused by very high heat. If this happens, don't panic. Just take a non abrasive sponge under hot water and lightly scrub off the small bits of loosened seasoning. Then, return to the burner and add a few layers of seasoning to the exposed area to keep any rust from forming. IRON AND HEAT: Remember that iron continues to rise in temperature, thus you can easily burn your food. You will need to get to know your pan in order to find out when to adjust the heat. Regardless of what I'm cooking, I almost never set my heat to HIGH unless it's stir fry. It just doesn't drop in temperature fast enough before burning something. Also, if you add anything cold to your pan it will be stuck initially. Like I mentioned with the eggs, you should wait until it forms a nice crust in which it can be easily removed or flipped. CLEANING AND COOKING UTENSILS: Wait for several batches of food before you use a metal spatula. If you notice small scratches in your layer of seasoning after cooking from your cooking utensils...don't worry. It will darken over rather quickly and should not cause any issues. Flax oil seasoning isn't real soft, but it isn't indestructible either. So, just be graceful at first. To clean your pan do not use soap and water. The good thing about seasoning initially with flax is that the layers are very hard, and even if you happen to use soap and water, it shouldn't completely destroy your seasoning. With that said, I still do not recommend cleaning your pan with soap and water. Hot water is perfectly fine. Do not use metal scrubbers - only the basic sponges with the more gentle scrubbers is recommended. Clearly you will have times when it is necessary to be more aggressive, and that's fine. Just don't feel that you haven't seasoned your pan enough just because you have some sticking. Remember... true seasoning doesn't occur immediately. It takes time. If really stubborn food is stuck to your pan after cooking add HOT water, bring to a boil for about 30 seconds and scrub stuck particles with a wooden utensil. Dispose of the liquid, rinse and towel dry. Afterwards you'll need to place a light layer of oil in your pan and heat the pan just barely to the smoking point. It's not a good idea to boil water often as it will slow the maturing process. Additionally, one tip suggests to place course salt in the pan to sanitize it. However, this can scratch your surface rather quickly if it's the beginning stages of your seasoning, so use that tip cautiously. I really hope this helps you. Good luck, and happy cooking!
Lori Kirkpatrick Finney
KING OF FRY PANS!!!!
PROFESSIONAL'S CHOICE in a truly 'permanent' non-stick fry pan! ~ This was my THIRD purchase of one of these ultra-fine pro-chef's fry pans, the first of which was the 14" size followed by the 10" size, both of which I am extremely happy with! ~ This 12" pan gives me more versatility and has been the size I have been using most, depending on how much I'm going to cook. ~ I have a Cuisinart ceramic-lined pan that was non-stick for about a year but has lost that ability the same as all the other 'non-stick' pans that I have had in the past, thus I will never buy another! THESE DeBuyer Mineral pans are TRULY non-stick on a permanent basis, by simply following directions on caring for them! Expensive, yes, but well worth the $$$$ seeing that these pans will outlast you and will be handed down to future generations! NOTE: The photo in this ad shows the 12" pan with an assist handle added which is wrong, as THAT is the European model; the one you will get is the export model which only has ONE straight handle. ~ Personally, I like the single handle better on the pans lesser than my 14" which does come with a much needed assist handle due to its weight. ~ You cannot go wrong in owning a DeBuyer pan!!!
Crystal Trofholz
I love my cast iron
When I first got this pan, I was extremely excited. I love my cast iron, and this seemed like the natural step up. So imagine my surprise when I tried to season it like cast iron, and then with the first thing I cooked, the seasoning flaked, the food stuck to the bottom, and my fingertips were bleeding and pruned from having to attack it with steel wool. Naturally I began to hate it. But not wanting to write off my expensive new purchase, I decided to do a little research. Skeptical, I seasoned it by puttting a couple cups of grapeseed oil, a few cups of salt, and a handful of potato peels in the bottom, put it on the heat, and waited for the oil to smoke. Let it cool back down slowly by reducing the heat a tiny bit every few minutes. Let it rest until it was completely cool, then poured off the weird concoction I had seasoned it with into a jug for proper disposal. Wiped it clean with a piece of cheesecloth and then set it aside for a while, not wanting a repeat of the first experience. Finally the day came when I wanted to cook crepes. Lacking a dedicated crepe pan, I pulled this behemoth from the cabinet. For good measure, I filmed it with some oil, heated it to smoking, then turned the heat down to a more appropriate crepe cooking temperature. And holy cow, best crepe cooking experience ever. Being carbon steel, the bottom doesn't warp the way aluminum non stick pans do, leaving me with perfectly flat, thin crepes. No sticking or tearing. Now this beast is my go to saute pan. It is definitely the only piece of kitchen equipment I have ever owned that will let you know immediately, and with emphasis, when you are not treating it right. If you don't film it with oil when you are done with it, it will rust. If you don't film it with oil and heat it to smoking before you cook, your food will probably stick. It looks ugly as it patinas. Acidic food will destroy your patina if it is not sufficiently well established. But if you treat it right, and give it the respect and maintenance that it is due, it will be the last and only saute pan you will ever need. It will not warp, it distributes heat evenly through its thick base, it retains heat like cast iron. Now that I know what I am doing, I can't believe I ever used anything else. For: 1. People who are passionate about cooking 2. People who have the patience to maintain it properly. All in all, this is not any more time than it takes to scrub a traditional pan, but it is different, forcing you to develop new habits around its use. 3. People who cook a lot. This thing is an investment, and will outlast just about anything else in your kitchen. Your great-grand kids will be using this pan, and will likely pass it down to their great-grand kids. Not for: 1. People who lack the time/patience to initially season it and let it develop a good patina prior to making marinara sauce 2. People who can't lift heavy things (seriously, this thing weighs probably 12 pounds) 3. People who don't cook that often. It needs regular use to really begin to shine. 4. People who want super attractive, clean looking cookware. While this thing develops its patina, it is one of the ugliest looking pans I have ever used. Now that I have used it a ton, the bottom is a handsome matte black, but the sides look, well, less than appealing.
SecretoMoney Na Power
Seasons Beautifully And Is Well Made
The De Buyer Mineral B is an excellent, heavy steel skillet. The handles are solid and well riveted (although of course that means there are rivets inside which is a bit of a minus). The handle is VERY long and stick ups more than most pans. I would make sure the pan & handle will fit in the oven rack you want to put it on before your pan is full of hot stuff. It is also coated in some sort of epoxy to provide a cool touch handle (most of the time). The handle is supposed to be good for oven temperatures, for about 200 degrees C (or about 400 degrees F). If you cook for long times in ovens hotter than this - then this pan may not be suitable for you. I used hot water to scrub the interior wax coating off and then used the 'quick season' method of frying a pan of potato skins in salt and oil (I used Grapeseed, flax is better but harder to find and more expensive). After cooking the skins to dark brown crispiness (i.e over cooking them) the bottom of the pan was well seasoned. Toss the skins of course, they are a sacrificial offering to the seasoning gods ;). Then the ultimate test, I re-heated the pan (tip: a drop of water should skitter and disappear when the pan is hot) and a pat of butter then an egg was added. After waiting for the egg to brown a bit on the bottom it released with just some gentle nudges from a spatula. After the flip just the tiniest bit of egg stuck and it scraped off with a single swipe of the spatula. The egg was sliding around the pan after a bit more cooking and a gentle nudge. This is Teflon levels of non-stick and this is after ONE seasoning pass. Well made, reasonably priced, egg sliding after a single round of seasoning - can't ask for more than that unless someone invents 'helium steel' that is lighter.
Lucky Day
I love this pan
I love this pan. I use it mostly for searing meats before braising or roasting, but I also alternate it for regular use with my Lodge cast iron. I don't even use my tri-ply pans (calphalon's all-clad competitor) anymore because once you get these seasoned you can scramble eggs on them. I followed various instructions to season...if I could start over I'd just do the one where you: 1. coat the pan in a very light coat of oil (I just used normal veggie oil...people have plenty of opinions on what's best but veggie worked for me and it was no hassle) 2. put it in the oven 3. set the oven to 450 4. wait ~4 hours 5. turn the oven off 6. let the pan cool 7. repeat as necessary it gave my pan a nice dark bronzey coating and after doing it a couple times then cooking plain ol bacon (no sugars or glazes or anything) a few times I can scramble eggs no problem. One thing to note: do not touch the handle until it is cool because it appears to have a silicone coating...not a huge deal but when i went to pull it out of the oven my mitt left an imprint.
Youcef Aid
Great pan.
We have 3 different DeBuyer Mineral B frying pans. There is a lot of information on the internet about how to season them, etc. The idea is to give them a protective coating and then cook with them and not have stuff stick. Seasoning can be fairly casual. A number of people think you need 10 coats of a certain oil and that the inner surface should be a seasoned black like cast iron. This is a misunderstanding. A simple heating cycle or two with oil should suffice. How you cook with it and clean t makes more of a difference. Our pans are jeeps. There is no pretty patina. They are wiped out before use, oiled and heated up hot before food goes in. The heat is what really keeps the food from sticking. Butter heated hot is enough to keep omelettes from sticking. For cleanup just wipe out. Oil and coarse salt can scrub it if necessary. Put a light coat of oil on the pan before hanging them. Ours stain. The patina changes daily. They are very care free and worry free. People that see them usually say something like woah where did you get these. The French know how to make great pans, great knives, great wine and great art. Give these pans a try.