


- CUSTOMIZE YOUR LIGHTS - Add convenience and customization to your home with the Honeywell Home ECONOSwitch 7-Day Solar Programmable Light Switch
- HELPS SAVE ON YOUR ENERGY BILL - Scheduled programming allows the Econoswitch to turn your home lights and motors on and off automatically, helping you save both time and energy
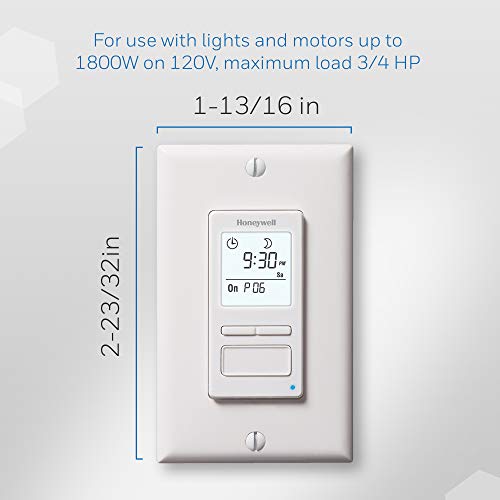
- CONTROL MULTIPLE DEVICES - Schedule your motor-operated appliances such as ceiling fans, bathroom fans, pond pumps, and pool pumps in addition to all your home lighting (one switch per home installation). 1800W, ¾ HP on 120v
- SIMPLE PROGRAMMING - Easily program up to 7 on-and-off schedules per week that can be repeated daily or weekly. 3-button interface makes programming simple
- VERSATILE LIGHTING - Compatible with LED, CFL, incandescent, halogen and fluorescent lighting for outdoor or indoor operation
- EASY INSTALLATION - Painless and straightforward installation saves you time. Cut power at the circuit breaker to avoid electric shock. Simply remove your existing switch, install the new ECONOSwitch, and apply power at the circuit breaker*
- MULTIPLE MODES - Manually control your lighting or let the ECONOswitch run automatically on a programmed schedule
- CONVENIENT UPDATES - Automatically adjusts to daylight savings to ensure that your programs run correctly and on time. Programs protected during power outages. The Random Setting turns timed light on and off for extra home security while you’re away
- SLEEK DESIGN - Sleek wall mounts blend in with virtually any home interior and a large backlit screen provides clear viewing at night
- DIMENSIONS - 6.7 x 9.1 x 1.9 inches
-
Information
-
Twitter
-
Pinterest
-
Youtube
-
Facebook
Rita Grech
The Best Outdoor Light Timer
I've used this for years on my front lights to welcome us home. In the driveway an infrared type light makes sense, but on the front lights using this timer in the automated setting is best. Installation: I fist use a contactless voltmeter to find the Hot Wire (has 120v current) hooked up to the light switch and mark it with nail polish. Then go turn off your circuit breaker. Next go an connect the BLACK wire to the one which you just marked with nail polish. You will need to find your neutral, which is generally white and NOT connected to a standard two pole light switch. Just find the neutral and some white 14 gauge solid white wire and create a pig tail; then connect it to the white wire with an electric wing nut. Lastly, connect the blue LOAD wire to the wire which was connected to your switch. Sometimes you might have a green wire which was a ground wire. I just loop it around the screw as I reinstall all the wires. I also tend to wrap everything in electric tape as I go to ensure no shorts anywhere. Go to google maps and get your current location, you will need the first two numbers of your Lattitude and Longitude. Press the big frond button for 3 seconds to enter configuration mode and follow the single directions. It's mostly updating the year, month and day, next the time and lastly the latitude and longitude. Lastly I don't like the back light on all the time, so I turn that off. It still glows for 8 seconds whenever you press any button. I use the defaul P01 which turn on at sunrise and off at 11pm in your time zone and automatically adjusts for day light savings time. This is a very well made unit. I've noticed they've been increasing in price but purchased an Amazon Warehouse deal which was perfect, never used but just broken packaging. It saved me a few bucks and worked perfectly.
Jo Jenssen
Great programmable switch.
I was scared that this project was going to cost me more by hiring an electrician. But after reading the instructions and watching youtube videos on installation I took enough courage and decided to tackle this myself. Turns out, it was super easy to install. Mind you, I'm installing this on a brand new house and wiring may differ. I purchased this light switch because I wanted to have my porch light on a timer. I leave early in the morning and get home late at night and I want it to seem that someone is at home. Also, I never have to worry about having to turn it on and then forgetting to turn it off. This light also has a sunrise/sunset feature based on longitude/latitude which you have to input. It also has a random setting in case you are out of town and want the light to randomly turn on/off and confuse a would be thief. Lastly, it has the conventional programming. The light switch looks killer too. Highly recommend!
Yvonne Campbell
Easy to Install, Just pay Attention to Electrical Wiring.
Installed two programmable switches in 30mins. I am not an experienced electrician so I had to educate myself on what the various wires do. Hopefully this will save you some time. This switch requires three wires. The "Line" or Hot wire (usually black), the "Load" usually blue/red and Neutral (usually white). My old switch that controls porch light only had two wires installed, Line (Black) and Load (Red), but I found the Neutral (White) wire tucked behind. After connecting the Line and Load wires, the switch did not power on. So I reversed the Line and Load wires and it works. Programming is straight forward. I like the fact that I can have my porch light turn on at sunset and off at sunrise based on actual time of sunset which you enter latitude/longitude of your location. Basically set it and forget ti. Uploaded photo of old switch and new switch.
Debra Sanders
Great timer for my chicken coop door
I love this timer. I’m using it to operate an automatic chicken coop door I designed and built. My favorite thing about this timer is that I can set it to close the coop door up to 70 minutes AFTER sundown so no stragglers get stuck outside during the night. I also have the timer programmed to open the coop door 60 minutes BEFORE sunrise. I can adjust those sunrise and sunset offsets individually, in 10 minute increments up to a total offset of 70 minutes. When setting up my timer I entered my latitude and longtitude, day, year, month, and time into the timer and it told me when sunset would be. And it was only 3 minutes different than what my weather channel app said sunset time would be. I went to google earth and had it zoom in on my location and it told me my exact lattitude and longitude . I also turned on the daylight savings feature so the timer should adjust itself all year long. The timer has a capacitor that will act as a battery backup for up to 4 hours in the event power goes out in my area. Another great feature of this timer is that to override the timer and make my open door close, or closed door open, all I have to do is simply press the large button on the front of the timer just once. Another neat feature is a tiny blue led light on the front of the timer that lets you know it’s currently sending power to the load (to my door in this case). The only part of the instructions that I thought was not written well was the section about the backlit display. In my opinion, The instructions should say that you can turn the back light off (but it will turn on for 8 seconds when you push any button on the timer), or you can have a constant, always on, dim or bright backlight on the timer’s digital display. Since my timer is in my coop I only want the display to light up when I push a button on the timer. I don’t want the backlight on all night, irritating my chickens . I spent a long time researching timers trying to find one with all these features and I’m extremely pleased with this one.
Nadine Dauphin-Simmons
An excellent product and better in design than other switches I have used!
Cory D Young
Works great, easy to install
I love this device. We set it up for our outdoor lights for the front door, and now the lights turn on automatically at sunset, or a configurable amount of time before or after sunset. And they turn off automatically, too, according to how I configure it. It works great. It replaces a standard "Decora" wall switch, fits behind the same wall plate. Looks very nice (sorry no pictures). I've installed these in different houses, and when people see it working, they absolutely love it. People ask me "where'd you get that?" and "can you show me how to install one of those for myself?" Everyone seems to like it. If you leave for work sometimes when it's dark, and sometimes return after dark, it's nice to have the lights come on automatically for you. This switch can do that. There are two aspects to installing the switch. 1. the wiring 2. the configuration. Neither is difficult. The wiring is ~slightly~ more complicated than installing a dimmer switch, but not much. Specifically, you need to be able to distinguish between the load and the line. If you don't know what that means, then get some help installing it. As always, turn off the power before fiddling with electrical stuff. After you wire it up and replace the faceplate, you configure the thing. This is easy, but you need to have good eyesight to see the little screen. There's a relatively simple menu system that allows you to set up the on / off times. The instructions that come with the switch are easy to follow. It takes about 5 minutes to figure out the menu, and then another 5 minutes to program it to come on when you want, and turn off when you want. After you set it up, there's nothing else you ever need to do. It just works. Highly recommended. BTW, for those unclear, the RPLS740B is white in color, and the RPLS741B is almond. That's the only difference.
Cyndi Lu
Read this review for detailed installation instructions
I really like this switch. Works as described. And for only having 3 buttons, the using interface and navigation is surprisingly very well done. If you've installed or modified an outlet or switch before, you should have no problem installing this product. If you haven't done this before, then the process is still doable, but it'll take you longer while you get confident working with the exposed wires and figuring out which wire goes where. Don't be scared; as long as your circuit breaker is off, you can't get hurt. Here are the steps I went through to install the switch. Your process will likely be similar. --PREP WORK-- 1. Turn off the circuit breaker at the electrical panel. Just turning off the switch is not good enough because at least one of the wires in the box would still be live. 2. Unscrew the existing wall plate. 3. You'll see that the switch is screwed into a blue box. Unscrew the old switch from the blue box and pull it out a bit (with the wires still attached) so that you that you have access to the wires and the space behind the switch. Don't worry, the wires are way less brittle than they seem. Unbend them instead of pulling them if you're paranoid. 4. (Optional) If you need more space to work in the blue box and/or you don't have easy access to the white neutral/return wires, you might need to unscrew and pull out the other switches that are there. I had to do this because the white wires were folded up behind the other switches. 5. Bear with me. 5a. Long story short: You should have two black wires attached to two different screws on the old switch that you're replacing. Figure out which one of these is the line and which is the load. Mark or identify them in some way. 5b. Long story long: One of the black wires attached to your old switch supplies power from the electrical panel to the switch. This is called the 'line.' The other wire, called the load, is connected from the switch to the light itself. When the switch is off, there is no electrical connection between the electrical panel and the light (between the line and the load). When the switch is on, you are physically connecting the line and load, which allows current to flow from the electrical panel, through the switch, to the light, then back through the neutral/return wires (which are white), eventually returning to the circuit panel. For typical boring switches like the one you're replacing, it doesn't matter if the line or the load is on the top or bottom screw of the switch. All that the switch is doing is connecting the two separate wires; doesn't matter if current is flowing up through the switch or down through the switch. However, it does matter for the Honeywell Econoswitch (and any other fancy programmable switches). This is because programmable switches are always using a little bit of power to display the current status, keep accurate time, charge the battery, etc. Therefore, you need to make sure that turning the switch off will disconnect the light from the switch and not the electrical panel from the switch. Okay, now in order to actually figure out which black wire is the line and which is the load, I personally turned the circuit breaker back on, made sure the old switch is in the OFF position, and used a voltmeter by putting one lead of the voltmeter on one of the black wires/screws of the old switch and the other lead on one of the ground wires that should be hiding in the blue box somewhere. (The ground wires are easy to spot because they have no plastic insulation around them.) If you do this and you get no reading on the voltmeter, then the black wire you're touching is the load (connected to the light). If you do get a reading, you have identified the line (connected to the electrical panel). Just to be sure, you should test the other black wire on the old switch to check that you get a different reading. Again, keep the other lead of the voltmeter on the ground wire. You could also use a white neutral/return wire instead of the ground here, but at the time I didn't expose any of the white wires' copper conductor. 6. Turn the circuit breaker back off so everything's safe. --INSTALLING THE NEW SWITCH-- 7. Remove the old switch by unscrewing the black line and black load wires. 8. Gain access to any of the neutral/return wires. These are white. If the box you are working on only contains switches, then all the white wires are probably just twisted together with a colored wire nut/cap. Untwist the wire nut (CCW to loosen) and pull it off. You now have access to the neutral/return wires. You will eventually shove the white neutral wire from the Honeywell into this twisted mess and put the colored wire nut back on. 9. You should now have three conductors in the box that you'll connect to the Honeywell's three wires: a black line wire that was connected to the old switch, a black load wire that was also connected to the old switch, and one or more white neutral/return wire that are probably just twisted together. Use one of the supplied wire nuts to connect the line wire in the box to the line wire of the Honeywell. Do the same for the two load wires. Do the same for the white neutral/return wires, noting that you might have to use the old wire nut in case the supplied nut is too small. 10. Everything is now connected and ready to be tested. Turn the circuit breaker back on, and make sure the switch works. Pushing the big button on the bottom should control the light as normal. 11. Turn the circuit breaker back off. --SHOVING EVERYTHING BACK IN-- 12. For me, showing the wires back into the box is always the hardest part. Electricians have a knack for fitting a mess of wires into a small box. I apparently can't do this well. Anyway, do remember that the wires are less breakable than they seem. The worst that can happen during this stage is that a wire is pulled loose from a wire cap. That's unsafe, so make sure it doesn't happen. There are techniques to ensuring a secure fit; find them online. 13. Screw the switch(es) back onto the blue box. I always have trouble making sure that the switch are flush to the wall and not crooked. Again, bend those wires. They're sturdy. 14. Screw the new* wall plate on, and you're done. *New because your old wall plate was probably only big enough for a toggle switch. You need something like the Leviton 80401-W 1-Gang Decora/GFCI Wallplate, Standard Size, Thermoset, Device Mount, White.
Serban Vanessa
Full-featured Timer
The Honeywell RPLS740B has some key features I was looking for: 1. Compatible with compact fluorescent bulbs (this timer even works with electric motors). 2. Has the option of turning on or off at either a certain time or at dawn or dusk. It keeps track of the time of year so that it knows when dawn and dusk are. 3. Adjusts for daylight saving time automatically (although it may eventually be a few days off if they change the dates for daylight saving time again). 4. Keeps its programming and the correct time and date during power outages. 5. Has no batteries to wear out (more about this below). These features let me set it up once and then leave it alone. Of course, it's easy to override it if needed. Just press the main button to turn the lights on or off. The timer will stay programmed and resume automatic operation when it is time to turn on or off automatically again. Some of the literature on this product says that it has a backup battery to keep the programming set up and the clock running during power outages. At first, I was concerned that the timer might need to be replaced when the backup battery wears out. Even a rechargeable battery only lasts so long. I carefully opened the unit to see if the battery is user-replaceable. I was pleasantly surprised to see that instead of a battery, it has a 0.22-Farad super-capacitor. A super-capacitor substitutes for a battery, but for all practical purposes, doesn't wear out. I wish more electronic devices would use these. As with any product that has a mountain of features, it takes a little time to read the instructions and set up the timer. However, the menu system is pretty logical, and was easy to catch onto once I had programmed a few settings. I don't even need the instructions now. Since the timer has been installed for only a week, I can't really be sure about reliability yet. It appears to be well built, inside and out. So far, it works flawlessly and the time is staying accurate. It is a little expensive, but it's the lowest-priced timer I could find that has the features I want and has good reviews about working reliably. Also, with the super-capacitor instead of a battery, there's no need to worry about battery replacement. The timer came via Amazon Super-saver Shipping, and arrived ahead of schedule in just a few days.
Tabieros Serrano Hanny
Great quality.
Great product. I purchased three of these to control all of my outside lights. Install took a few minutes only because I needed to pigtail a few wires and clean up the commons and hots neatly. I could not figure out how to program it myself but my wife was luckily more intelligent than I. Very satisified!
Bobby Degina
Great product, but make sure to combine all white wires
Takes less than 20 min to install if you know that all white wires have to be wire capped together with the white wire from the switch. I originally had 2 regular switches in my gang box. There were 4 white wires going into a wall nut (square looking cap that's clear on one end and orange on the wire entry end....fyi, very difficult to pull white wires out, so you might want to cut wires and strip). I didn't realize the white wire from the switch had to be wire capped with the 4 white wires in the gang box. Once the wall nut was removed off the ends of the white wires, I was able to use a larger wire cap to combine all 5 white wires (4 currently in the box and 1 from the Honeywell switch). Once I got that figured out, the 2nd Honeywell switch I installed to control the lights in front of my garage was installed in less than 20 minutes. Loving the look and the fact I don't have to remember to turn on/off my exterior lights. Loving how the lights will be on when/if I come home late at night.