


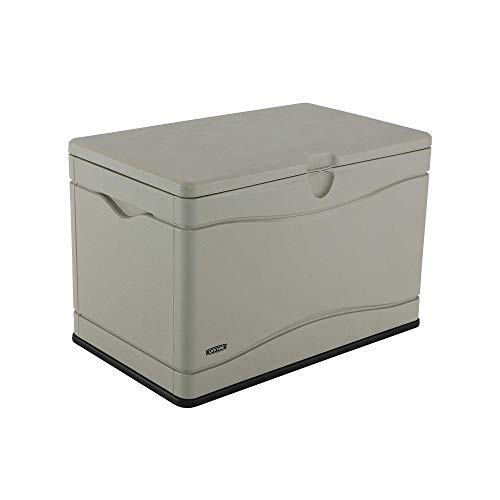
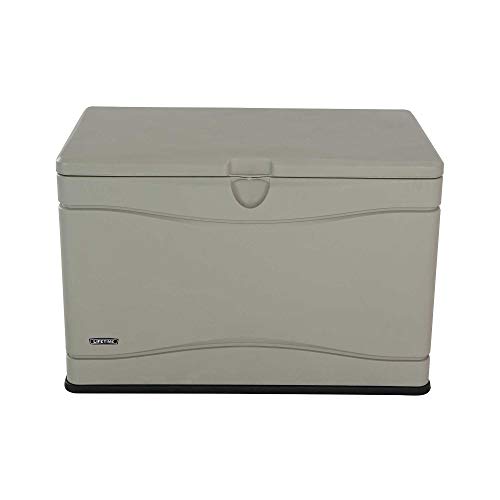
- Rigid dual wall High density polyethylene construction
- Controlled spring-hinge lid opens greater than 90 degrees, won't slam shut and is lockable
- Strong and durable; can be used as a Bench
- Uv protected with all weather finish; weather and water resistant seal
- Easy straight-forward assembly; backed by a 10-year limited manufacturer
-
Information
-
Twitter
-
Pinterest
-
Youtube
-
Facebook
Amy Owens Burbol
Much better than most
After looking at a few different deck/storage boxes I decided on this one. I don't use this for storage but as a package drop off box. Other deck boxes had more slots for ventilation, which is great if you may be putting some damp seat cushions in, but that also lets bugs, dust, pollen in. After I put this together, I caulked the slots on the bottom where the panels slide together. This will help keep those tiny ants, spiders out. As other reviewers have said, the ground really needs to be level, if not, the top will not close all the way. By the way, all the carriers love that they have a place to put the packages, they are out of the weather, the neighborhood dogs can't carry them off, and out of site from the crooks. If you have a spot to put a box, your mail man will love you. (Yes, this box is probably a bit bigger than most people need, so get a smaller one. I have a lot of 4ft long packages and my old box wasn't big enough, though it worked well the last 20 years)
Renee Hodge
Sturdy box
Okay, this product is going to take you a while to put together. Especially if you are doing it on your own, like I did. But it is very sturdy. I was worried that someone would be able to pull open the top lid even with a lock on and just kind of stick their hand down into it. That is not going to happen. There is a really nice iron bar that runs across the bottom of the lid that stops anything like that. It's really pretty spacious, and I'm very satisfied with the product.
Cheryl Williams
Nice Deck Box!
This is a really nice deck box. It is very large and right now holds our table and chairs winter cover and all the chair pads with a lot of room to spare. It is made very sturdy and can easily sit 2-3 people on the lid. It took my husband about 45 minutes to put it together. We did take the advice of another reviewer and caulked the inside. If you look at my pictures you can see the one with the holes. If you are sitting it in an area where it might flood a few inches it would be best to seal the inside. It has rained a few time really hard and no water yet. We did not put any caulk at the latch hole and we didn't have a problem with leakage. We'll see what the winter holds!
Judie Farley
Hints for assembly
I was able to assemble the Deck Box alone without any help, however their is one instruction I found to be unclear: It deals with the bar that goes across the front of the box, your instruction says to insert one end and once in, " rotate it and place the other end in the slot"...If you insert one end in the " notch" and rotate it, it will damage the insert cut out and "round it out" making a sloppy fit, even tho you screw the bar into the front panel. I found that it was much easier and a better install by inserting one end of the bar, then with my left hand grasp the bar on the end, and "bow" the center just enough to line up the bar with the insert hole, and it slips right in. Also, I purchased some time ago a set of wrenches that have an open end at one end and the other end is a closed/box wrench at the other end, and this box end is a "ratchet" end, so that when you place it on one way it tightens, the flip over loosens. It became quite handy as some of my sockets walls were to thick to fit between the panels and get a firm grip on the screw or nut that I was attempting to lock down. Another item you may want to HIGHLIGHT.....When screwing in screws or tightening bolts and nuts, be careful as you can "over tighten" the screw, which leaves you no "bite" into material, after all its plastic not metal or wood and it gives or "strips" very easily and you have a poor/weak point of assembly. The last item is, you may want to predrill small holes in the material for starting the screws. If you use a "nut driver" on the drill, then go only 3/4 of the way with the drill and complete the tightening by hand, you get to "feel the tightness and won't over tighten". Otherwise it went together very well and inuse....Here in Florida its hot and rainy and its holding up well.
Cornelius Martin
Excellent Purchase - Absolutely Water-Proof
I waited over a year to write this review as I wanted to go through a summer (2015), winter (2015), and another summer (2016) to see how this box stood up to the elements here in NC (Raleigh area). This box is very large, extremely easy to assemble, nice soft open/close hinges - and the lid stays open when wanted, closes tightly, and absolutely positively keeps the water out. As others noted, do take the time to make sure you have the correct panels in place before snapping together as I can see how they could be difficult to get apart if put together wrong - but everything was labelled easily so just read it. Some reviewers stated they used caulk inside to seal it but we did not and it never allowed water in - ever, and we get torrential rain when storms roll through. FYI, This box was placed on our pool patio directly on the concrete so moisture from the outside bottom did not get in. It has not faded (it gets a lot of dead sun all day) and did not crack during the cold months. Nothing smells inside - no musty smell or anything; and no mold or algae formed around/on the outside. It was packaged well, delivered intact, no pieces missing. We have a large U-shaped sectional with a ton of seat and back cushions and small square throw pillows. This box holds all 12 of our back cushions (these are smaller than the seat cushions), 4 small square throw pillows, my pool exercise items (float belt, float shoes, float dumbbells, small kickboard), fly swatter, and a few other small items. ;-) The 10 seat cushions are larger/thicker so we had to split storing those in 2 other deck boxes (different style/brand) along with the remaining throw pillows. So yes, we have 3 deck boxes around our pool, LOL. After buying this through Amazon and liking it, I found the same one at a local big box home store and bought it. The 2nd one is located up on our house deck to hold cushions for the patio furniture that is up there. The quality is the same with the 2nd Lifetime box as the one ordered through Amazon. I highly recommend this Brand and model no matter where you purchase it.
Klara Podres
This box is very heavy, high quality & has a 10-Year limited manufacturer warranty.
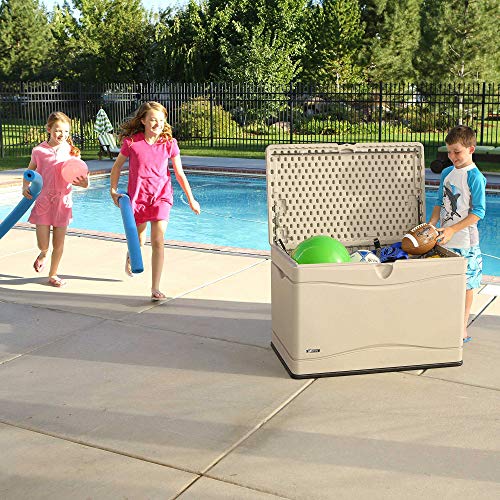
I bought this deck box last summer to store my patio cushions & it is still like new. It is huge & I can fit 2 lounge chaise cushions as well as several pillows & a couple of small dog beds inside. My husband sealed the inside with silicone for extra protection from the weather. Whenever the weather turns nasty I just stuff everything in & push the lid down tight, make sure you get it pushed all the way down to seal it. The next sunny day I open the box & all my cushions are nice & dry. My husband put it together very quickly. This box is very heavy, high quality & has a 10-Year limited manufacturer warranty. I highly recommend it. It's sturdy enough to use as a seat but I'd recommend putting a cushion on top. UPDATE: It's been 2 years and this box is still in great shape. I just added some recent photos. My husband had to reseal the inside bottom with new silicone because the old began to peel away and in heavy downpours of rain it was leaking a bit of moisture in through the bottom. But now it's good as new.
Sharon Tribe
Best solution - sun and rain - but...
Check out the photo. I placed this box in direct sun light part of the day, hot close to equator climate year round, and prone to heavy rains. Water getting into yours? - The first thing you want to do is make sure the ground is raised. See how I put a 6 inch cement platform? That's similar to per code in most cities. You want to do this for your box for two reasons. 1) The cement is even. So the plastic isnt going to warp out causing large gaps on base 2) If your area has flooding, even if half a inch, and there is a gap you are going to get water in the box This box is not to just drop on the grass somewhere behind your yard. If you actually do that anyway then silicone the base inside and out to give yourself a fighting chance. Placing it on a flat service that doesnt flood is the key. - The direct sun is no problem. What I did was purchase a bottle of UV protection spray here on amazon and put it on the areas that gets sun. I do this once every few months and keep it in the bin and use it when I remember to. Still looks brand new. I searched through each and every deckbox/ storage shed on Amazon. I was originally steered away from this product because it is so inexpensive. I wanted to pay more for the best possible solution. After receiving it I couldnt be more happy. Assembly: - Make sure when sliding the side together you are doing it correctly. Its easy, but put some muscle in it to create a locked in fit. - You should use a socket attachment. Whether its a socket wrench, a socket attachment to your screw driver, or to your drill... just go to the hardware store and pick one up for a couple bucks. Its worth it and I can promise you many of the disgruntled assembly reviews must come from someone who tried to use a screw driver. -Your lid is closing unevenly? - You didnt assemble it incorrectly. Just make sure the box is on an even surface. I believed my lid was on an even surface but when noticing the lid not closing perfectly (slightly to the left) I placed it on what I knew to be for sure an even surface it the lid closed perfectly. Recommendations: - Silicone caulking has been recommended by others but I havent needed to since I raised mine on flat surface. - A UV protectant spray. - A socket attachment for assembly *Important note: It is more difficult to assemble than something like an Ikea furniture set. It will take someone handy just minutes to do it but if you are not handy assembling this deckbox might slightly irritate you. If you need a deck box get this one.
Theresa M Bodman Barcavage
Review of Lifetime 60254 Heavy-Duty Outdoor Storage Deck Box, 150 Gallon Desert Sand/Brown
I’m satisfied with all aspects of this storage unit. You do need two people to put this together and we got it done in about an hour. This plastic is top quality, high density, I can imagine it lasting at least 5 years with no issue. There is a 10 year warranty on the item I recommend keeping the manual and receipts. The 150 gallon is massive, the sand color is more light beige than tan. Sturdy enough to be used as a bench. By following the instructions to the “T” everything fit correctly. The only suggestion I would give for putting this together, the bottom tabs where you drill the screws in, I recommend making very small drill holes first and it becomes a lot easier to get the screws in. The hydraulic struts, I recommend greasing them and also to get a sealant for extra protection from moisture. This is one of the few storage bins I’ve seen that is weather and water resistant. Placed our deck. It is heavy. I’m so happy!
Jeannette Chambers
Deck box that appears weatherproof!
This deck box holds all my outdoor items safely and securely. I love the fact that is has a place to lock the lid. I have checked it after heavy rains and all the items stay dry inside. I would recommend this product. It wasn't hard to install, either and took my father and I about 20 minutes. We used youtube to insure we were doing it right since the directions were a little confusing. Overall, a nice solid box that should last several seasons.
Ena Pericas
A beast to assemble but works perfectly!
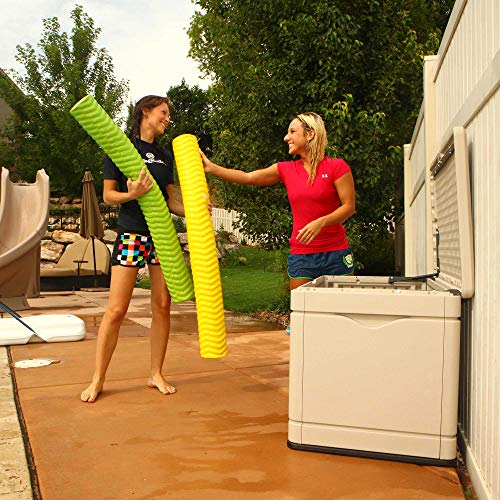
This thing survived a hurricane! I bought this in October to hold the cushions for my outdoor patio set (4 big love seat cushions, 2 big chair cushions, 1 medium ottoman cushion), plus a couple blankets, throw pillows, lighter, extension cord, etc. It weighs a ton, so be prepared to get some help moving the box and assembling it if you're not very strong. The sides basically slide and "pop" into place with a fair amount of force, which makes sense considering this is supposed to be waterproof. The really tough part was installing the hinges and the top part. The screws are a very tight fit to get into the plastic and take a lot of torque to get in all the way (see the first photo -- some screws didn't get in all the way even with a lot of force) . Part of the problem is a weird angle to finish installing the second hinge. Again, see the second photo - the angle is awful but it is possible! One tip: I immediately ditched the printed instructions and found a video on You Tube that walked me through the assembly process. That's the only way I was able to finish it. Well, that an my son's strength and help. Once done, it's perfect! A couple weeks after I finished it, Hurricane Matthew came along. I had no where to move the box, so I loaded everything into it and wished for the best. There was some water along the outside lip of the top (where the brown stains are in the last 2 photos), but no moisture got into the box and all of my cushions stayed bone dry.