
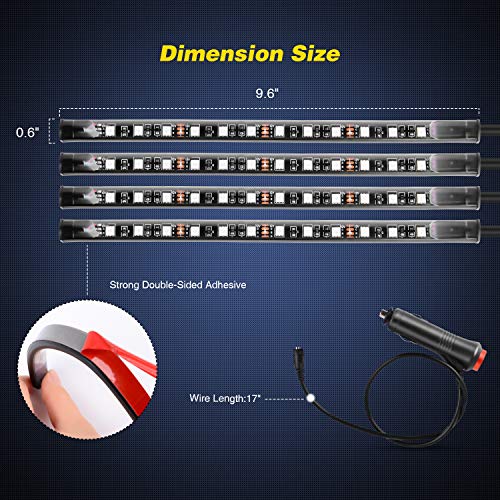
- High-Quality Material: Voltage: DC 12V. Wattage: 10W. ABS material made, ultra-thin, high quality music LED strip light, water resistant, anti-collision, anti-corrosion, fits all cars SUV vans trucks boats with 12V DC power.
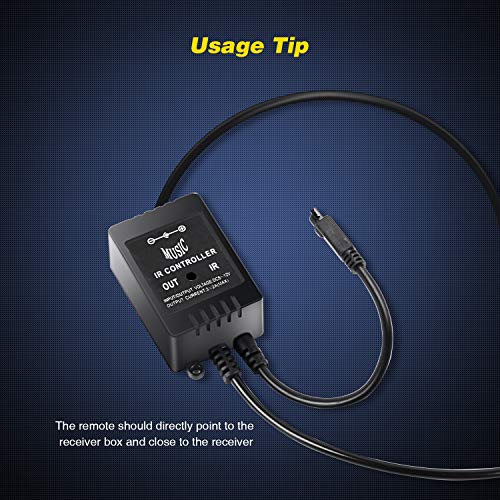
- Sound Active Function: The LED strip light can change color with your voice or music. Allows you to enjoy the fun with the color changing following your car stereo music rhythm as well as your voice.
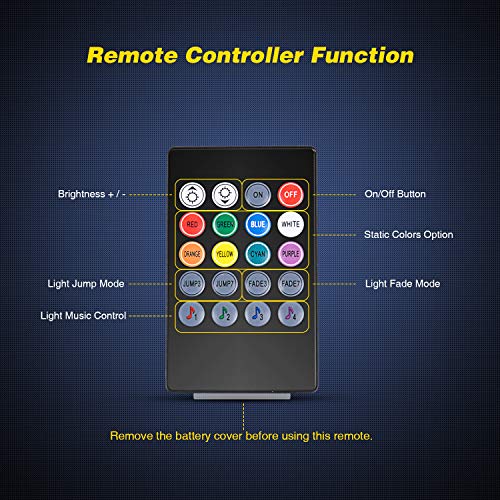
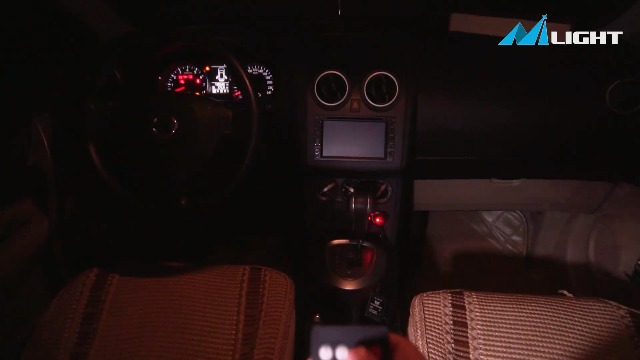
- Wireless Remote Control: You can use the wireless remote to change the color and adjust the brightness as you wish. Please note: 1. The remote control should point directly to the black receiver box and there is no obstacle between them. 2. The remote should be put near to the receiver box, not too far.
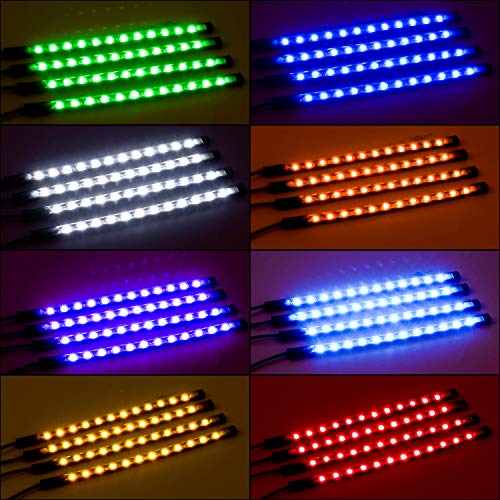
- Multicolor Mode: This LED strip light with 8 fixed color modes and 8 flexible color modes. You can change color modes in different conditions as you like.
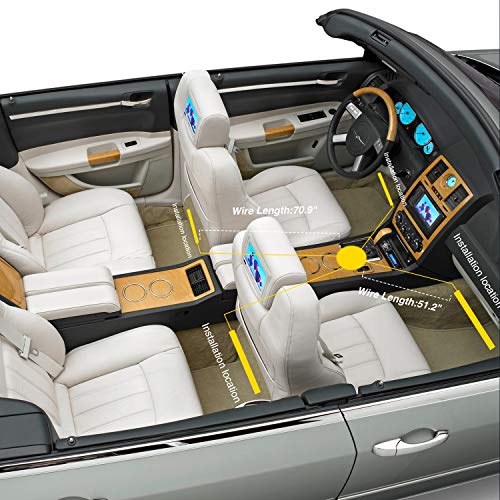
- Easy To Install: Double-sided adhesive straps, directly inserted in the cigarette lighter, can be easily installed in the gap and virtually invisible. Plug and play, without modification.
-
Information
-
Twitter
-
Pinterest
-
Youtube
-
Facebook
Suneetha S
Work great and look amazing as accent lighting for my Deck
I installed my strips as accent lighting for my newly remodeled deck, tucking them under the hand rail, oriented downward. Turned out pretty sweet and only cost me about $60 to do my entire deck with stairs! You'll have to get a Power Supply Driver Transformer, which you can also find on amazon for pretty cheap (I used "Ledwholesalers 30 Watt LED Power Supply Driver Transformer 120 to 12V" and it works fine). You may also want to get some strip-to-strip connectors if you want to make turns with the strips ("LED PCB Connector- 2 Conductor, 4pcs, Strip to Strip, Any Angle"). These help quite a bit if you're not especially electrically savvy. (Note: If you use these connectors with the waterproof strip, you'll have to peel back a bit of the silicone waterproofing to expose the strip in order to get them to go into the connector) One thing I did to "stop" the strip at one spot and then "continue" them at a spot a bit further away was to cut a connector right in the middle of the wire, then splice the exposed part of the wire with some cheap "doorbell wire" I found at Home Depot. Then you can run the doorbell wire to your next start point and splice the other half of the connector in order to start your next strip. (Hard to explain with words, but it works well)
Cascey Blosch
Great Weatherproof Lights (and Running Board Lights)
One word: WOW. These hold up incredibly well. Very bright. Consistent color throughout the strip. They are very weatherproof. As with ALL these types of lights - do not depend on the 3M double sided tape on the back. It barely holds itself to the lights in some places. However, it does help hold the lights long enough for a secondary type of glue or something to cure. In my case, I applied them as running board lights underneath my truck directly on painted areas with a bead of RTV Silicone (made for boat accessories/waterproofing) and they have held there for weeks and don't look like they're going anywhere for awhile. I have driven through dirty spots and thunderstorms very fast and kicked up a lot of rocks/rain towards these lights even where the wiring exists (I soldered connections and applied silicone + superglue to the non-insulated wire connections that I created) and they still run absolutely fine. I would recommend these for outdoor products or quality indoor applications where consistent color is required or they may be at risk of getting bumped/messed with as the silicone that already coats the strip protects the LEDs themselves.
Sheila Lyn Matela Bueno
Running Board Lights for Ford F-150
These LED's are great. I was considering purchasing a kit for running board lights but didn't want to spend $80 in case I didn't like them. The adhesive seems OK, and I was concerned that they may not hold so I used RTV silicone with them, link below. I also used the ZITrades zip connectors for the piece I cut that didn't have leads. I taped the connections up pretty good so hopefully they will hold. Hardest part of the process was determining the correct wires to tap into for power. All the wiring can be found under the rear door kick plates. I ran the driver side up through the rear kick plate and tucked behind the jam molding then behind the rear seat over to the passenger side. I used quick taps to tap into the wire for the passenger LED's then I only had to tap the passenger wire into the correct power source within the wiring on the passenger side. Did a lot of research for a 2012 F-150 and figured out the Neutral should be the smaller yellow/black wire and the Positive should be the small solid purple, (puddle lights wire). Now when you open any door they come on with the dome and puddles and dim to off after a short delay when doors close up. http://www.amazon.com/Loctite-37463-Silicone-Adhesive-80-milliliter/dp/B000XSJIL6?ie=UTF8&ref_=cm_cr_ryp_prd_ttl_sol_18 http://www.amazon.com/ZITRADES-10Pcs-Strip-Connectors-Single/dp/B00B98ZUBG?ie=UTF8&ref_=cm_cr_ryp_prd_ttl_sol_20
Andy M Johnstone
Very bright.
I purchased this item to add lights to an ordinary wall mirror to hang over my makeup vanity and give it that glamorous look and it also provides excellent lighting when plucking brows or appying makeup. They were easy to apply with the adhesive backing...they were too complicated for me to hook to the electrical cord that I had to purchase separately, but my husband was able to with no problems. Its been 6 months and they are still attached to the mirror with no peeling. I love these lights.
Foziya Khan
Love these more than I thought I would!
SO EASY TO INSTALL and way better than I was expecting! Just have to find a better way to disguise the cords in my car. I love that the lights can dance to music. My kiddos love that feature. The adhesion hasn’t had any issues so far. It’s very strong but not damaging to my car which I appreciate! I have a 2014 Fiat 500L that doesn’t gave great lighting inside. And we downsized from a Honda Pilot that had a lot of storage and lighting in it. These lights are just enough that the kids can see in the back seat if something falls, and I can see under the dash in the front while I’m driving (which is nice when you have a stick shift and drop something lol) the remote works great and it has so many options!
Ana Dulce Flores
Perfect Led setup.
This thing pulls about 2 amps an hour without a dimmer. If you want to use this with a dimmer setup that's easy, and for indoor use I recommend (HitLights 5-24V Easy Plug Dimmer for Single-Color LED Strip Light, 2A Max) with (niceEshop 10 Pcs 2.1x5.5mm Male Jack DC Power Adapter for CCTV Camera) and (12PCS Pack 2.1mm x 5.5mm Female CCTV Power Jack Adapter for 5050 3528 Flexible led strip use BY ZITRADES). With those 3 things with this led light setup you can get this strip down to about 0.1amps per hour at about 1watt. While this is very dim, it will not Kill your battery over night if you use 18+ AH battery, I'd recommend 35AH with this, so the less AH you pull out the longer the battery last, hook it all up to a solar panel with charge controller, maybe a timer. You could have this led light system up and running all night every night off the grid. This timer (GadgetZone (US Seller) DBPower® CN101 DC 12V Digital LCD Programmable Timer Time Relay Switch Support 17-times Daily Weekly Program, White) along with, (GSM CYC-SOLC10A 10 AMP Solar Charge Controller, Black) and (Grape Solar GS-S-105-Fab8 Monocrystalline PV Panel, 105-watt). and its a perfect off grid system. Make sure if you get a setup like this you keep the stuff that shouldn't really get wet out of the weather. Monocrystalline solar panels are more expansive but a little smaller then poly. If you want cheap 100 Watt solar panels in the 130-140$ range look into these brands, Renogy, and Grape Solar, and Windynation. They all have nice affordable cheap but great polycrystalline panels. other items that can go with this and a 12v battery are. (Battery Tender 081-0069-6 Ring Terminal Harness with Black Fused 2-Pin Quick Disconnect Plug ) (Allstar Performance ALL76232 Universal Two Wire Connector with 12" Loop) Batteries (PS-12180NB 12v 18Ah Lead Acid Battery 12VOLT - PACK OF 2 Offered by Ace Comp Solutions.) or (Powersonic PS-12350NB - 12 Volt/35 Amp Hour Sealed Lead Acid Battery with Nut-Bolt Connector. Offered by Ace Comp Solutions.)
Fi Fi Jamieson
Camper awning lights
Used them under the awning on my camper. Lights up the area wonderfully, so much so that I ordered a remote dimmer to dim the lights when you don't need it brightly lit. The silicone waterproofing is nice and thick and should keep them nicely watertight, however it can be tough to cut through to expose the copper conductors to solder to. I cleaned the surface with solvent that I applied the strip to and it seemed to stick well...at least for now. I added a couple of close up pictures so you can see what size they are and the silicone covering.
Eun Hee Lee
Easy, cheap, and works
Received and installed these lights in under 30 minutes. I suggest laying everything out and making sure everything will reach where you want it before sticking them onto the surface and test them first. Each light bar has a different length. Make sure to rubbing alcohol wipe the surface before you apply (give it a minute to dry.) I personally drove around with the heat on to warm up the cab before cleaning and applying. Lights work great so far and the music sensor works pretty well, except I think my exhaust which is aftermarket effects it.
Phea Roun
LET THERE BE LIGHT!
Review by Quilt Lady's hubby, We have a RV & the kitchen cabinets are deep & really dark inside making it VERY difficult to find something. We had to use a flashlight just to find items in the back. I first thought of using battery operated motion sensor lights, but there's a total of 6 levels I have to illuminate & that would be really costly. Came across these lights & since the lighting in the RV is 12volts I didn't need a voltage convertor. I ended up cutting the strip into 8 sections & sticking them vertically to both sides next to the tracks that hold the shelves up. I was hoping to fashion a switch that would activate the lights when the doors were opened, but realized that wasn't going to work so I mounted a simple on/off toggle switch inside just the door. The results are outstanding! I had to buy a package of the connectors & connect 1 to each strip. THAT'S another whole story, but in the end they work really well. My biggest concern is whether the sticky tape will hold up over time. I did wipe down where they were to be mounted with alcohol first. It took me a bit longer than I thought it would, but in the end it was WELL worth the time spent & the total cost was under $20!
Serban Vanessa
Clean, stark white color, easy to solder and install and last for a very long time. Adhesive is hit and miss so plan ahead
I got these lights for random projects around my house like lighting under the stairs and kitchen cabinets and they work great. I had bought the silicone covered all weather type of these lights before and they were very had to work with and solder connections onto so i will only get this type from now on if they are inside the house. These were easy to cut and solder and even turn around corners. The lights are very bright and durable, although i did have a cluster of 3 that went out towards the end of the string which i had to cut out and reattach the main line to but that could have been how i twisted them on the end. The copper holding them together is strong enough but if you puncture it or break it you will lose some lights before or after it depending on the break. The adhesive on the back is not great and inconsistent on one occasion they adhered and stuck to cabinets perfectly and are still there 6 months later. On the second occasion it didnt stick at all so i used a staple gun to attach them in the closet frame. All in all i am, very happy with these lights, the color temp is is very white and not yellow at all and even if they did need to be replaced it should be a cinch, but I have had them turned on 24/7 in my kitchen for 6 months and expect them to last years and years.