
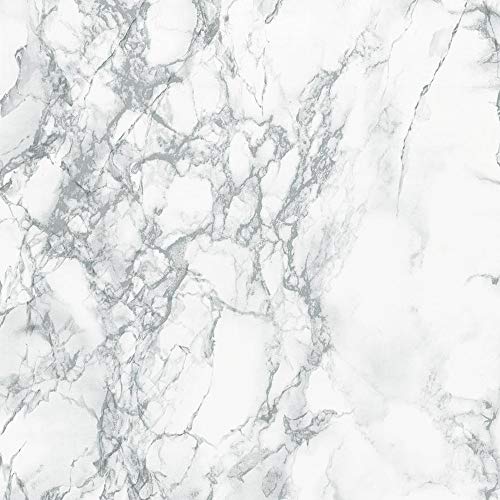
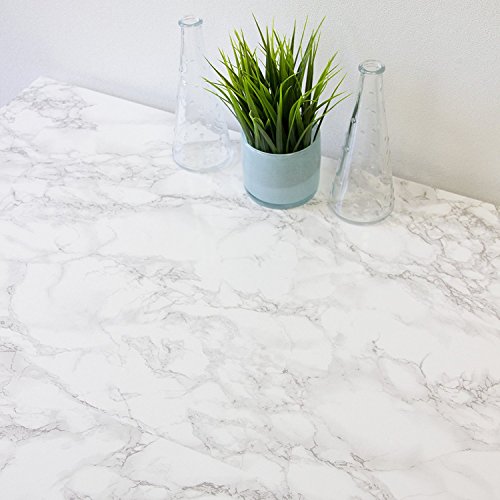
- This decorative self-adhesive film transforms flat surfaces and is safe to apply to walls, kitchen cupboards, furniture, shelves and more creating a unique, personalized look
- D-C-Fix films are ideal for DIY home décor renovations making them simple and affordable with minimal equipment required
- Quick and easy to install - just peel and stick
- Durable vinyl film cleans easily and is water resistant
- Films have trimming gridlines on the back for precise measurements and are fully removable without leaving a residue
-
Information
-
Twitter
-
Pinterest
-
Youtube
-
Facebook
Edward Rush
5 STARS
Love this stuff! Transformed my bathroom vanity completely (I am in a rental). It takes some time to get it straight but it keeps its stickiness. It seems to be holding up well with water getting splashed on it and around edges. Easy to clean off. The only issue is the seams because it is not a pattern where you can line up the edges. People that have seen it have said they didn't notice them until I pointed them out, but I can definitely tell where they are.I am thinking of getting some paint to try to blur the lines maybe? Up close it is a wee bit pixelated but you cant tell at all when its down. I had to buy 3 rolls for a vanity. Cutting around the sink was difficult. I added a before and after picture so you can see just how hideous my bathroom was.
Ross Ariffin
A seriously awesome product for small projects
I used this marble contact paper as part of a makeover on two ikea dressers. I was hopeful yet skeptical, so I was thrilled at the quality and the results! It looks amazingly real! Everyone who sees it has thought that it was real - I only know this because I proudly announce, "DUDEEEEEEE THIS IS CONTACT PAPER!" to anyone that sees them, whether they care to know or not. It's only a little bit of a pain in the butt to put on, which is ok because I expected it to be a large pain in the butt. Here are a few tips: 1) I think the most important thing is to unroll it slowly as you work so that you can hold the excess paper as tight and taut as possible while you smooth it on. I used a 6 inch plastic ruler to work out the air bubbles. Slow and steady wins the race when putting this on, but the results are worth it for the money! 2) I followed the suggestion of another reviewer and googled "how to do corners with contact paper" and found a lot of helpful suggestions. As usual, the internet makes everything look a little bit easier than it really is, but I was able to finagle a few ideas together and make them work for me. 3) The paper was just a little too narrow to cover the entire top of the dressers, so I had to use two strips. There's a seam where the two meet - this would be almost impossible to avoid as it's not an actual slab of marble and I am not some sort of contact paper whisperer. For my purposes, this is totally fine - I used as wide of a piece as possible and then used a smaller strip at the back of the dresser. Since the dressers are against a wall, and I have various tchotchkes on them, it's really not noticeable. If you are covering a large and/or highly visible surface, this something I would consider. It's hard to get the patterns to match up along a seam - and even if you did, it would likely mean wasting a lot of paper AND the seam would still be visible if you were looking at it from close up. If this is the type of thing that would drive you bonkers, it might not be the right fit for you. I also think curved surfaces/corners would be tough. Do-able for those folks out there that are pluckier and more patient than me, but I probably would have lost my marbles. 4) Have your tools laid out within arm's reach before you start - once you remove the backing from the adhesive, it's really all systems go time. Here are the things I found most helpful: • Plastic ruler to use for a "squeegee". Obviously it doesn't have to be plastic, or even a ruler, but you are going to want something rigid/strong for this. I found the advantage of the ruler to be that there's no handle - I did this project on my own, so I found myself contorted at odd angles for much of the time, and a squeegee handle would have been unwieldy to manage. • Scissors • X-acto knife - I used the scissors for making big cuts and the x-acto knife for cleaning up the edges and doing the corners. • Pencil - helpful to measure/mark the back of the paper for extra strips/pieces. All in all, for the price, it's a seriously awesome product for small projects. I ended up needing to buy two rolls for this project (two dressers), but have most of the second roll leftover for a rainy day DIY.
Senad Mustafovski
LOVE!!
I work in social media and needed a marble background for pics. As long as you're not using a flash, it works great!! The finish is a bit glossy so light can reflect on it if it's hitting it at the right angle. Overall, I am VERY happy with this purchase. It was a great alternative to buying a huge, expensive, professional background which would have been difficult to manage for what I need it for. I will be buying again in the future.
Ricardo Correia
Transformed my old wood table.
I just used this to wrap a cheap contemporary wood table. Totally changed the look and turned out well. Suggestion: Youtube "how to do corners with contact paper" so you get clean corners.
Antoinette April Chase
YES! Even you can do it! But follow the grain.
We have a four year lease on this apartment so I wanted to make it nice. I hesitated for months before taking the plunge. In hindsight I waited too long. This project was faaaaar easier than I had anticipated. I watched all the YouTube videos and read all the reviews. I measured then ordered 5 rolls of 26" x 78" which was just enough. The first thing I did was unroll all the rolls and lay them flat on the floor overnight -weighting the ends. Then I cleaned the old countertops with rubbing alcohol and got to work. I did NOT use windex as some videos suggested. Be aware-the marble pattern has a definite grain (just like wallpaper) and you should make sure all your major pieces are running in exactly the same direction. I can't stress this enough. Match seam lines as best you can. Especially on the largest areas like islands and breakfast bars. The pattern repeats every 28 1/2 inches. I used a credit card to smooth out the bubbles.....but even then I had to pull large portions off and start again. Getting the edges to line up was a chore so you have to be very PATIENT. I used a very sharp pencil-shaped exacto knife and crafting cutting board. I had a long metal straightedge. Tip- If you are not worried about marring the formica, overlap the teams. Then cut through both pieces and remove the excess edges. I took frequent breaks and put soothing music on. The whole project took 8 hours. Some tips- Invest in an electric staple gun. It makes thing SO much easier. Staple the underside every 4 inches (see photo). Use a fine paintbrush and white primer to touch up seams and mistakes. I used water-based clear high-gloss polyurethane over everything to seal the seams and give it added strength. Final tip--- don't get upset if it is not perfect AND don't get upset if you burn a hole in it. You can just pull up the damaged piece and replace it. Please give me your feedback. I'd love to hear about your experience. Good luck!
Lou Olmos
Great product for smaller surfaces
This would work great for a small project like a bathroom sink, I was looking for a quick change for my kitchen counters. While I don't have a lot of counter space it was still to much for this type of product. It worked great and look good in smaller areas. **Here's a tip for application. Lightly spray the surface with windex, don't wipe it off and you can slide it to where you need the sheet to go. Get a plastic putty knife and you can squee-gee the windex out from under and you have no air bubbles! This worked great for my husband and I to test different looks of granites for our kitchen 🎹👍
Susila Silwal
I used mine on glass and it looks great. One note
Very realistic and affordable. I used mine on glass and it looks great. One note: take your time smoothing out small sections at a time. don't try putting down too much or it will look bad and you will get angry and need a drink..
Johannes M. Koch
easy to cover the tiles with the film
used a little more than one roll for a quick makeover for an ugly fireplace in a rental apartment; easy to cover the tiles with the film, and could stretch the film out about 1 mm if had cut the strip too short; makes a huge difference for minimal effort/price; don't think anyone would be squinting down at the floor to notice the pixelated pattern
Teri Fanguy
Medusa Your Whole Life With Faux Stone
So Pinteresting! I used this adhesive film to turn two cheap IKEA tables into less cheap looking IKEA tables because I'm not made of money but I would like others to believe I am. Super simple to use and a ton of it for the price I was really pleased overall. The pattern actually looks like marble not a weird pixel-y repetitive pattern so that's great as well. Also it was delivered same day which was miraculous as my DIY initiative tends to fade approximately 48 hours after I discover a project I want to do.
Renee Hodge
Great for my DIY Table Makeover!!
I used this product to re-cover a laminate wood piece of a DIY Coffee Table project. Taking your time and using a squeegee for air bubbles is key to using this product. Once you get the hang of it, its quite easy to apply.