

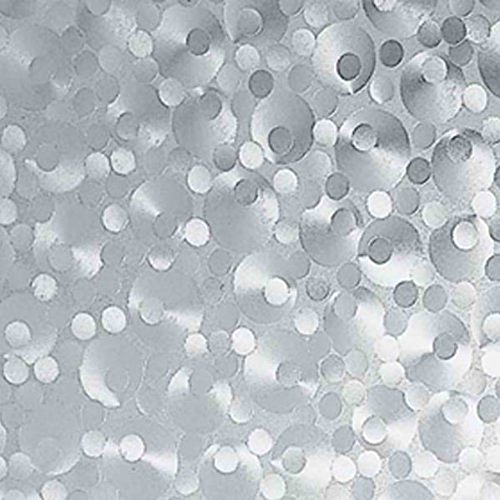
- Can be applied to any glass surface; windows, doors, shower doors, and furniture
- Design features; UV protection of 95%, filters light, reduces glare and provides privacy to block unwanted viewing
- Quick and easy to install - just peel and stick
- Durable decorative design cleans easily and is water resistant
- Removable without leaving any residue
- Films have trimming gridlines on the back for precise measurements and are fully removable
-
Information
-
Twitter
-
Pinterest
-
Youtube
-
Facebook
Waji Faizy
Very nice looking privacy film
I bought a house and the bathroom window was just a normal glass window. I tried a plant in the sill (it's an arched window) but that didn't look nice. I really didn't want curtains in a bathroom. Luckily I found this stuff. It was easy to install. I put the film face down to the window, and traced the curved edge around the window. I cut it a little big and refined my cuts about 3 times. Peeled it, stuck it to the window. Been fine since then. Just make sure to clean the window before hand so you get a good stick.
Deana Williams
Finally We Can Open Our Blinds!!!
**Tips**. Comes in a tightly wound roll. Like a poster. Recommend unrolling and reroll in the opposite direction to straighten out contact paper. This makes it a lot easier to install. Also, measure window to see how many rolls you'll need for the width, because they are long and narrow. If you mess it up just peel off and reapply. It's sticky like a post-it note. **Tools** Scissors. It's that easy. The reason for getting this: Our window faces directly into our neighbors dining room and vise versa. Still let's in tons of light while maintaining privacy. We had leftovers and finished the little windows on the patio door.
Cathleen Henson
LOVE LOVE LOVE!!!!!!
I live in an apartment that has a huge window that faces out onto a busy road and walkway. There is nothing worse than sitting on your couch and looking out your window to see people staring at you as they walk by. LOL I had to do something LOL After spending some time browsing different products, I decided on this (DC Fix 3460276 Pearl Self-Adhesive Window Film) as well as bought some frosted glass spray. I LOVE LOVE LOVE how this came out on my windows!! And loath the frosted spray I bought from another company. It stank (fumes) and did not come out the desired effect. This self-adhesive window film was well worth it!!! :) Here's some tips. First make sure you have a measure tape, pencil, razor blade, and a squeegee ( I found a bathroom type squeegee at rite aid for $1.99 that worked perfect for this project!) 1) I bought two rolls for one large window and I am glad I did. The roll is not very wide so if you have a big project, I would buy more than one. 2) Take your time when applying :) Other reviewers mentioned this was a two person job. I think it worked fine with just myself. Although the section my daughter helped me with did go quicker :) If you go too quick you may end up with bubbles. The best application method I found was to slowly apply by rolling from one side to the other and as I went I used my squeegee to rub out any air pockets. If you make a mistake or have too many bubbles, this product will hold up for you to remove and start over. I had to do that once on a strip I went to quick on, but it pulled up easily and stuck right back on. 3) make sure to measure and cut it a little larger than needed. I noticed it worked well when I did that and once it was applied I just went back over it with a razor blade for a clean edge. All and all I am VERY pleased with this product! It was easy to apply and took less than 20 minutes from start to finish, and it looks AMAZING!!!!!! It looks not only beautiful but it does exactly what it claims to! I am amazed at how much light my window brings in now that I am not afraid to open it all the way up. I don't have to worry about snooping neighbors anymore :) PS DON'T WASTE YOUR MONEY ON THE SPRAY ON FROSTING. THEY DON'T WORK NEARLY AS WELL AS THESE SELF ADHESIVES! Now I am going to have to scrap my upstairs window from using the cheap frost spray and buy more of this beautiful product for up there LOL
Sudeep Yadav
Easy to apply and works great
Easy to apply, works great for privacy as long as you're not going to be up against the window. See my two photos taken from the outside at night. In one photo, the person's face is right up against the window. In the other photo, the person is standing about a foot from the window. I followed other recommendations and cleaned the window first with Invisible Glass, then applied a little soapy water to the window with a paper towel, which helped hold the film in place and allow it to be adjusted. Then I used a credit card to remove the bubbles and help adhere it to the window. I used a box cutter along the edges to trim the excess. Very quick and easy job.
Andrea Hatcher
Ordered more today!
Looks fantastic and adds privacy to a shared backyard. The picture was taken at night, from the outdoors looking in.
Tara Gordon
Thrilled with result!!!
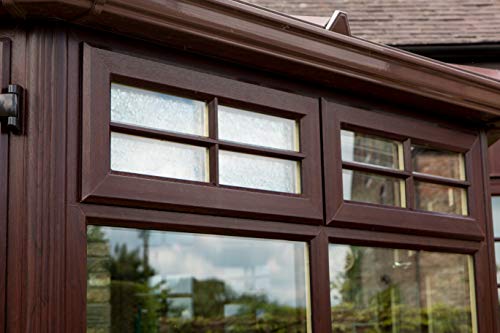
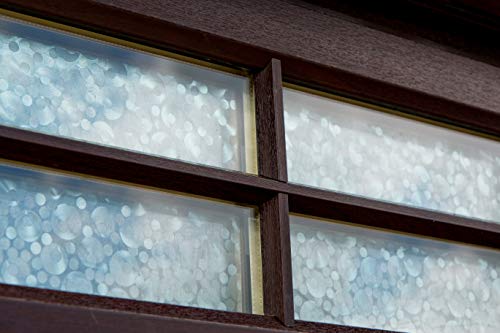
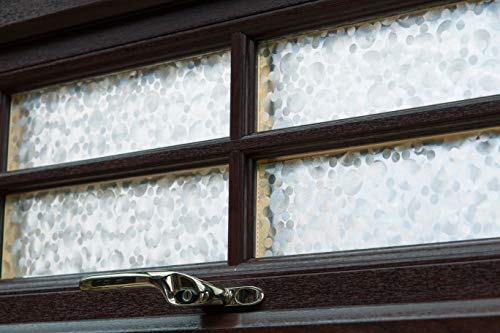
We have bathroom windows that look out to the street. I've used window film before and it took hours so I've been reluctant to buy them again. But I hate blinds. I'm so happy I bought this!!! I was skeptical when I got it because it seems so clear. You can see the photo with my hand. But I put it up anyway. Look at the before and after!! It looks great! The window has the white dividers inside the glass so it is one piece of smooth glass. It gets direct sunlight all afternoon. Just some notes... It shows which edge is supposed to be straight. Put that edge in the middle of the window so the next piece lines up against it. I did a seam right down the middle. I was worried that not matching the pattern would look bad. You can't tell unless you get very close. Total time for 1 window was about an hour. Cut it about 1" too wide and long. Peel of backing slowly and smooth out bubbles with a sponge. If you go slow it's easy to pull it off and reposition. Then trim along edge with a razor blade. Little bubbles don't show!!! I'm buying again for other window!
Ishaz Fwie
Perfect for what I needed it for
I wanted to hide all the ugly game systems and cords in our tv unit. This did just the trick, and does not interfere with the remotes signal.
Lucky Day
Love it!
Love it! My partner and I recently remodeled our guest bathroom and had the shower changed to glass on two sides. When one of our guests showered in it, they mentioned that the glass made them feel exposed, despite the bathroom being small and having the door closed. We got two rolls of Pearl design and didn't even use up all of the first roll. It's q fantastic design, very subtle and pretty. Applying it to the glass didn't take too long at all. I was able to do it alone, without the help of my partner. I love the finished look and can't wait to hear what guests have to say about the change. Two thumbs up!
Claudio Delgado A Luis
Perfect!
I bought this film to cover the first floor windows of my mother's assisted living apartment that looked out onto a parking lot. She did not want to be on display while in her home. I spent an entire evening researching different types/prices of window film. I needed opaque that also did not look bad from the outside looking in, since the facility was really unsure they would even let me hang it. Unlike some of them that require soapy water to apply, this is just like contact paper - a peel-able backing that has a grid on it for easy cutting. Easily repositionable. Good width that makes it easy to handle, and the price was excellent. It's tacky enough that it really sticks to the window, but pulls up and reapplies multiple times without losing its stickiness - and absolutely NO residue. This still lets lots of light through the window, but you can't see any of the parking lot from the inside, and nothing of the apartment from the outside (even at night). It looks a little like pebbled shower glass, and with the blinds over it it just looks a little sparkly. Mom is so happy - and several of the other ladies there have asked me to install it on THEIR windows! A great, inexpensive alternative to heavy drapes or keeping the blinds closed all the time.
Alice F. Hyke
Great for renters!
I am a renting an apartment so it was important for me that the film not leave behind residue and that it could be easily removed. I was really happy with this product on both accounts. I didn't apply it straight the first time and it was easy to remove it and reposition. If you have a funky shaped window, it can be tricky to make sure you cut the right size so try tracing the window shape with pencil & paper and then make a stencil to cut the film. In terms of visibility, you can't see anything through the window. You can see light so you'll be able to tell if it's daytime or nighttime, but other than that, no dice. I attached a picture of my window after putting the film on one pane.