

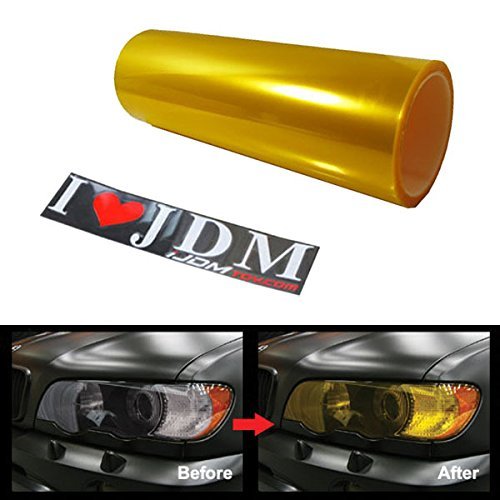
- 1 piece 12 by 48 inches
- Color: JDM Gold Yellow
- Self-adhesive, peel and stick
- Stretchable with heat and water resistant
- Easily cleansed with water and easy to remove without residual
-
Information
-
Twitter
-
Pinterest
-
Youtube
-
Facebook
Emily Mertis Cherukara
ordered despite the bad reviews. this stuff went on great
ordered despite the bad reviews. this stuff went on great. its a little thick, but with heat and patience, they stretched and adhered just fine. i installed these on a 2016 4runner fog light. had to use my finger and a microfiber to apply because my squeegee was leaving marks(had to remove protective layer because would have been impossible when finished.
Anila Qureshii
Apply this product the same way you would the "high end" stuff and you'll get EXCELLENT results!!
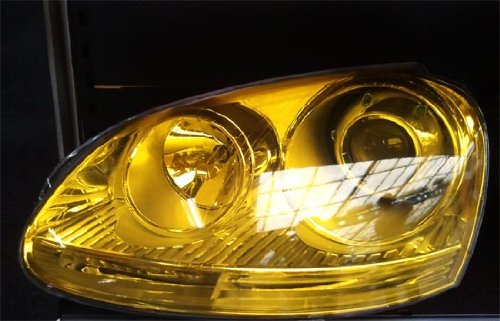
I got really really great results the SECOND time around. I had a friend who does vinyl wraps professionally put it on for me both times. He scoffed at the idea of using this low-grade non-name-brand vinyl. I read the mfr's recommended instructions, "peel and stick." This did not work at all. The vinyl arrives sort of like a "Fruit Roll-Up," it's rolled, but is then crushed a little bit. If you do not use a heat gun or a hair dryer - - You WILL have creases!! The proper technique which gave me an excellent final result which my friend used is to ABSOLUTELY use soapy water (I think the preferred soap is Johnson + Johnsons' no tear) and a heat gun. I would suggest a hair dryer instead so that you reduce the risk of melting the tint or warping plastic headlamp lenses. Would also strongly suggest a quality vinyl squeegee, one that is felt edged. You're basically combining window tinting technique and vinyl wrapping techniques into one. Mist some soapy water onto the clean headlight lens. Remove the protective film from the adhesive side of the vinyl tint. Lay the vinyl down on one portion. Work in one direction out from this point that you have squeegeed down. Apply heat, and squeegee out more moisture. Gradually, probably half an inch at a time until you reach the edges. Then work the opposite direction in the same fashion. I really regret not shooting video but I'll at least attach some pictures.
Victor W Black
Stuff looks great. It came in perfect condition
Stuff looks great. It came in perfect condition, not crumpled or smashed. It was hard for me to apply, but that's because I SUCK at putting stickers and such on. I found the best way using tips from this video: https://www.youtube.com/watch?v=QO0Kjq6DPWk Basically I did exactly like the video, but I used a hairdryer. Stick it in the center and work your way out using a paper towel to let your finger glide easily. If a wrinkle starts to appear, put the heat on it and work the wrinkle away. Also, REMEMBER that there is a protective sheet on the BACK to protect the sticky side, and ALSO a protective sheet on the FRONT to protect the shiny outer side. Peel the back off to install, then the front after install is complete. As far as quality goes, they look fine to me. I don't know what expensive name brand stuff you could use, but this looks and works great. Plus, it was only 5 dollars AFTER shipping, so what do you really have to lose? (Pic taken is with the foglights ON in daylight. Looks great either way!)
Joyce Thalacker-Hudson
Great for bowfishing
Used this to cover the LED lights for my bowfishing boat. I started by just doing every other light so that I could see the difference, and it actually was a huge help. Not only did it let me see into the dirtier water better, but it did not reflect the fog coming off the water nearly as much as the white light did, which was a big advantage. Needless to say I wrapped the rest of my boat lights with this and fog/steam was never an issue again. The product when on as it should, and will not be coming off any time soon. This stuff is heavy duty and I expect it to last for a few years at least.
Alice F. Hyke
I recommend having a friend for an extra set of hands
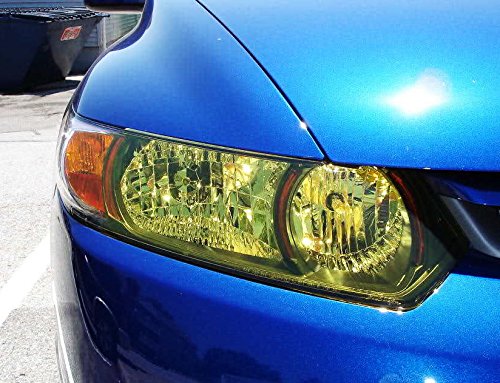
Needed two rolls to get the desired strength of yellow. I bought two rolls with the intention of doubling up if needed. Allows PLENTY of light with the tint of yellow needed to be effective. I recommend having a friend for an extra set of hands. Do it indoors in a clean environment, a blow dryer and patience goes a long way!!
Tina Hutchins
Easy to use, even for a newbie
First of all I don’t know why everyone is saying the adhesive isn’t strong enough. Reading the reviews I went straight for using soapy water to put the tint on my fog lights and it didn’t work at all. Maybe I didn’t have the right technique . But then I just used the adhesive the tint came with and a hair dryer and it went on great. I had to try a couple of times, but that’s because I’ve never done this before. And my roll didn’t come wrinkled or anything. I used it on my Toyota Venza and I love the way it looks.
Butch Gabriel
Working so far!
I bought this to use on my back porch lights. I have an LED motion detector light, I covered the lenses with this because 'bugs can't see yellow', that's what I was told anyway.. But, it went on fairly easy, kinda has wrinkles because I'm no good at this stuff, but you can't see them when the light is on. I'll pretty much have to wait till next spring to see if the 'bugs can't see yellow'. But I do like the product.
Cheryl Warren
looks pretty slick and was easy to put on
Bought this for my motor cycle head light. looks pretty slick and was easy to put on. however... I tried to put it on my 2013 vw golf. that requires much more skill than a flat motor cycle light. recommend watching youtube videos on how to do it before you dive in. but i bought it for the motor cycle. and i like it I put a before and after picture. had some electrical tape on it before. because you know. i'm bored or whatever.
Rebel Jutt
IT WORKS!
If you haven't put vinyl before, please watch a couple "How to videos" before complaining that this product doesn't work. For the price you can't beat it! With a little heat you can stick this product anywhere!
Chris Anglin
Perfect product and color
Ok very please with the outcome, I used the viny on a LED 5000k fog light that are very bright putting the film on I'm sure I lost some outputs but it is compasated by the yellow color. When it was just the 5000k I could not see the obstacle on the road properly and after the viny I'm super happier I can see better and car looks unit too.