


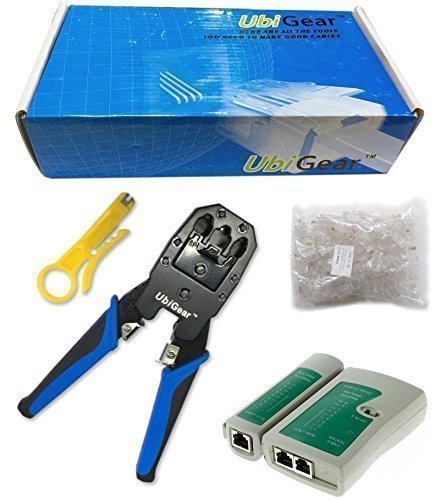
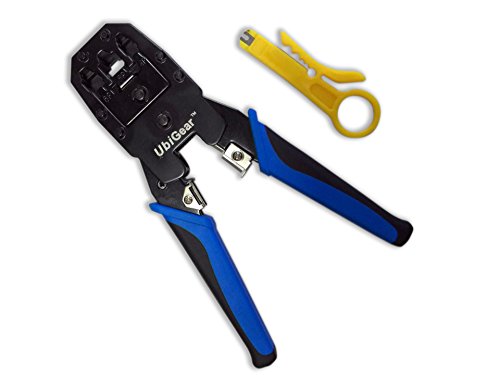
- 1 x UbiGear Network Crimper 315 -- works for RJ11 (6P4C)/RJ12 (6P6C)/RJ45 (8P8C) connectors.
- 1 x UbiGearCable Tester for cables with RJ45/RJ11/RJ12 Connecto (battery/charger not included). The LED lights will flash in rotation if all the wires are properly connected, otherwise the corresponding light will not flash. The color of the LED light does not mean anything.
- 1 x Wire Stripper (Free)
- 100 x RJ45 RJ-45 CAT5 Modular Plug
- UbiGear One-Year Limited Warranty with 100% Satisfaction Guarantee! If there is anything wrong with your order, just let us know, and we’ll take care of it.
-
Information
-
Twitter
-
Pinterest
-
Youtube
-
Facebook
Simone Gallimore
"Technicians" don't understand the concept of generic products.
The crimper is actually not as large as I initially thought it would be! On top of that, the stripper and crimp heads are all perfectly fine and dandy, I don't get why so many so called "technicians" are saying this is cheap crap. Literally this is no higher quality than buying another crimper rebranded with a TrendNET logo or anything else. It's definitely not a fluke networks tool or anything, but for a quick $15 replacement, with 100 connector ends and a stripper? Heck yes!
Krystal Brewster
Great budget eth kit
Works great for the price. If you have crimped twisted pair before, this is the same stuff. Made 8 cables, all 16 ends crimped fine. Did not use the yellow punch and strip tool. Tester works fine, just ligts each pin in sequence. It does not test rates. It is simple, and probably can not handle shorts. I see from reviews, some people had issues, try this: - cut the cable to length with the flat balde in the handle. - very lightly score the cable jacketing 1 inch down. Use the half circle blade in the handle for round cable, or the gap blade for flat cables. Break the jacket and remove. - untwist all pairs, and peel back insulation fibers. - arrange conductors in the A or B patten. Use the same standard (a or b) on both ends for standard cables. - gently bend and massage the arranged conductors together in an arc, alternating sides until wires are flat. - trim all of the conductors even with the flat blade in the handle about to about 1/2 inch length. - slide the connector on, and apply pressure. You should see all conductors slide into grooves and sit flush at the end of each channel. - place the connector in the crimp channel. Make sure the toothed side lines up with the metal pins. Putting it in backward will ruin the connector and crush the pins. - apply pressure to the cable into the connector and crimp down all the way. If you notice the clips are not latching well in jacks, just lightly bend them up and they will work better.
Charlotte Arp
and stripping tool work great. Giving three stars because of the tester
Crimp tool, RJ45 connectors, and stripping tool work great. Giving three stars because of the tester. Instructions state to use a standard 9V battery, as do all the folks who answered the questions here on Amazon. I open the battery door and lo and behold, it is very obvious this unit takes (what appears to be) two AAA batteries (side by side with polarities opposite, just like any other device that takes 2 AAA batteries). A 9V wouldn't fit into the space even if it was supposed to go there. Tried two different sets of AAA batteries and got no response from the unit. Not sure if I got the right tester with this kit or, if they've changed the battery type, the unit is just DOA. Didn't really need the tester anyway so no big deal, but if you're buying this at the end of 2017, be advised. EDIT: Tried a third set of batteries and got the tester to work. Instructions that come with the device are either outdated or from another tester. Mine didn't have any green lights, only red. Despite this, the cable I made worked fine, so I'm assuming my version only has red lights to indicate continuity. Changing to five stars.
Akarshan Lochun
Just what I was looking for
Purchased for a networking class. I didn't buy the crimper 315 but the Premium. It came with everything pictured and everything was carefully packaged in a nice black case. There are not one but three different tools in this kit that can strip your cords (The one built in the crimper was the one most difficult to use). The Crimper has nice straight teeth and those teeth are covered when the Crimper is open to help prevent damage to the teeth, The crimper IS directional to avoid damage to both the crimper and the connector make sure everything goes in correctly. The crimper does lock when closed, to open squeeze all the way down and the crimper will unlock and open. I was able to successfully make several cat 5e cables with out any issues using this kit. My only wish is that this kit come with an optional length of cabling (either Cat 5e or Cat 6). Items received are pictured below (9v battery already installed)
Cristina Bucad
Perfect Kit for Small Jobs
We recently changed over our internet service to fiber. There is a CAT6 line running from our detached garage to inside our house into a media closet. AT&T was unable to get the line to work properly so I ended up having to move the router to the garage which is far from ideal. I wanted to troubleshoot the CAT6 line to try to identify where the issue was. I needed a cable tester and a way to add RJ45 ends to the wire once cut. Since I only had a small project and would not be adding any new wiring I also wanted something inexpensive. I ended purchasing the 568ToolKit, this is the one with the ratcheting crimper (568R). There are a lot of other similar network tool kits on Amazon, but this was the only one in this price range with the ratcheting crimper. The "instructions" that come with this kit are miserable...and that is putting it kindly. That being said, there are tutorials and instructions all over the internet, just do some simple searches. If you are unable to find instructinos you really shouldn't be working on a network :). The tester has two speed modes, normal and slow. As a bonus you can skip the 9v battery (not included) and use a micro USB cable to power the tester. The lights will move sequentially down on both ends. You can then identify if there is cross-wiring (e.g. lights up 1, 3, 2...). In my case it was skipping light #1 altogether. This helped identify that one of the wires (4 pairs / 8 wires) was corrupted. The wire stripper is fine but you need to be really careful with it. It is way to easy to nick one of the pairs of wires inside the sheathing. The crimper works really well and the wire cutter near the handle makes it easy to get a 90 degree cut on the wires before inserting in the RJ45 connector. The RJ45 connectors that come with this kit are for CAT5 cabling. They do not really work that well with CAT6. I had already purchased a separate set of CAT6 connectors. If this is your first time working with network cables I suggest taking an old cable and working with it until you feel comfortable, you will just end up ruining (or shortening) the cable and wasting a couple of RJ45 connectors. Overall, I'm very happy with this kit considering what I paid for it. If you only have a couple dozen cable terminations to make as a one time job and need a tester as well, this will work fine. If you plan on doing any more than that I would suggest at least a better wire stripper and real punchdown tool (assuming you need one at all).
Alia Khan
Fully functional. Couldn't ask for more for the price.
Is this the best crimper on planet Earth? No. Is it the best crimper you could possibly buy for the price? Quite possibly. The value of this kit is unbelievable. I have made about 20 crimps with it so far, and have had no problems. The included tester feels kind of like a McDonald's toy, but it works well and has saved a significant amount of time for me in checking each connector. The connectors themselves are cheep. If this comes as a surprise, please consult the price above. However, they are fully functional despite what they lack in beefyness, and for the price its functionality is really the only thing that it can be fairly judged by. If you are a network pro, you should know better than to be looking in this price range for tools. If you don't plan to make 100 crimps per week, this is the tool for you. 10/10, would buy again.
Kelly Nichole Presley
You can buy this. It does work
all these negative reviews. I can imagine people buying expensive s*** because of the reviews. All the people screaming that it doesn't work, that s*** is cheap. So here is a review for the price range this set is made for. My wife bought a house with a pool house while was in Afghanistan. She left me the good router and bought a cheaper wireless for the new house. Even when I brought the good router down to the new house, it still wouldn't provide signal to the pool house. I had a the leftover spool of cat 5 from a Reno we had done and decided to take her cheap router and run a cascade. Being as I only needed a few ends, I opted for this kit. As cheap as it is, I figured it was worth the risk. It arrived. I wanted to practice before making my ends because there was just enough on the spook to reach where I wanted it to be. So I took another chunk of cord and put ends on it. Hooked up the tester in remote format and got a first time go. Verified when I used new cord to plug into computer to clone settings for WAP. Used ends,crimper and tester for the 20m cord for my project. Also got first time go. Writing this review from pool house on wifi. Nope, not ratcheting. Seems to save time. Position correctly and it sets perfect. Set cutting tool like you are doing cat 5 and break sheathing. Don't cut it like Romex. I also used cutting tool for cutting the fibre cable. I also went outside and amazed a few end with my shoe, and a few more with a hammer. My 20 oz framing hammer ended them quick, but I still was able to use the ones that I tried to curb stomp to make a usable cable. I am sure that for an IT specialist that this tool would be inadequate. But if an IT specialist was trying to set his kit this cheap, you wouldn't hire him. For the homeowner, hobbyist, general contractor, this set is perfect. It makes a good connection, and the tool works as it should. It allows you to make a termination for a cat 5 cable without spending an arm and a leg. The ends supplied are standard quality. It's well worth the money I spent, and I would recommend this to friends in a heartbeat.
Key Tiffany Carter
Good crimping tool, useless wire stripper
I bought the UbiGear Crimp 315. I have not crimped Cat5e before so there was a learning curve. Fortunately, I have a brother with experience. The yellow wire stripper is useless. When I used it to strip the Cat5e cable it nicked 1 or more wires underneath the outer shield. So I used a small scissors to cut upwards from the end for the length that I needed, then around the cable to reach the wires underneath. I made the mistake of trying to strip the individual wires before inserting them into the clip; not necessary. However, the stripper did a very poor job anyway, either stripping one side of the insulation or cutting through the wire. I have tossed the stripper. The crimper does a very nice job of piercing the wires and making a good connection. Once I understood how to do it, it was fairly easy and each connection worked well. The tester allowed me to separate the units and put one on the second floor and the base on the other end on the first floor. The clips aren't high quality but they work just fine for my needs. I ran the first two wires from 2nd floor, to the attic, down to the crawl space and back up to the first floor. I put the clips on all 4 ends and used the tester to confirm. I connected to my cable box, the Roku box and the Sony Blu-ray player. All connections tested OK and now no more drops from the wireless connection. I'm going to add a switch to one of the wires and run more Cat5e to other first floor rooms. How I did the crimps -Run your wires as necessary in your home -Strip about a half inch of outer insulation from the end of the Cat5e exposing the 4 twisted pairs of wires -Straighten the individual wire pairs and align them according to the T568B or T568A standard (see the included instruction sheet). Whichever you use, always use that through your network. Flatten the pairs of aligned wires, you may need to trim them so they are all the same length. -When you have the wires aligned to the standard, use forceps (or some gentle clip) to flatten and hold them in place -With the retaining tab facing down, push the wires into the end of the clip. You should see the tips of the wires at the other end of the clip. You can look at the edges to see the outer 2 wires. It's very important that you have them ALL THE WAY to the end of the clip -Insert the clip into the center (8P) of the crimper, tab up, careful not to pull the wires out. Squeeze the crimper and the chrome slide will go up to force the gold tabs up into the individual wires, piercing them and making the connection. Depress the tab on the clip and remove it from the crimper -Do the other end of the wire the same way -Separate the 2 pieces of the tester, put the smaller on one end of a new Cat5e clip -Make sure there are batteries in the large tester and put the other end of the Cat5e into it. Move the slide switch to on or s(slow). "G" will light on only one of the testers (OK). Each tester will glow red for each of the numbers 1-8 (4 pair). If any light is missing then the crimp didn't work. (I went through about 6 clips before getting it right. Then the rest were OK on the first try.) Hope this helps someone else.
Joan Ellen Erbstoesser
All you need for the average home networking project!
I used this kit to install my home surveillance system. The system comes cabled with RJ45 connectors for each camera, however I purchased my own cable, better quality, and boxed designed for easy pulling. While installing the surveillance system, I also pulled cable to hard-wire my computers for internet and installed an Ethernet switch...no more wifi...Do yourself a favor and wean off your wifi and get your through-put back. Its an amazing performance upgrade! ; )...Folks belly ache'n about bad/slow internet has crap'y wifi... My cable modem/router/gateway, whatever Comcast calls it, I call it...crap! I particularly like pass-through crimpers, less chance for for pin-out color-code errors and its just easier and quicker to make your plugs. The pin-out code is stamped on the crimper. I purchased two 500' box's of cat5e, pulled 16 cables used 895' made 32 plugs with no failures. I experienced no issues with the crimper, it made clean cuts each time with no wires hanging. It has a nice heavy feel with a smooth ratchet action. You do not need an $80 crimper for home projects! The cable tester, honestly, is the most important item in this kit, whether you make your own cables or have factory cabled plugs, test, test and test again. Mistakes are part of life, my wife says I was a mistake!...LOL...! Majority of connection issues with cameras, router, modem, internet will trace back to cabling. When trouble-shooting, test your cable first! You can spend hours, uninstalling/installing software, drivers, boot/reboot, scratching your a**, quoting various 3, 4 letter words, only to figure out, after finishing off a 6 pack of Coronas...it was a damned 3' Ethernet cable...yes...s*** happens, and at 69...I've seen and stood'n my share! I recommend this kit to anyone and would purchase again if needed. Happy cabling! ; )
Renee Hodge
Great Product, works as advertised
I have a small cabling project to do (<10 connections). I read all the negative reviews and checked my new crimper as soon as it arrived, looking for the reported defects. Problem 1, the crimper die does not align with the pins in the connector - False. Works perfectly. Problem 2, No instructions provided with the kit - That's why we have Google. Besides, the one comment I read concerned the stripping tool. (Man, if you can't figure this one out without instructions, stay away from tools entirely.) Problem 3, Can't figure out what kind of battery to install - 2 "AAA" cells. Doh! The only things that will fit. Problem 4, Tester did not work - No problem with mine. I plugged in a known good cable and the lights stepped from 1 to 8 just as pretty as you please. I did have one question. The tester has positions for On, Off and S. I didn't know what S was for. So I selected it. The scan rate slowed down. S = Slow. Pretty nifty. All in all a very cost effective set of tools for occasional use. If I was a cable installer, I'd probably prefer a better tool, but for my use (and budget) this was perfect.