


- My Image Garden Software handles photo and document scanning and organizes your files in a simple and friendly way so you can get the most out of them
- FARE (Film Automatic Retouching and Enhancement) Level 3: This built-in retouching technology delivers automatic correction to photos and film, removing much of the dust and scratches while restoring their color, all at the same time
- Zero warm-up time and offers lower power consumption with super-efficient white LEDs
- Auto Scan Mode automatically adjusts settings by detecting what you're scanning
- OS Compatibility : Windows 8, Windows RT, Windows 7, Windows Vista, Windows XP and Mac OS X v10.6.8 to 10.7
-
Information
-
Twitter
-
Pinterest
-
Youtube
-
Facebook
Gina Ordiway
Excellent scanner but quirky software, use my links to view high-resolution scans of 35 and 120 mm film
I bought the CanoScan 9000 F Mark II scanner in March, 2013 for $179.00 and use it primarily to scan 35 mm and 120 mm film. So far I have scanned over 1,000 frames. I have uploaded low-resolution images to the Amazon site (11/26/13.. Amazon has deleted these images), and have provided (below) links to high-resolution scans. Rather than taking my word, or anyone else's, on the quality of this scanner, look at the images it has produced and judge for yourself. The links will take you to my photography web site. To view an image at a higher resolution, click on the "sizes" icon at the far-right bottom of the page; the "original" option is the highest resolution available. 1.Cowboys [...] This and the five photos that follow were shot on 120 mm Fuji Velvia (transparency) film in October 1980. 2.Moth [...] This and the seven photos that follow were shot on 35 mm Kodak Ektachrome (transparency) film in 1977. 3.Key West [...] 35 mm Kodak Ektacolor (negative) film shot in 1974. 4.Santa Barbara [...] 120 mm Kodak Vericolor Professional (negative) film shot in 1988. 5.Biscayne Bay [...] 35mm Kodak Kodacolor II (negative) film shot in 1972. For the money, I don't think you could buy a better scanner; however, the software, could be better. The Canoscan offers three programs for scanning film: Auto Scan, Custom Scan and Scan Gear. It also comes with another program, Image Garden, for cataloging and filing images. I am currently using Adobe Lightroom to do this and do not care to switch. To run Auto Scan you simply push the auto button on the scanner. The scanner detects whether you are scanning film, photos or documents, automatically selects the resolution and file format and sends files of each image to your computer. In regard to film, the Auto Scan will scan only 35 mm film in the JPEG format at 1200 dpi. If you want a TIFF format and / or a higher resolution, you must activate the Custom Scan or Scan Gear from your computer. The auto and custom scan programs will scan only 35 mm film while the Scan Gear program scans 35 mm and 120 mm formats and lets you make corrections on a low-resolution preview. I generally use Scan Gear for all my film scans because I can select which frames to scan from the preview; the other programs scan every frame. For the most part, the programs work OK, but are far from perfect. Each program requires you to designate a folder on your computer that will store the scanned images. If you create different folders for each program you will get triplicate files of the same images no matter which program you use. While the scanner's uncorrected output is pretty good, a serious photographer would probably want to make post-scan adjustments using more specialized software such as Adobe Lightroom or Photoshop. The Scan Gear program can make useful adjustments, such as flip or rotate, but does a terrible job on the finer adjustments such as color balance, exposure and contrast. The scanner's ability to output "TIFF" files rather than just "JPEG" is a real advantage. The TIFF format is uncompressed meaning that it captures more information than JPEG and thereby allows a wider range of corrections (assuming you have the software that can make the corrections). Unfortunately, the TIFF files are about four times the size as JPEG. When I first tried to scan a full-frame of 120 mm film at 9600 DPI (the highest) resolution, I got an error message: "Scanner cannot be performed unless the crop size or output resolution is reduced to 10208 x 4032 pixels or less." This message also appears, but less frequently, when scanning 35 mm film at full-frame. By trial and error, I found that I cannot scan a full-fame of 120 mm film at more than 2400 dpi. I also discovered that if I use a crop tool to reduce the size of the scan area, I can avoid the error message and scan at 9600 dpi. This scan, however, creates a very large file of more than 500 MB. The manual does not explain what this confusing message means. It appears to say that you must reduce resolution in terms of pixels but the scanner settings are expressed in dpi's. (Pixels and dpi's are not equivalent terms). I thought that I might have an outdated driver, but the Canon web site offers only one driver: "9000F MarkII MP Drivers Ver. 1.00" while the scanner came with driver 19.0.2. It is not clear which is the more current, so I am still using the driver that came with the scanner. Despite the software quirks, I am giving this scanner five stars because it is reasonably-priced and produces scans that are comparable to drum scans. 4/12/14 update: Today I noticed that Amazon has deleted my links to high-resolution scans that I could not post on their web site. I have written to Amazon asking whether they now forbid reviews to include links to external, non-commercial web sites.
Tara Freeman
Great film negative scanning performance for the price!
I'm really happy with this scanner's performance. The CanoScan is less than a $100 more than those small consumer film negative scanners, and the performance is WAY better. Definitely worth the extra money. I use this exclusively for 35mm film negatives. Here are a couple details on film negative scanning: The scan quality is solid. No scan lines. Decently sharp. I've been scanning at 4800 ppi which seems to be the threshold for quality/sharpness. This will give you a nice 6k resolution scan. The film holder is a bit flimsy, but keeps the film flat and works good enough. I haven't tried the included scanning software and I've read some complaints on it. I'm on a Mac and honestly, I'm not even sure the software works on the current OSX. Make sure to double check this before purchasing if you plan to use the Canon software. I paired this scanner with SilverFast SE app which is about $50. I DEFINITELY recommend getting this software to unlock the full potential of this scanner. You'll be able to scan in different formats, (Jpeg, TIF, PSD) adjust exposure/color, and scan a lot faster than with the Canon software. (from what I've read) With SilverFast, it takes about 2 minutes to scan a 35mm negative at 4800 ppi. No hiccups or connectivity issues whatsoever. All in all, it's a great scanner for an unbeatable price. If you're trying to decide between a cheap $99 consumer scanner and this, or are on a budget and can't spend $500+ on a dedicated film negative scanner, I absolutely recommend this product!
Gussy Wilson
this Canon 9000F was one of the best purchases I have made in a long time
In my office, I had 2 printers. One printer was being used as a scanner, and it was doing only a mediocre job. I finally decided to remove that printer/scanner from service, and look for another. Let me tell you, this Canon 9000F was one of the best purchases I have made in a long time. This is a fabulous machine and it does everything I need it to do. Since it is not a "combo" unit, it does scanning best. No printer ink to keep feeding it. I use it to copy documents to my digital files, but most of all, it is able to copy old photos to digital format. When I was young, so many years ago, I used to take roll after roll of B&W film. Yes Millennials, there was a time in the past where all pictures were captured on 35mm film and had to be sent off to a photo lab for developing. Well, I developed my own film, but never really printed anything. This Canon scanner can scan the film and capture it in a digital picture! From there, it can be printed or just saved for posterity. This Canon scanner will also scan slides and convert those to a digital archive. I am so impressed with this machine, and I was very impressed with the reasonable price tag. Thanks, Amazon!
Felipe Aya Sanchez
Great images from negatives, great software, not all that easy to set up initially.
The good news first. If you have lots of old negatives, get this. It will magically turn your negatives into high quality digital images. The dust removal and color restoration technology is awesome. The bad news is that set up is not intuitive. You need to tinker a lot with the settings to get it to work at all. Edit the settings in custom scan -- make sure that you've checked the box for "use image correction." Also, you need to tinker to see how the negatives fit into the tray (which side up, etc). After about an hour of trial and error, I had the thing running well. The best thing is that the images come out great when you get all the settings right, and it's installed properly. I wouldn't hesitate to buy this again -- but just know that it's not plug and play.
ツ ツ
Canon Cano Scan 9000F MKII.
I really do like the scanner, especially how my old color negatives come out and that the machine can also remove dust and scratches (color only). My only negative are the film holders, especially with radically curved film. I am trying out strips of glass to fit in the film holder and I sandwich the negatives between them. The problem is that I have to tape the glass to flatten the negatives and if they're not completely flat then you will get a rainbow type of reflection on parts of the negatives. This is an experiment in progress and I may nave the glass guy cut me some thicker, heavier glass. Other than that, it is so nice to finally get to my hundreds, if not thousands, of my color and black & white negatives plus my slides. I do have a regular darkroom, but to me it is now too time consuming and expensive, what with paper and chemicals. I always hated the waste of paper when a print didn't look right. I will also be investing in Adobe Lightroom, especially for my black & whites. Here is one I did recently from a Tri-X negative.
Jean Basile Some
Open Sourced Linux Driver
I noticed one major feature difference between the Epson V600 and Canon 9000f (MKII), Epson's driver is primarily closed source or proprietary and the Canon 9000f (MKII) driver is entirely open source code. There maybe some benefits with the closed source code Epson IScan driver, but history dictates products having open source code drivers usually rival products having only closed source code drivers. The main feature of open source code drivers, the code is backwards and forwards compatible with past and future operating systems. Also, open source code drivers tend to be always readily available, versus closed source code having a tendency of their download mirrors simply disappearing due to internal business decisions. There is a web page detailing some of the differences between the Epson V600 and Canon 9000f scanner models, by searching with an Internet search engine and using the search term "Epson V600 Canon 9000f MKII versus". This page listing the differences is published within the versus.com domain name. In brief, the Canon seems to win over the Epson unless you want 16 bit reflective grayscale scans, then the Epson V600 would be your choice. In practice, scanning black and white photos with a scanner not having 16 bit grayscale output can still be achieved by simply scanning in color 48 bit which outputs to 16 bit. Then open the image file using your photo editor and click "Image > Mode > Grayscale" to convert the RGB/color image to grayscale! Further reviews by filmscanner.com shows the following effective viewable resolution comparisons: Epson Perfection V600 Photo 1560ppi (less than a quarter of the claimed 6400ppi resolution) Epson Perfection V700 Photo 2300 dpi (less than 40% of the claimed 6400 dpi resolution) Epson Perfection V750 Photo 2300 dpi (less than 40% of the claimed 6400 dpi resolution) CAnon CAnoScan 9000F Mark II 1700 ppi (17% of the rated value of 9600ppi) Also, scanning photos (or reflective media and not negatives/positives) is limited to the manufacturer's 4800 dpi resolution on all scanners mentioned above. They're higher stated dpi/ppi resolutions are only for negative & positive media. Makes me wonder why more people by the Epson versus Canon. The Canon seems to be a far better deal all over, unless you're buying a Nikon (or other scanner) specifically for scanning negatives. Pros 1) Open Sourced Linux Driver (ie. sane-backends "pixma") 2) Many improvements over the Epson V600, such as better power management 3) ScanGear (or IJ Utility included within the Canon Driver package) are useful and apparently adequate. ScanGear's Advanced menu without thumbnails appears to be very similar to Linux XSane with having a few additional customizations. 4) Scanner seems very light weight, and I like the inside cover unique insertion, and can be easily removed for scanning negative/positive media. 5) Power management is another huge plus. I always hated seeing my older scanner filament lights always powered on. Cons 1) Only able to perform 16 bit grayscale negatives/positives and color reflecctive media. Only 8 bit grayscale reflective (ie. Black and White Photo), versus the Epson V600 able to perform 16 bit negative & reflective grayscale media. Other than this, both are able to perform 16 bit color. But if 16 bit reflective grayscale is needed, then just scan the black and white photo as 16 bit depth color and then transform to black and white. (This is likely why Canon negated the 16-bit depth reflective grayscale feature, as reflective color scans support 16-bit depth color.) 2) The My Image Garden software (680 MB) and Quick Menu are basically useless. These two pieces of software will not function within VirtualBox Windows XP session, using NVidia binary drivers & Linux. (The problem occurs with Virtual Box Windows' 2D/3D display acceleration, as these application's graphical interfaces apparently depend upon the acceleration.) However, any software usually bundled with any purchased hardware is basically useless, except usually the in-house created utility and drivers for operating the basic hardware components. 3) Digital Ice or FARE (or scratch and dust fixing) seems like a gimmick for flat bed scanners, and only useful for scanning negatives. Hardware not specifically made for scanning negatives/positives, do not include the full version of the Digital ICE software for fixing negatives. Even then I've heard it's just best to perform all image fixing from within the Gimp or Adobe Photoshop, as automatic filters tend to provide unexpected results. The other option if you strongly desire the infrared image hardware fixing features, buy VueScan or other after-market proprietary software. If you have many negatives to scan, strongly consider buying hardware desired specifically for scanning negatives; and infrared image fixing is desired, buy VueScan or other third party capable software. TIP 1: Old 4x6 black and white photos are scanned in as color 16 bit (ie. Input 48 bits color) at 600 DPI and then transformed to grayscale from within the Gimp. Smaller photos will likely benefit from the higher 1200 DPI. Rotate as required and use; 1) Image > Mode > Grayscale, 2) Colors > Levels > Auto should produce good grayscale images. I tend to keep the initial scanned image file size at around 100MB. TIP 2: When working with old color photos, instead of using Auto Levels, try using Colors > Auto > Equalize. TIP 3: For Windows' operating system users, avoid installing My Image Garden (mig @ 680 MB) and the (Canon) Quick Menu software when prompted for selecting or deselecting installing software components. Only select to install the Adobe 1998 Profile and Canon Driver, for which the driver includes the IJ Utility and ScanGear. There will be no shortcuts created on the desktop until you make one using the Program Files entry shortcut. Also, update your driver and Adobe Profile by downloading the updated software online at Canon.com. The updates are several months older than the CD that was provided with my scanner. When using ScanGear, make sure to set file saving settings to TIFF instead of default JPEG for best results. There are no additional compression settings for TIFF files. TIP 4: For Linux users, Linux XSane includes an open source driver, with XSane able to scan at 16-bit depth for color reflective scans only. When scanning grayscale (or black and white) photos, scan in color (16 bit depth) as previously mentioned and then use the Gimp to convert the Image > Mode > Grayscale. Also CMS color management profiles are contained within the Canon driver CAB files. (ie. CNSN0D.ICC, CNSP0D.ICC, CNSR0D.ICC) Using hexedit, hexedit clearly displays each color ICC profile as negative, positive and reflective. You'll need to manually select the profiles when scanning either negative (ie. negative/positive) or reflective media. ImageMagick's identify or the Gimp is your friend for displaying scanned image file properties, or ensuring you're getting 16-bit depth scans. Save scanned image either as PNM or TIFF without any compression. Can also embed the scanner profile into the image. (ie. CNSR0D.ICC 212KB) TIP 5: ScanGear does not provide color profiles for negatives. VueScan does provide color profiles for negatives. (ie. Standard, Kodak, ...) When comparing scans from Canon ScanGear and VueScan, the ScanGear scans look very similar to VueScan except ScanGear's scans seem to be too colorful or over-saturated (eg. Lawn grass looking to comic book color green.) ScanGear's color negative scans also look slightly unnatural versus using VueScan after using "Lock Film Base Color"/"Lock Image Color" method. As such, VueScan scan's have a more realistic color look. If you're performing color scans, especially color negatives, it is likely best to invest the $80 for VueScan Professional. Some settings within VueScan seem tricky without hover-over hints, requiring some searching for definitions for configuration settings. VueScan works within Windows & Linux, including infrared fixing for negatives. I've read quite a few negative reviews for SilverFast. XSane (Sane for Linux) appears relatively good for reflective bed scanning, and barely adequate for somebody performing few negative scans. The nice feature with ScanGear, ScanGear's multiple auto cropping for negatives works well versus VueScan's multiple auto cropping. I tried to include the two photos comparing ScanGear to VueScan, but Amazon.com wouldn't permit the upload. Tip 6: Instead of using VueScan's preset negative color profiles (ie. KODAK GOLD 200 Gen 6 GOLD 200-6), it's said to be best and of little effort to perform the color profile yourself. Follow steps listed on VueScan's "Advanced Workflow Suggestions" (http://www.hamrick.com/vuescan/html/vuesc16.htm) and ignore the "Lock exposure" option as this option likely no longer exists. First set the Color > Negative Vendor to standard, then preview a negative and crop an area of print which is pure black for a negative. Perform a second preview (for the cropped black area) and then tick "Input > Lock film base color". The film for this roll of film is now color profiled. Using the preset negative color profiles, I've witnessed slightly brighter images (slightly washed-out) than using this custom profile method. TIP 7: I think the reason why many Linux Sane/XSane users migrate to VueScan; when scanning negatives, there is no complete infrared support and good color profiling (ie. ICC/ICM) support. Although there is infrared source code (ie. antidust.c), antidust.c support is currently not integrated into Sane/XSane or at all useful to end users. Although XSane does allow users to create their own medium definition, medium definitions cannot be used at the same time color profiling support is activated. (ie. CanoScan 9000F CNSN0D.ICC negative ICC/ICM, cannot use both the ICC and custom media definition for which are two color definition tactics apparently used at the same time from within VueScan and Canon's ScanGear.) TIP 6: When scanning negatives or film, whether color or black and white, first preview the negative then rectangle select an area of the negative's border. Click "Lock Film Base Color" and click preview again. Click "Lock Image Color" and click preview again. Now you can maximize the crop area and perform the final scan without worrying about black/white clipping or orange masks. (As they say, film or color film profiles suck! Just use this lock method workflow, providing far better results!) TIP 7: Preferably, save to RAW TIFF (not DNG) only and then use VueScan's "scan from file" function. This gives you a digital negative, for which you can later use DarkTable (or other RAW image manipulation application) for manually augmenting, or in my case for fool proof archiving. TIP 8: I haven't seen much difference between 4800 DPI and 9600 DPI, albeit 9600 DPI double or quadruples the file size. I just played with an UnSharp Mask and Gaussian Blur on a 4800 DPI image, and it turned-out looking very similar to the 9600 DPI scan, but with a far smaller file size. (The work piece was an old black and white photograph, and might see better results with recent color film.)
Mish Khan
Best under-$200 scanner you can buy. And QUICK.
I tend to have about 3 scanners at any given time: a higher-end flatbed (for photos and film) and two economy models for my antiqarian book business, one newer with a 'good' glass surface (few, if any, scratches) and the second-newest one which usually has scratches, used for rougher items. In other words, I use scanners quite a bit and know a good one when I see it; and this new MKII version of the 9000F is quite good. SPEED: The most important aspect of a scanner for someone who does a lot of scanning is speed: speed in warming up, speed in scanning in high-res. The 9000F MKII is excellent at both, better than my $700 Epson V700 (with one exception). The difference lies in the LED technology of the new Canon. My first thought was that LED may produce inferior results but this is certainly not the case, after analyzing the results. And because the LEDs don't need warming-up, 'warm-up time' is a thing of the past. The one exception in speed tests is scanning at high-res with Canon's FARE software turned on: very slow indeed. However, I personally always make raw scans and then batch-process them in Photoshop, so this is not a factor for me. With FARE turned off, the speed is very good, even in high-res. SOFTWARE: The second most important aspect of a scanner is software, both the user interface and the correction software. Canon's UI software has always been inferior to Epson in that it is dumbed-down and kind of clunky in comparison to the customizable and fluid Epson UI. However, there are now big improvements in this area: I was amazed - really, amazed - at how well Auto Scan Mode works: excellent recognition, cropping, scanning and saving files in just one click. Scary good, really. Auto Document Fix (as opposed to photo fix with FARE) is also quite advanced and, for example, makes text as clear as possible - automatically. And while settings are fully customizable, as Epson's are, Canon still lags behind a bit, clearing your settings at times (Epson requires the user to reset, which is better). One software feature that, again, amazed me, was 'Gutter Shadow Correction': as a book dealer I often scan pages within books; this feature automatically recognizes the gutter shadow (the crevice between pages) and eliminates it. Wow. QUALITY: Let's make this simple: today, even low-end scanners have incredible quality. You are getting what 5 years ago would be a $1,000 professional scanner. To get caught up in dpi and microscopic analysis of scan results is a bit too much when you're talking about a $170 scanner. The highest usable dpi for reflective media is about 3600; anything beyond that is useless (i.e., the scanner's dpi exceeds that of the photo you're scanning!). For film - certain, high-res film - maybe 4800dpi comes into play. Beyond that, get a film scanner - that's why God invented them. To expect the Ferrari of imaging devices for $170 is a bit much. This is why I've always had a separate photo scanner in addition to lower-end scanners for other uses. The 9600 dpi CCD sensor on this scanner is superb. This 9000F MKII has tremendous image quality; don't let anyone convince you otherwise. One unexpected feature is the fact that the scanner includes not only 35mm film capability, but medium format as well. On the downside, Canon no longer bundles Photoshop Elements with the scanner. As for new bells and whistles, the major differences between the original 9000F and the MKII (aside from the improved optical quality) are the external 'EZ Buttons': touch a button for instant copy/scan/email/pdf functions. All in all, an excellent scanner and well worth the money.
Zaini Asma
The best scanner for 35 mm slides.
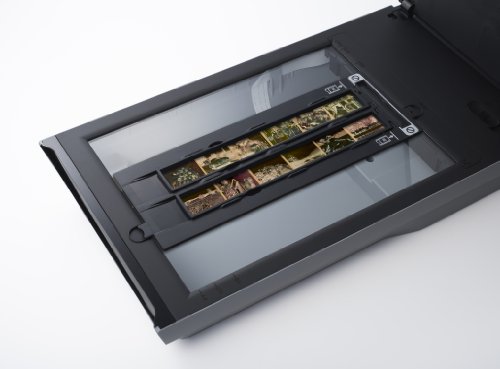
Just scanned 1,800 35mm slides with this outstanding scanner. The results were spectacular. Some of these slides were over 50 years old. The slides that were taken with a Canon SRL camera were still in great shape and the colors were just as they were when the picture was taken. The resulting jpg's were between 1 and 2 megs. Don't waste your time or money with the cheaper scanners. This one will give you the results you want. Some tips. This scanner comes with a 4-slide holder so you can scan 4 slides at a time, but the scanner actually scans one slide after the other. It takes about 75 seconds to to scan the four slides. Clean the slides before scanning and periodically, clean the glass plate of the scanner. After you install the software, go to the Canon web site, register the scanner, and then download the software update and the latest driver. I used another software product to "fix" up the scanned jpg's. Finally, the software does not use the term 35mm slide. When scanning 35 mm slides, select the "Auto" button to scan these slides.
Mic Santander Campit
A dream come true for those with a lot of medium-format transparencies and negatives.
I am an older guy and have thousands of 6 x 7 cm negatives and transparencies that I could not copy on my existing HP copier/printer/scanner. That one did a good job on 35 mm materials as well as prints and documents, but this Canon does a better job still, and it does very well, indeed, with the larger 120-class film. It is also much faster than the HP with negatives and transparencies, and also handles print and document copying with utter competence. The set-up disc did a terrific job of configuring the unit to my computer, and if I have any quibbles about its abilities they involve a few features that seem somewhat cryptic and unnecessary for my needs. (Overkill is the name of the game in the computer world.) Photographers with a lot of medium-format materials will want to obtain this scanner to put those items into their computer files.
Kara McKinney
Awesome scanner
I love this, it has worked flawlessly for me. I did spend some time playing with the settings to get the best results to meet my expectations but once I found them I have been scanning old family negatives daily, so far I've scanned 1800 without issue and have about 20000 more to scan. Photo added to review was in a box for 30 years and after scanning it looks the same as it did when my mom printed it 30 years ago (the original photo is in a family album at my moms). I have been able to edit and adjust images scanned in that in the original print were too dark and turned out poorly, so I am able to save photos that 30 years ago were "junk" photos. I also have cousins who do not have many photos from childhood and I was able to make them a digital copy, as well as a digital copy for each of my siblings to have. It really is a user friendly scanner that works well. I have scanned 35, and 110. To scan 110 you just set it in the scanner click preview and there is a box on the top left of the scan gear you click and it gives you a preview of the whole 110 strip, from there you use the little crop box and place it over the individual image from the strip until the image appears as a tiny thumbnail photo. You can do multiple crop boxes and then click scan. I read in some reviews that this does not do 110 film, but it does. I imagine any strip of film with individual image frames on it could be scanned using the method I used for the 110 so I do not feel this scanner is as limited as some have said it is. The setting that have worked best for me was 4800dpi, jpeg files. The Tiff files took forever to scan and were very large. I have tried the scratch and dust setting but that also added a lot of time to the scan so I do not use that setting as the majority of my negatives are still in very good condition. I have also scanned my boyfriends childhood photos in at 600dpi and they turned out wonderful too. I would absolutely recommend this product to friend or family. I am completely pleased with this purchase.