
- TEAR RESISTANT - Mold Star silicones cure to soft, strong rubbers which are tear resistant and exhibit very low long term shrinkage *Packaging may vary*
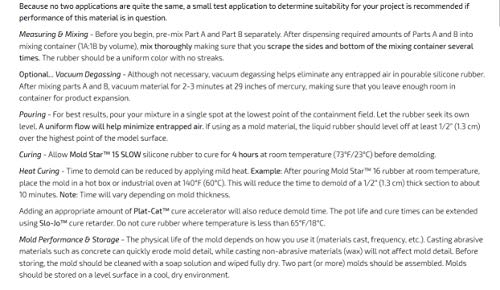
- HEAT RESISTANT - Cured Mold Star rubber is heat resistant up to 450°F (232°C) and is suitable for casting low-temperature melt metal alloys
- CURING- Allow Mold Star 15 SLOW silicone rubber to cure for 4 hours at room temperature (73°F/23°C) before demolding.
- VACCUM DEGASSING - Although not necessary, vacuum degassing helps eliminate any entrapped air in pourable silicone rubber
- MOLD PREFORMACE - The physical life of the mold depends on how you use it (materials cast, frequency, etc.). Casting abrasive materials such as concrete can quickly erode mold detail, while casting non-abrasive materials (wax) will not affect mold detail. Before storing, the mold should be cleaned with a soap solution and wiped fully dry. Two part (or more) molds should be assembled. Molds should be stored on a level surface in a cool, dry environment
-
Information
-
Twitter
-
Pinterest
-
Youtube
-
Facebook
Peter Patino
Excellent product , great way to test ideas without huge costs!!!!!!!
These are great kits for beginners or experienced alike, If you need a small amount for testing this is an ideal way to buy. I especially love the slow cure time of this silicon as i don't need to use a pressure tank or degassing unit to rid the mold of air bubbles. I just tapped the sides of the acrylic mold walls for a minute or so and it is left overnight to cure (4 hours is the normal cure time). Next morning i removed the original plastilina scalp and a perfect silicon mould was the result. I used smooth-ons white resin to test cast some door pulls i wanted for my workshop, i needed something big and strong to take the abuse one normally gets in a workshop environment. Smooth-On Smooth-Cast 300 Liquid Plastic Compound Smooth-Cast 300 was the perfect answer, 2.5 minute pot life and a 10 minute de-mold time was just right to enable me to get rid of all the small air bubbles introduce during the mixing process. After de-molding a quick rinse in Acetone and the pulls are ready for paint. As you will see form the first picture the far right skull is the original sculpt then the white resin skull,l next the red painted skull and finally far left we have the final product with a little Burnt Umber Acrylic added to highlight the detail. I will need more than 100 pulls so i have ordered a gallon of the resin and more of the silicon so that i can cast 4 at a time, i may even try the Bronze powder and the Onyx resins to see what they look like 100% recommend these products but do pay attention to the mixing instructions and do shake the resins well before mixing together as they do settle over time
Tahesher PinkishSmilez Anderson
Easy and fun!
I’d like to begin with the fact that I did not have enough to completely cover my sculpture. Mixing the two parts together was very easy. I secured my sculpture in a box and poured slowly on one side and then found I didn’t have enough product so with my bare hands removed my sculpture put it in a different container and poured the silicone will be mixture into the new container making a bit of a mess of myself which was surprisingly easy to clean up. I saw tons of air bubbles and I thought my project was lost but I let it cure for three hours and proceeded to slowly cut my sculpture out from the extra mold material that got underneath it from transferring it to a new container. And the mold turned out perfect there were no air bubbles the detail was great it was flexible enough to release my sculpture. For having done a messy job I am super impressed! I would recommend buying an extra set just in case you need more !
Tyler Schwenk
Expensivebutneasy to use and making molds
The curing temperature matters. After pouring, i left it to cure. After 16 hours, still not cured because my house temperature is lower than 10 degree celcius. So I put it under heated pad covering with my bedding. About an hour later, cured. I dont get why mold making silicones are expensive. Anyway, easy to use like level 1. Follow the instruction; result will be good.
Bianca van Boven
Great for beginners!
I love this silicone. The 1:1 ratio makes it simple and easy to use. It takes some practice but the molds turn out amazing as shown in my picture.
Willam Tonelli
Very good for casting.
For casting this is a great product. Pot life is plenty long enough to get all the small details perfect and if you use slow and gentle stiring and pouring methods the bubbles with more than likely rise to the top before procurement. If the material is cast in a section smaller than an 1/4 of an inch then it gets quite soft and a little too flexible for my taste but it will still hold the overall shape of the object till you grab it and it immediately bends. Like I said I used this as the cast and not a mold so your experience may vary if you want a mold of a sulptur or diy project. My tips if you want to buy and use this, get paper bowls or cups for mix the partA and partB because you won't use the leftover residue in it that doesn't solidify if it's in glass it'll never wash out because silicone is, of course, very waterproof. Second if you spill any of it as long as it's not on clothes, dont clean it, it'll dry in the puddle and peel off very easily; otherwise it'll be hundreds of tiny little puddle to scrape up and it takes way longer. But with that said, it definitely is good silicone.
Marjorie Marie Webb
Quality stuff but not much of it
Used this to make a mold for a sculpture project. Make sure to mix it really well - Smoothon recommends mixing in a cup and then pouring into a clean cup and mixing again. Really excellent quality silicone. Extra plus is it's not smelly! But - there isnt much volume.. I judged by the size of the containers, but they are not full to the top! I ended up needing to order more. Also make sure you received what you ordered. All the smoothon products have the same packaging minus the title, and it's easy to mix up. One of mine was a different silicone rubber so I had to exchange it.
Josefine Jensen
Perfect!!
I've always been very crafty BUT I am not the greatest at sticking to directions, so the fact that this is a 1-1 deal when it comes to measures is perfect. It is really easy to use, you can't mess it up (unless you try really hard to). I bought this to make molds for polyhedral dice, my new personal obsession. Kudos to D&D players out there. The photos are of my first time trying this, I used all of the product for the set of 7, but that happened because I used an unnecessarily big prop as stand, so I sort of wasted a lot of material. The second trial went better and I got some left over to use for something else. The molds really turned out amazing! I've bought this product twice, as implied above, and will keep buying it in the future. *To those interested in seeing the results, I also posted two photos of how the dice turned out* One straight out of the mold (uncut/unpainted) and one cut, sanded and painted 😊.
Yves Guevremont
Did what it says it does, and worked for ...
Did what it says it does, and worked for my application. Interesting side note, had a little extra mixed up and decided to try something. Made a small object using Play-doh, and poured the remainder of the mixture over it in a small cup. Didn't cure correct with the still soft Play-doh, I guess the chemicals mixed or something. Not really an issue, and not why I bought it, just somewhat interesting.
Aabroo Fatima
Eliminate the bubbles
Follow the instructions. Stir each of the components before you use them. Stir well after measuring and mix to a uniform color. All this mixing will result in a lot of air getting trapped in the product which will show up as a poor surface on the end result. When pouring the material, use some sort of trough. Pour the mixture into the trough slowly and don't use too steep of an angle. Don't pour a lot of material at once. The trough and slow progress down to the mold container will allow time for the bubbles to be mostly eliminated. There will be a loss of some material in this process, but the results are much better. Also, if you line the trough with some parchment paper, the cleanup of the trough will be much easier. Nothing will stick to the parchment paper. I like to use the paper tube found in wrapping paper.
Taylor Bryant
Awesome choice for anyone, but especially for beginners
I've tried a lot of molding silicones from a few brands, and so far, this one's my favorite for a handful of reasons. 1. Long pot life means there's ample time to mix and pour before things start to thicken up on you. If you're like me, when you first start making your own molds, you'll find dozens of ways to screw things up. A nice long pot life means that if (or in my case, WHEN) things go haywire, you'll have plenty of time to fix things. Silicone isn't cheap, so mistakes can be expensive -- the wiggle room is nice! 2. Relatively quick cure time, especially given how long you have before the mix starts to solidify. I can come home from work, pour a mold, and it's ready to use with time to spare before I need to head to bed. 3. Platinum cure is always a plus. For mysterious reasons, I've had trouble with tin cure silicones and the material I usually cast (epoxy). I think post-curing tin-cure molds is supposed to solve part of the issue, but even when I've tried that, the tin-cure molds have left a slightly tacky, sticky film on the surface of my castings. I've had much better luck with platinum silicones, which actually seem to *improve* how my epoxy resin cures. 4. Low viscosity means you don't get bubbles as long as you don't overmix, and the trapped air in detailed molds doesn't have shove its way through super-thick goop to break free. In other words, unlike a lot of silicones, you can get excellent results with this one without using a vacuum degassing thing-a-ma-bob. The last thing is a plus/minus: This stuff is soft, but not insanely soft. The flexibility makes it excellent for intricate stuff because you don't need Hercules hands to get your casting out of the mold. However, really soft, flexible silicone like this can also cause some problems. So here are a couple tips I learned the hard way :). 1. If you'll be casting something in multiple layers, make sure you either place your mold in some kind of support shell -- a cup or a plastic bowl can work -- or make your mold with extra "buffer" rubber on the base and the sides. Why? Well, if you move the mold too much, those awesome natural silicone release properties can work against you and knock your layer loose, which means the next layer can ooze down the sides. Having something to make sure the soft mold doesn't get jostled makes all the difference. 2. On a similar note, if you're going to make one mold with lots of cavities, it's probably best to time things to everything is ready to be popped out of the mold at the same time. The flexibility means it's pretty easy to accidentally knock one casting loose while trying to remove another one. All in all, a really awesome product. Highly recommended!