

- Low VOC, low odor, water-based acrylic paint for transforming outdated countertops without costly replacement
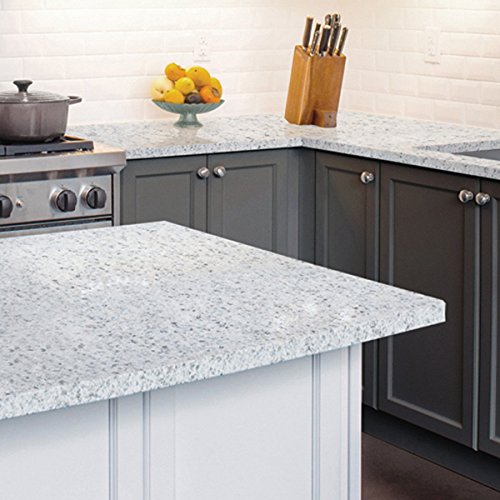
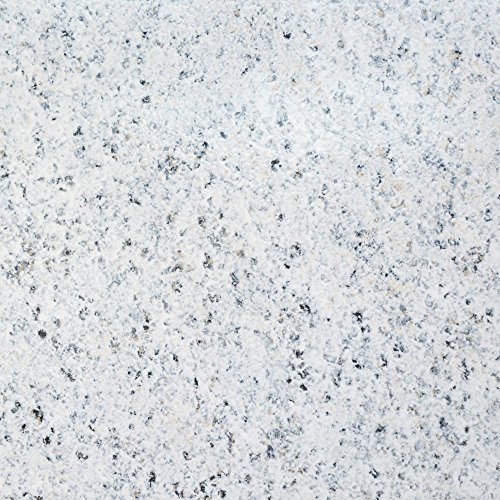
- Fun, easy DIY project complete with step-by-step instructions. The new minerals will allow you to easily create a brighter white granite look, without having to build up as many layers of White Limestone
- One weekend application process that dries in a high gloss finish to simulate the look of granite
- Covers 35 square feet (16 linear feet of standard 24" wide counters), the typical surface area of most kitchen countertops
- Ideal for use on Formica, laminate, Corian, ceramic tile, butcher block, cultured marble and traditional granite
- Durable acrylic topcoat for protection against everyday use
- 5 versatile colors that compliment a variety kitchen and bath decor
- Can be easily adjusted to accentuate mineral colors to better suit surrounding decor
- Can be used on countertops with separate sink installations or one-piece sink and countertop combos (see product description for application instructions)
- Pairs well with Nuvo Cabinet Paint Kits for complete kitchen or bath makeovers
-
Information
-
Twitter
-
Pinterest
-
Youtube
-
Facebook
Tammy Hubert
I was super excited about the marble-looking countertop until I attempted the ...
Wow! Okay, so, someone else had mentioned don't attempt the veins unless you're a professional artist, and... I'm not gonna lie, I was super excited about the marble-looking countertop until I attempted the veins. Then it just kinda looked amateur. However! I went over the veins with one layer of the pearl and then two coats of the white and they're barely visible, so they look *just* convincing enough to *maybe* be real. Sure, anyone who sits at the bar is going to know right away it's not real marble, but they might just think it's marble-looking corian or something, which we would have had to put in anyway since we couldn't fit real marble into our budget. So, if I had to choose between completely replacing the countertops for the big bucks or painting them to look like marble corian? Marble paint all the way, baby! Thank you, Giani! You're amazing!
Reynaldo Quillao
White Diamond Before and After
I have an old tiny kitchen that I will eventually remodel but wanted to clean it up and lighten up the room. After reading about different brands of countertop kit I decided to go with Giani and their White Diamond colored kit. I washed my counters but then sanded them. Sanding isn't required but as said above... my kitchen is old! Counters didn't take me long to paint. I followed the directions up to a certain point. I primed like directions, let dry for 8+ hours. After that I changed it up with how I added the colors. Once I had the counter looking the way I wanted it I let it dry. I didn't use the kits clear topcoat. I wanted durability as I need this to last so I used epoxy as the topcoat. Wow! it looks like granite!
Yvonne Campbell
Would Recommend!
Amazing stuff! My husband and I fix up homes, and are hard-core DIY-ers. We've gutted and redone kitchens, bathrooms, floors, paint etc so feel quite confident in any job. Our newest fix had pink bathroom countertops so we wanted to redo, but didn't want to spend the money on granite or new countertops, so after much research, we tried this. 1. You must scrape away any old caulking! The paint won't stick, and it looks terrible. Do it before to save yourself time. 2. The primer went on easily and dried quickly, though it was a bit shocking to see my counters such a dark color. Would this really work?! 3. When you start dabbing the colors on, layer, layer, and layer. All our DIY experience and this part terrified me. I thought it looked horrible until I'd layered forever, and then suddenly it came together! You'll know when it's where you want it because it starts really looking like laminate! (note: I didn't say granite :)) 3. Sand before applying final clear coat and you'll stay away from any bumps. Don't re roll after rolling it once, otherwise, hello air bubbles! 4. We finished with white caulk around the wall edge where ours butts up to tile and around our sinks. Really finished it off perfectly. Final notes - This doesn't look like granite to us. It looks like we redid the countertops with laminate. I can't imagine anyone coming in and thinking it's granite, but they do all think we redid our laminate. It's been about four months and holding up really really well. I'm happy with it, and will use it on future projects!
Jomz Grajo
Best purchase and project EVER!!!!
I don't usually give reviews on products. I'm just that kinda person. But...I have to say that this countertop paint is the BOMB! So I have to tell everyone how much I love this product!! We have these 1980s laminate countertops that transition to the wall for the backsplash. I repainted the kitchen and thought that the countertops would be ok with the updated paint job. Ummm, nope. Did not look good at all. And I really hated the countertops! Ugh! So I thought I would look up products and reviews. I didn't want to invest in new countertops cause we don't know how long we will be in this house. I came across this Giani paint. I read the reviews (thank you) and looked at several different combinations of what can be done with this paint. Now I'm not an artist. Let's just start with that. But I did do a lot of planning on how I wanted it to look before I bought it. I also wanted to make sure it was doable with what I had going on my life. I work full-time with 2 busy teens. So I knew I had to plan accordingly. I read how you have to let the base coat dry for 8 hours. So I painted that when I got off work on a Friday evening. I did sand the countertops. I highly recommend that. Sand with fine (220 or greater) sandpaper. Make sure to wipe it all off. On Saturday I did the sponge painting. It was very easy to do. I kinda played with the colors to get what I wanted. I used the diamond white paint. But I wanted more of the black to show through so I made sure not to be generous with the white paint. I let the sponge paint dry the recommended time. I sanded between the sponge-painting and the topcoat. Please do this if you want a smooth finish. I used 3 coats of the top coat. I am 6 weeks into the use of these countertops and I love them!! I'm waiting to see how they hold up before I decide if I want to use a polyurethane top coat like some reviewers suggested. So far I love this product. It has lived up to the positive reviews. Make sure you follow the directions to a "T" and I guarantee you will not be disappointed. Do not cut corners with the suggested drying times. Some things I would suggest that I did not do and wish I had: use a small brush to sponge the corners and close to the walls.
Marsha Felton
In love with the results
I'm a pretty diehard Amazon shopper and this is my first product review ever. I am in love with the results I got from this kit. There was bit of fuss and muss involved, but the results more than warrant the minor hassle of long dry times and a temporarily out of order bathroom. I was unsure about adding the veining at first but then went for it and am so glad I did. My husband usually side eyes my constant DIY projects, but he is now trying to convince me to tackle our whole kitchen. Highly recommended!
Jasmine Bell
Very Pleased with this Product
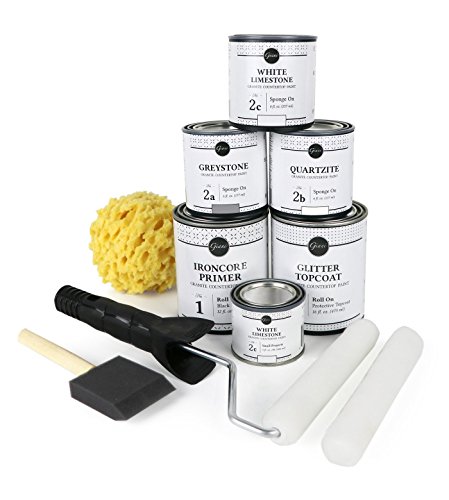
I used this kit to paint our Formica countertops to resemble white carrara marble. To do this, I did not use the included Quartzite color at all, and ordered 3 additional cans of the White Limestone. I applied the primer, the Greystone, 3 thin coats of white, added the veining with a 1:3 mixture of the primer and white, and then coated over the veining with 2 more coats of white. Instead of following the included instructions, I let each coat dry for 4+ hours in-between, with the exception of the white coat immediately after the veining. Instead of the included topcoat we used 2 coats of Environmental Technology 2128 128-Ounce Kit Lite Pour-On, High Gloss Finish for a more durable and chip proof top. The painting took a weekend, but the topcoat we used added a weeks time between the curing and prep process. The included instructions are very clear and helpful. Overall, I am very happy with the results. I watched lots of videos and read a lot of blog posts and reviews to be fully prepared before beginning. My decision to forgo the use of the topcoat was based on this research after seeing results of heavily used areas chipped after a years time. There are pros and cons to both but I need durability and longevity. For around $300 and a couple of weeks without a fully functioning kitchen we were able to completely transform the look of our countertops.
Wanda Cantero
The prefect fix on a budget!!!
I will start of by saying I took my time with this project. I started on Thursday May 25, 2017 with the first coat of primer. I let each step dry much longer (about 24 hours total dry time) than stated on the instructions. However, my kitchen is apparently much larger than I OR the kit expected. I was scraping the primer can to finish out the second coat, I completely ran out of the silver pearl and white and I still had a small section to go. I just ran to Lowes and got a glossy white sample jar and it ended up looking just fine. I then applied 2 coats of the clear gloss finish. I wanted to make sure I had my counters protected so I did an extra step (actually 2) and applied 2 coats of minwax polyurethane high gloss. I applied the last coat on June 1, 2017, which worked out perfect. We left for vacation the next day so my counters had a full week to set. I am very pleased with the results. Definitely recommend.
Amanda Hudson
Lots of FUN!
Fun product. Go on YouTube for variations how to use it. Wish it had more of the pearl and white paints but I had enough to do kitchen island and lazy Susan. The island looks like granite and the lazy Susan like marble. So far seems very durable. Next time I'll order individual paints from Giani's instead of the kit. It may be cheaper. I will definitely use product again!
Pascale Blangenois
Great product!
so far I am very satisfied with this product. I believe it is very easy to use. I don't know my kitchens exact square footage but I think it's pretty normal sized. This one kit was plenty for me. I used about 80% of the black primer, all of the pearl, had just enough of it. And still had a half can of the white left. I used the entire can of top coat. The primer was a quick application. I let it dry an entire day. It took me about 5 hours for the sponging part of this project. I was exhausted but just turn on some music and get in the groove. I believe anytime you don't like how it is turning out just add more white! I feel like this is pretty easy. Anyone could do it. I don't really understand the reviewers who said they couldn't get good results and that a drunk cat did it, you just have to be patient with it. My kit DID NOT come with a DVD like some reviewers stated. I watched videos on giani's website that were very helpful. I would advise on buying some paint trays that arent included in the kit, and a pack of paper plates. I did the veining technique but not without practice on the sheet they gave you. I did my practice sheet my first day of applying base and it made me very confident for the next days sponging. This product is very customizable to whatever you want. I DID NOT USE ANY OF THE GOLD. Do not feel like you have to use it just because it come with the kit. I did not want any warm colors in my kitchen and I wanted this to look like marble slate so I used zero gold. I think it's a nice touch if you're going for that look but I was not. I did freak out when I put the top coat on because it came out very potent baby blue color. It did dry completely clear though although I do see some reviewers blue hue did not go away. I contacted Giani about this issue and they advised me that if you leave too much black coming through it can be blue. I did get some extra fine silver glitter to sprinkle into my counter tops. It added a great touch. I feel like my counter tops are very vivid and bright. I did purchase the Giani counter top cleaner because I would love to get many, many years out of this paint. I am consernded with how long it will hold up but I think I'd rather baby my counter tops and spend $80 rather than spend thousands. I used all my clear coat which ended up being 3 coats. I will update this review with time with updates on how the counter tops hold up
Amanda Spouse
It was shockingly easy to apply and it really does look like stone
I was very pleasantly surprised by how well this worked. It was shockingly easy to apply and it really does look like stone. I do have a few tips for applying it: -tape higher than you think you need to. The sponges were larger than the tape was high so I ended up adding more tape to be sur I didn't paint the back splash. -make it a little darker than you want if you are doing a large area. I was scrapping the bottom of the paint on my last section so I ordered another can of the white and lightened it later. It blended well since I just needed to lighten a small area, but it would have been easier to have everything else a hair darker and not have to wait for an extra can to come in before I sealed it. -do small sections and don't try to tackle the whole thing at once. The pain does stop blending well if you let it dry so unless you just need to add a little more to lighten an area like I did you will end up with a disaster trying to blend the paint later. The instructions reccomended 2 for areas but I did it in 1 for sections give or take and it worked well for me. -I used the tip of a 2 inch angled brush for the marble looking veins and I likes the result. I wanted thick veins and by doing small sections I was able to blend it before it looked like I did it with a paint brush. I just stopped at the end of the area I was working on and it looked smooth when I continued a line in the next section. -plan a whole day to complete the project. Doing my kitchen took about 9 hours because I didn't want to rush and end up making it look painted. Take the time to really sponge it and know it takes a while -let the primer dry for at least an hour. It will blend into the rest of the paint too much if you start the sponging too soon -the kit comes with one sponge that you have to cut. I cut a few small pieces of sponge to get in crevices and along the wall which made it a lot easier to get right to the edge without it looking painted. -the most important thing is to be patient and not try to rush it