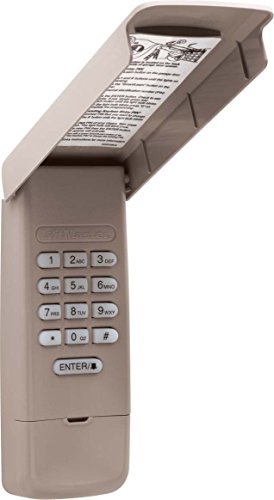
- Security+2.0 and security+ rolling code technology assures a new code is sent every time
- Weatherproof flip-up protective cover
- Backlit keypad makes numbers easy to see, even in the dark
- Compatible with all LiftMaster garage door openers manufactured since January 1993
-
Information
-
Twitter
-
Pinterest
-
Youtube
-
Facebook
Maree Dun
Works like a charm and was super easy to install
Works like a charm and was super easy to install. Had it up and running in literally 10mins. With this installed, there's no need for our children to carry house keys. We can leave a spare key hidden in the garage or just leave the internal garage entrance to the house unlocked. One plus is that the buttons light up at night. If you found this review helpful, please click the appropriate button. Thanks,
Andrew Springer
Remote garage door opener
I bought this to operate my second garage door. I installed the same model to operate my primary garage door and by applying "lessons-learned" during unit No. 1 install, I was able to install this one in about 10-minutes. Here are the steps I followed. I first located a tall step ladder directly under the door opener. I took the remote and the directions up the ladder. Although very easy to program, there are a few ambiguous statements in the directions. My opener has a purple colored "learn" button which correlates to code 2. Steps to program the remote are exactly as described in the directions. However, the opener directions misstate a critical step. After you push the learn button and press the code that you previously entered into the remote, the directions say to press the enter button on the remote and you will hear two clicks from the opener. You actually need to HOLD the enter button on the remote until you hear the two clicks which indicates that the remote and opener are linked. Once you get this step complete, you can proceed to install the remote in desired location. The remote comes with a stainless screw designed to affix the remote to the trim around the exterior of the garage door. A No. 2 phillips or suitable drill-driver is all you need. Drive the screw into the trim slip the remote over the screw head and press down to seat the remote. The unit I installed on garage door No. 1 has been working for about a year now with no issue. The remote even arrives with an installed 9-VDC battery.
Sarfraz Ali
IGNORE the instructions that come with the unit! Refer to your manual instead.
Use the instructions in your Liftmaster manual that accompanies your garage door opener. It's MUCH simpler. I have the Liftmaster Model 8500. I could not get the keypad to work using the lengthy instructions included. I found the manual and there it was.....SO simple. If you have the Liftmaster Model 8500 this is how to program the keypad: 1. Press the MyQ Control Panel LEARN button twice (the red learn LED will turn on). 2. Enter the 4-digit PIN of your choice on the keyless keypad. Then press the ENTER button. 3. The garage door opener lights will flash (or two clicks will be heard.....in my case, the lights flashed) and that's it. I entered my PIN to test and it worked. Happy happy!
Summer Day
Open Sesame!
Quick delivery and easy set up. Thank 365 Garage Door Parts! I needed a replacement keypad as the battery connection eroded and crumbled when I went to change the 9v battery on my old key pad. It took me all of 30 seconds to get this new 877MAX functioning and installed. The key pad lights up red, I guess it will be easier on the eyes at night and be a little more difficult for passerby's to see your code, unless they are good at picking up hand movements. The last key pad I had lit up bright green so I think this color change is an improvement. It came with a 9v battery pre-installed, that's a plus. The other noticeable feature that I liked is that you can tell when you properly push in the number pads. With my old key pad, you couldn't really tell if you properly pushed a number pad and it was easy to accidentally hit the wrong number, which resulted in multiple attempts entering the code. Oh, and it is no longer a mission to remove the battery cover so you can access the battery itself when it comes time for replacment. The box stated the 877MAX is for all LiftMaster garage doors made since January 1993, not sure if there is much of a compatibility difference but initially I was going to purchase a different model key pad. I decided to call LiftMaster to verify and they confirmed the 877MAX would be best option, versus the other model, for my model of garage door opener. LiftMaster Customer Service was quick and helpful so give them a call first if you're not 100% sure, they were very helpful and even helped me troubleshoot a separate minor issue I was experiencing beyond ordering the proper key pad.
Pankaj Kumar
Wireless remote garage door opener functions well
Product works as advertised. Pairing with the garage door opener was easy, and mounting it to the house outside the garage was easy too. It also works fine: press your 4 digit code followed by # and the garage door opens (or closes). I think for what it does, it's a five star product. One consideration is that it uses a 9 volt battery. A non-alkaline one is provided in the package. Those don't last as long, so I just switched it for one of my own alkaline version. That said, the battery will still need to be replaced every year or two. So either put a spare 9v battery in a bag and stash it outside somewhere, or remember to swap out the battery every year, or both. The other consideration is that a better choice may be a wifi garage door opener with a smartphone app. Many people carry a smartphone everywhere they go. So using an app may be better solution. Some of these apps allow each person to have their own codes so you can selectively lock out rogue household members; they also let you know if you left the door open; log door usage; and allow you check on and close or open the door from anywhere in the world. That is a more expensive solution though. The benefit of this opener is that you can get into your garage if your keys and phone are lost, stolen, forgotten, out of batteries. In the end, the best may be to have both this opener AND a wifi opener.
Desirae Beck
Works perfectly now!
The problem with this lift master is if you'd just opened the garage door, you then need to wait at least several minutes before using this device to close the door. It erratically blinks and until it stops, it won’t work! I'm guessing it has something to do with timing and I don't know if that's modifiable. Most the time I find it frustrating, requiring I unlock my car to close the garage door. UPDATE: make sure you don’t have an LED light bulb in your garage door opener. Apparently, it’s a known issue and interferes with the lifter. Once we replaced the bulb with a regular one, the lifter worked perfectly!
Bisma Farooq
Easiest Install and Set-up EVER!!
I've struggled with garage door controller set-ups for years...trying to connect to HomeLink, reprogramming remotes, and even trying to get Chamberlin MyQ devices to sync up with their own App have all been a challenge. The instructions never seem to work and I always spend a lot of time training and cursing and trying to talk to the Customer Repellant people on the phone. I have installed 25+ Smart thermostats, dozens of Smart light switches and door locks, plus many other home automation devices at my various properties. THIS one was the Easiest Ever! The Hub, wall controls, and outside keypad were all simple to mount, simple to connect to each other, simple to connect to the App, and simple to connect to my cars!! Somebody finally got it right! The only "wish" left on my list is for Chamberlin to work with SmartThings. They are an excellent user interface that is easy to set up too, but you could teach them a thing or two about keeping it simple. Please add them to your team. Together you would be the perfect garage door control solution as a component of a whole home automation. Great Product Chamberlin/Lift-Master!!
Eun Hee Lee
Good product but instructions aren't clear
Good product, overall. It feels solid and is relatively easy to program once I looked up how to do so on YouTube... otherwise I probably would have never got this working. I have a PURPLE learn button and the instructions for me are out of order. Here is what I did to get it working: Note: Once you start, you only have 30 seconds to complete, so don't dawdle! 1) Press the Purple Learn button 2) Press and hold * and # together until the keypad stops flashing 3) Enter a 4 digit PIN and then press # 4) Press ENTER twice, quickly, and look for the garage light to flash or listen for the clicks (note if you have a different color learn button, the number of times you press Enter at this step changes. Yellow = 1, Purple = 2, Red/Orange = 3, Green = 4) 5) Press the 0 button to exit the programming mode 6) Test The instruction manual I received with the product doesn't say to press the Learn button until Step 5 and it throws everything all out of whack.
Daniel Lovett
5 STARS + Install tips
Recently replaced my old garage door opener keypad with the LiftMaster 877 Max (aka the unit).. I received it a day early from Amazon and had it installed in approx 1 hour - counting moving cars, ladder, mounting, etc. Note my install was for two garage door operation with one unit. Here are a few install notes that may be helpful: The unit comes with a 9 volt batter installed and ready to operate. The unit can be entirely programed from the comfort of your kitchen table (or wherever you choose). No need to mount it first and then stand in the cold/wind and hit buttons while reading directions. The programming instructions were accurate and precise. No errors that I could tell. Once you've finished programming the unit (aka entering the opener codes you will use), take the unit up the ladder and hit the learn button on the garage door opener. Follow the printed instructions and you've finished the hard and maybe tricky part. To confirm operation, enter the code on the unit, press enter, and - hopefully - the garage door will cycle. Now install the unit on the outside wall of the garage. Test to confirm it stills works. And you're done! Hope this helps.
Dianne Marsters
So far......so good.
We have a Liftmaster 1/2 HP Garage Door Opener which is the original with this house built in 2006. The original keypad to this house was showing signs of wear and tear so we decided to replace it. The original keypad no longer is made and we found it was replaced with this model. Read the directions, had the right color learn button etc. etc and everything should have been a snap to install. Not quite. Took 2 hours. Now we are not dummies. We know how to read instructions but we ended up finding some of the sequences, like others here, are off. So as we trial and errored it, the garage door finally opened and things were great in paradise again. The product is great, however, not sure if there can be directions that work for everyone replacing old keypads with newer versions. I still gave it 5 stars. But for installation instructions, only 1 star. Would I recommend this, yes indeed. However, if the first time doesn't do it for you, or the second attempt, go find a YouTube video for this to help you along the way.