


- (Recommended) Watch the online videos on manufacturers website and video websites
- The screen surface provides a 1.1 gain and an exceptionally wide viewing angle at 160 degrees with no resolution loss at any viewing angle
- 2 3/8" heavy duty beveled aluminum frame wrapped in light-absorbing black velvet material for a beautifully crisp viewing image; Enjoy beautiful movies, pictures, and games in FULL HD and Active 3D
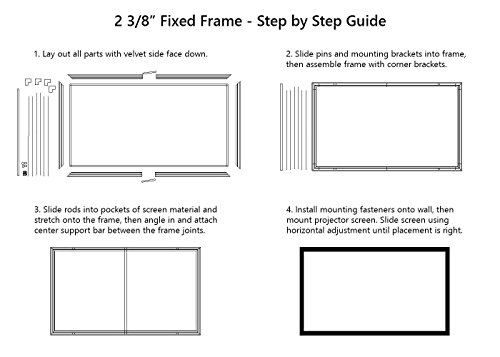
- Quick and easy assembly with tensioning rod system ensures that you can bring cinema-quality entertainment to your home in just a few minutes
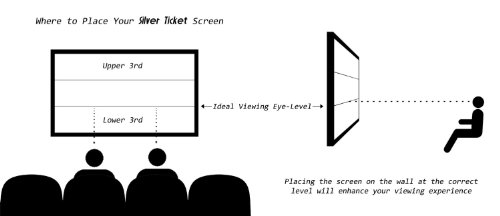
- Secure top and bottom mounting brackets that allow horizontal adjustment
-
Information
-
Twitter
-
Pinterest
-
Youtube
-
Facebook
Angel Dimitrov
Great screen
I watched the the 5 youtube videos that silver ticket has up in order to get the assembly down. The center post gives people problems. After the screen was attached to all the clips, I released the screen from the two top/center clips and two bottom/center clips (where the center posts gets wedged in). Then, with far end of the center post in the groove of the frame, I was able to use my index fingers and thumbs to force the post and frame away from one another just enough for the end of the post to drop down into the groove. I then re-attached the screen to the top and bottom center clips. I attached two 1/4" hooks ($.98 from HD) and have the screen hanging in front of my plasma which is mounted to the wall behind it. I had previously had an elite B model pull down screen hanging from very strong wire through the ceiling and screwed to ceiling joists. I could no longer take all the wrinkles and waves of the pull-down screen. This screen is only about 20 lbs or so I'm guessing. It's easy to hang without help. I just lean it against a wall in a side room when using the plasma tv behind it, which is most of the time.
Timothy Olesen
World of difference!
I have nothing to compare it to other than my lightly textured tan wall and boy what a difference! Assembly was easy and material was made with high quality.
Jacquelyn Blankenship
I assembled and installed this today and very pleased with the product
I assembled and installed this today and very pleased with the product. I did all of the assembly myself, but got help to hang it on the wall. Assembly took about 1.5 - 2 hours from unboxing to completion. ** You need a very big, clear floor space to assemble this! ** Anticipate requiring 3ft of clearance on each side as you insert the tension rods (you can carefully slide the frame around to gain this clearance as needed). I assembled mine on a carpeted floor in an area about 14ft x 14 ft. The directions are clear enough, and warn you when to expect a challenging section (of which there are only 2). Everything is quite simple except for 2 parts: 1. When you go to stretch the screen material over the plastic pegs. The instructions tell you that the vinyl will stretch and that it will fit - and it certainly does, without problem. But there is a moment of uncertainty while you are stretching it when you think to yourself, "there's no way this is going to fit." But it does, without problem. 2. When you go to install the middle support beam. Ok, I'm lying. Others posted that they had massive difficulty or trepidation while installing this last piece. Actually, I had zero problem with it at all and I did it by myself. It took about 30 seconds to slide the bar into place. I don't know if I got a "good" kit or if I just took my time to get all of the parts properly installed as I went along. In any case, I had zero problem getting this crossbar installed. The quality of both the frame and the screen is excellent. The assembled product feels robust, not flimsy. Colors pop and the black velvet frame diffuses overscan perfectly.
Pretty Swag
Excellent Screen. Assembly video attached.
Victoria Antionette Chakales
Easy to install and looks amazing! Used 2x4's behind the screen to install LED lighting.
Easy to install and looks amazing! Used 2x4's behind the screen to install LED lighting.
Heather Boone
IT'S SO BEAUTIFUL!!!
This screen is amazing! I had my projector just projecting on to the wall before the screen came in and it looked good. Once I put this grey 120" screen up, it easily looked 20x better! I have this up in my master bedroom with a 200 lumens ultra short throw projector sitting 32" back from the screen. The borders help to be able to set up the perfect picture and look awesome! The screen definitely gave me a way better picture. Better definition, better color contrast and looks way better with lights on. I went with the grey material because this is now my main tv setup in my room where we do have a floor to ceiling window. With the curtains open during the day, I am still able to clearly and enjoyably watch it. They grey really makes a difference in not letting the picture get washed out with ambient light. Plus it looks great just on the wall when your not watching anything. Installation took me alone a total of 45 min. Instructions can be a bit confusing to read for some, but there are many videos on YouTube that make it easier. This is my first projector screen so I don't really have a basis for comparison, but I am beyond satisfied with this purchase. Side note: I debated between the white and grey material for a while. I can honestly say that I am happy I went with grey given the amount of ambient lighting in my room. If you will have some light in the room you are putting your screen, I would recommend going grey over white.
Lenelyn Igbuhay
Detailed Review - Amazing Screen and a Fantastic Value
If you have shopped for screens you likely already know there is a huge disparity in pricing, and there are a lot of options to choose from. Some people try to get by with a smooth wall painted white while others buy some fabric and construct a custom solution. However there are drawbacks to these options and you'll likely never get as clear and crisp of a picture as you would with a true screen. Since prices have come down considerably in recent years, you would be hard pressed to design and build anything of comparable quality for less money than simply purchasing one of these Silver Ticket screens. Yes you can spend much, much more – you could even spend more than $2,000 for the same size screen if you really wish, but I doubt you would find the final result any more gratifying. In fact I’ve read reviews elsewhere that compared much more expensive screens to this one and found the Silver Ticket screen was just as good if not better for a fraction of the price. As the saying goes… why pay more? Before purchasing my screen, I opted to project onto the wall to get a feel for what size would work best in my room. I used painters tape to mark the corners of the projected image and then measured to determine the appropriate screen size. I'd highly recommend this option since it allows you to get a feel for the optimal solution for your specific room factoring in speaker placement, distance to projector, obstructions etc. You also need to accommodate the size of the border so pay close attention to not only the dimensions of the screen, but also the overall dimensions including the frame to ensure everything fits as you intend. When I received my screen and started unpacking it I quickly realized I had made a good choice. The extruded aluminum rails are very robust and do not flex AT ALL. The felt covering is perfectly flat and smooth. Assembly instructions are simple and to the point, but YouTube videos are available if you are more of a visual learner. I had the advantage of a flat ping pong table (covered with a blanket) to use for assembly but an open area of carpeting would work as well. All of the assembly hardware was high quality and made this a snap. They also provided a few extra screen clips and at least one extra assembly screw just in case. Initially I was concerned that the two piece rails for the top and bottom would be a weak point, but once assembled this is not a concern as those rails are laser straight. Also, the joint in the rails is effectively invisible due to the felt on the rails themselves – if you didn’t know that joint was there, you would never see it so it turned out to be a non-issue. The tensioning system left the screen completely taught with zero ripples or waves - however if there were minor indentations on the screen material itself I would guess they would work themselves out over time as the screen adapted to the tension. It should be noted the screen itself is a PVC material with a coating so essentially a form of very flexible plastic rather than a traditional fabric. I noticed a minor smell when unrolling it similar to an air mattress or inflatable pool, but this odor disappeared within a couple of hours. I can’t say if this material is as strong as fabric, but I can say installation was easy and there were no problems with tensioning as some other screen designs struggle with, so perhaps this material is more forgiving (it does have a certain amount of stretch to it). Either way the quality of the image is amazing so in my view that is what matters. Because of the material being PVC this screen is not acoustically transparent. This means you would be unable to install speakers behind the screen as it would muffle the sound. If you want speakers hidden behind a screen you’ll have to opt for a true acoustically transparent (AT) screen which will either be perforated or will be more of a fabric weave material to allow sound to pass through it. The installation of the screen on the wall was the only step which required two people. After measuring, and measuring again to ensure I had the screws in the proper locations I found it was helpful to use a bit of painters tape on the front of the frame to show me where the wall brackets were located, and another piece of tape on the wall above the screws. This allowed us to lift the screen up, align the two pieces of tape, and hang the screen off of the screws with zero issues. However, if the wall screws are too loose or too tight you may have to take the screen back down and adjust - so be prepared to take a few minutes for this step. The four screws that hold the screen to the wall were the only part of the hardware that I wasn't 100% satisfied with. The Philips heads on the screws weren't machined all that well so some minor stripping did occur while screwing into the studs. If I were to install the screen again, I'd chuck these four screws in the trash and install four high quality bugle head construction screws instead. A minor point, but worth mentioning. The wall mount brackets themselves work well, but I would have preferred some type of French cleat system that would have been more forgiving and wouldn’t require precision alignment of the screws. I should also note that the wall mount brackets do result in the screen sitting in front of the wall by around one-half of an inch. This allows your fingers space behind the frame when installing, and it gives the center reinforcement strut a place to sit. I had thought the screen would sit flush with the wall when installed so initially I wasn’t sure how I would feel about this, but once installed I haven’t even noticed. That said, I do think with a small modification to their mounting brackets and a small change to the center strut they could easily design the screen to be installed flush to the wall. Why they didn’t do this I’m not sure since there is no need to worry about leaving room for speakers on a non-AT screen. All things considered I'm very happy. The projected image (I'm using the Sony VPLHW40ES 1080p 3D projector) is incredibly sharp and bright. There is a noticeable improvement over the image projected onto the wall and the detail is so fine that I'm able to see pores in the skin of actors from over 15 feet away... so clearly both the projector and screen are doing their jobs. The felt frame does a fantastic job of absorbing light, thus if you set your zoom so that a few pixels fall onto the edge of the screen you won't even see it. A homemade screen with a wood or metal frame that isn't covered with felt might not have this advantage as they would tend to reflect some of that light back at you rather than absorbing it like the felt. This screen also does not have any trademarks or brand names on the frame like some other screens I looked at. That isn’t a big issue for most people, but I feel a lack of a brand name makes it look more professional. In summary: The Good: * Sturdy aluminum rails * High quality assembly hardware * Smooth felt material on rails * Good assembly instructions * Easy and fast assembly * Great packaging * Amazing screen image * Even more amazing value * Lack of branding on frame The Bad: * Wall mount brackets require precision measuring (unforgiving) * Wall mount screws are not up to par with the rest of the package * Final installation leaves gap between screen and wall The Ugly: * Aside from the friend who paid five times much for a screen which isn’t as nice as this one giving you a dirty look out of frustration… there really isn’t anything to report here. If you are on the fence about this screen, I’d urge you to buy it. I couldn’t be happier with the finished product and I’m a bit picky when it comes to my AV gear. It took me months and months of research before I committed to a projector and screen and I regret nothing. I was prepared to spend much more on a screen but after reading reviews and comparing I kept coming back to the Silver Ticket option… and I’m glad I did. My very minor complaints are so small they aren't even worthy of deducting a half star from the rating, so this is most certainly a five out of five product. I’d love to hear your feedback if you come to the same conclusion as I did so leave a comment below and let me know!
Dan Morrison
When I first unboxed all of the parts my initial reaction was I was super impressed with the quality of it all considering It ...
I purchased the 120" Acoustically Transparent Woven screen. I have only had it up for about 2 days now so I wanted to leave a review while everything is fresh on my mind. First off, for the money, it is an absolutely incredible value, especially if you go shop around for other screens. The assembly is not hard AT ALL, though it does take a little bit of patience. When I first unboxed all of the parts my initial reaction was I was super impressed with the quality of it all considering It cost me $400. The metal frame is super hard and sturdy. The black velvet wrapping around it is super nice and clean, and the screen material is not some super thin, easy to rip material. For anyone looking at the Acoustic Woven screen, let me address the most common concern, loss of sound. To the human ear, there is Zero. I was actually more concerned when I opened it to discover that there is actually a secondary black fabric that goes behind the white woven material. It is just like the material most Floor speaker's fronts are covered in, but two layers?...I was worried. The truth is I actually watched movies for few weeks in the room on a TV, on a stand until I got the screen and projector up. So I know what it sounded like before and now, and there is zero difference. Okay so I guess with an sound measuring device, there may be a small decimal of loss, but your ears can not hear it and there is no muffling. The picture that shows up on the acoustic fabric is second to none. You dont even know it's perforated unless you are 1 ft from it. I would guess it will take most people 1 hr to assemble the frame and 25 minutes to mount the brackets and hang it. Now that I have done it once, I could do it all in 35 minutes or so. Note: I am using an Optoma HD142x as the projector and the in wall speakers are all the Polk RC line. I bought the entire set up on Amazon and the screen, projector, 3 speakers and the PW 505 sub, I have a home theater that is awesome to someone on a Budget yet still appreciates good sound and image. I was in film school for 2 years so I have set in a lot of 20-30K dollar screening rooms, this is not that, but for 10% of the price, the difference is so minimal. It wows my kids, it wows my friends. When a decent 75 inch TV from Sam's Club cost $2,000, I will take a true home theater over that any day.
Desirae Beck
Great!
Nice quality screen. Machining on aluminum components is high quality and flawless. I was extremely impressed during the assembly process. Lots of though has went into this design and no corners have been cut. Upon inspection I would expect this screen to sell for $600+. Nice velvet border and picture looks amazing (see photos). TIP: since the screen is so large, it can be very hard to mount it to the wall, especially if it's being installed into a tight space. After I installed the screws into studs, I marked the wall a few inches above the screw locations. Then I tied a long string to each screw, and pulled the string through the mounting brackets. Then I could lift up the screen, and pull the string tight and force the brackets to line up with the screws.. Basically allowing the screen to mount itself.
Ella Baesso
Excellent screen and easy build
Excellent screen and easy build. I fixed some LEDs to the back. Keep them close to the inside so the lip doesn't cast a shadow where you want your light. I rigged up a suspension so I didn't have to fix it to a cement basement wall. Really helped with letting the LEDs do their thing. LED control zip tied to one of the included wall mounts. IR hidden in the eyelet. No waves or wrinkles black velvet is very forgiving if you're not perfectly aligned. We love it!