
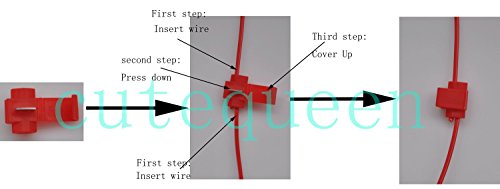
- 4PCS 50 watt 6Ohm Load Resistors + 8pc Quick wire Clip,We offer "ONE YEAR" warranty and Unconditional return policy with 30 days,
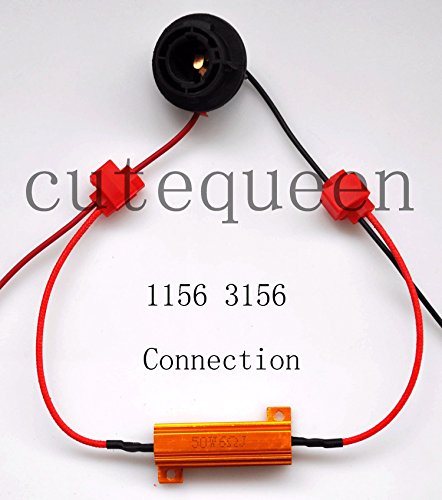
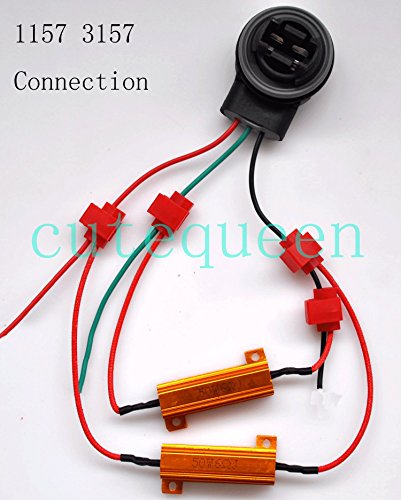
- "Load Resistors for LED Turn Signal Light Fix or LED License Plate Lights Error Fix. This will solve LED related turn signal lights or license plate light problems ,no flashing or burnt out bulb indications "
- Load Resistors get really HOT when working. Mount it on metal surface, NOT plastic.
- "It can work on any vehicle and can be connected across the turn signal bulbs or License Plate Lights to simulate the load of a regular filament bulb (2 Amp load). "
- One LED resistor is required for each turn signal bulb or each license plate light bulb.
-
Information
-
Twitter
-
Pinterest
-
Youtube
-
Facebook
Maria Agapiou Cignarella
Low Cost Solution, If You Can Stand the Heat
Way less expensive than the LED bulb vendor's version. Mounting space and surface might be an issue. These are a little bigger than a lipstick and get very hot, so you can't just tuck them into a harness or a plastic lamp housing. Solved the problem of getting an ABS MIL with Sylvania LEDs that were touted as being "compatible" with computer control modules. They can also be used to solve a fast flash or no flash turn signal with LED retrofits, instead of replacing the flasher. Just remember they will get hot enough to melt plastic parts and wire insulation.
John Banks
Fixes the problem!
Ok so here is the deal. If you are like me you do not like replacing things more than once. That's why when a bulb goes out in my vehicle I replace them with LED's. After all LED's are brighter, and virtually never go out. There are a few problems with this however. The first is that the signal lights flash at super sonic speeds because the flasher is used to supporting the load of a light bulb and LED's don't put off that load. This fixes that problem. If you happen to drive a Ford pick up and you replace the cabs brake light with an LED you just lost your cruise control. This fixes that problem too. The only thing that I wish I had gotten with the product is installation instructions. It wasn't too hard to figure out, but I did worry about reverse polarity issues until I put one in and realized it wasn't an issue. One wire to hot one to ground it is as easy as that. Make sure you mount them to metal on the chasses somewhere as they get super hot and need that metal to disperse the heat.
Monalisa Basu
These fixed the hyperflash on my 2009 Chevy Silverado
I had recently replaced all my bulbs in the truck with LEDs, and was getting the hyperflash. It never really bothered me, so I left it, but recently, started noticing when I put the signal on one direction, all the signals hyperflashed on both sides at the same time, so I couldn't leave it any more and went looking for an easy resistor solution and found these. My vehicle has two bulbs of the signal lights in each light housing, and you need one of these for each bulb. It didn't come with wiring connection instructions, both wires out were red, so that didn't help, so I read the reviews and figured it out. You have to connect one end to the positive flash wire, and one to the ground wire (or just a ground screw). Quick connects are provided to make it a breeze. Literally, the most time consuming part was just getting the housings out to gain access to the back. Once I got them all on, the hyperflashing was gone as expected. I had them on for quite some time, testing them and also wanted to see how hot they got. I had seen they get quite hot from the other reviews. If left on for a while (10 minutes of so) they will get pretty hot to the touch, hot enough you can't keep contact with you fingers without pain. In normal use, your signals aren't on but probably a couple minutes while you wait for the red lights to cycle at an intersection, but I can see it being an issue if say you had a flat and were on the side of the road with your hazard lights on for a while. This means you have to plan a little in making sure they aren't touching anything they might melt, like the other wires. I had one of them laying on the light housing during testing, it never even made a mark, so I don't think they get hot enough to affect those, but I could see where they would definitely melt wire insulation. Just make sure you either have them where they will hang free and get air around them, (the gold housing doubles as a heat sink, so just getting some air around them will disperse the heat, or even better would be to use the hole on it and put a screw into some metal, which would disperse the heat even better. Just something to watch out for. Overall, please with the purchase. Simple item to do a simple job, and everything needed is included (except perhaps a wiring diagram).
Aroha Samuels
Fixed the flashing glow plug light on my 02 Golf TDI with LED brake lights
I installed brake and tail LED's in my 02 Golf TDI, and I suffered from the flashing glow plug light, as well as loss of cruise control. I only found out I lost cruise control b/c the internet told me I did, as I hardly ever use it anyway. Nonetheless, the flashing glow plug light was enough to get me to invest in these load resistors. Once installed, the car was right back to normal, and the install only took about 10 minutes total. Those splicing things are great! I've worked with electronics/wiring for decades now, and I've actually never come across those before. I am now curious if I'll need more of these installed, if I choose to do the blinkers as well. I added them to the main brake light signal coming into the brakes, so I don't know if that's enough resistance to cover all the lamps in the brake light assemblies, or if I'll need to add another to the blinker signal, but as the blinkers don't stay on as long as the brake lights, I'm not so quick to replace them with LED's. I will, however, probably replace my headlights with LED's, and then I'll use the other two that came in this package.
Sunmi Kapai
These worked perfect to eliminate turbo flashers on my truck
These worked perfect to eliminate turbo flashers on my truck, since I replaced all my bulbs with LED. I broke 2 of the plastic clips, but they get taped around anyways, so no big deal. I was surprised how heavy duty these things are! I would recommend these to anyone that needs to use them!
Reynaldo Quillao
There is way less resistance on a LED than an incandescent bulb because of the superior efficiency. You simply need to add back
There were no directions in this kit, but simple enough to figure out what needs to happen. LED hyper flashing occurs when replacing a stock incandescent flashing bulb to a LED. There is way less resistance on a LED than an incandescent bulb because of the superior efficiency. You simply need to add back in the resistance to slow the flashes back down to a normal blink. So, since there were no directions, I thought I'd post some! I replaced stock 3157 rear brake light / turn signals with some 1200 Lumen LED's. As expected, I had the hyper flashing issue. On a 3157 / 3057 bulb you have three wires. I used an inexpensive 12 volt test light to determine which wire was ground, 12 volt constant and 12 volt switched. When you have your key on, turn signal engaged, your test light will blink when you find the 12 volt switched wire. It will stay on constant for the constant wire. You get no test light for ground wire. Got lucky and found a connector further inside the trunk behind the carpet. disconnected here, turned on the lights with the turn signal engaged, probed the terminals and quickly figured out what was what. Made notes and followed wires back to where I could mount these resistors onto a metal surface. If you have no connector, then just use the test light to carefully pierce the wire wherever you intend to cut them. Just remember to use electrical tape over the pierced wire if you choose not to cut it later. Now for the best part! These babies get HOT, real HOT! They absolutely must be mounted on metal to help dissipate the heat. If you choose to run one through the 12 volt constant it will be cooking HOT the entire time your lights are on. For this reason, I recommend only running the one on the switched wire side, therefore it only gets HOT when the brakes / flashers are on. If you have the hyper flashing issue, then you only need one resistor on the 12 volt switched circuit to correct it. You will be able to plug the light in without any resistors and it will light up constantly without any problem. I never have trusted the little jumper splice connectors that come in this kit! If you choose to use them, then they must be mounted inside the vehicle where it is completely dry. I recommend using dielectric grease inside of these connectors at the very least. I always use professional automotive grade shrink butt connectors, the ones that turn into a sticky hot glue to seal everything up when done. So the resistor jumps the 12 volt switched wire and the ground wire anywhere it can be mounted to metal. I cut and stripped the 12 volt switched wire, the ground wire and stripped both ends of the resistor. Twisted one end of the 12 volt switched wire to the resistor and placed inside the butt connector, crimped twice. Twisted the ground wire and the other end of the resistor and placed inside second butt connector, crimped twice. Took both butt connectors and crimped them twice onto the correct color wire on the other end of the cuts. Torched the heat shrink on the butt connectors, mounted the resistors to a metal part inside trunk and presto, no more hyper flash! Again, there were no directions in this kit, so I hope this helps.
Lyka Habal Belisario
Fixed the hyperflash on my 2015 Toyota Camry SE
As expected, once I swapped my 7444NA bulbs in my two front parking/turn signal lights on my Camry SE with these LED from JDM, I got hyperflash whenever I turned on my turn signals. Moreover, I also noticed my rear turn signals -- which still had OEM filament bulbs -- also hyperflashed. Thus, I got this great cheap set of resistors from CuteQueen & all my problems went away :) NO more hyperflashing. Furthermore, I was surprised by how cool they run. I was able to leave the turn signals on for at least 10secs and the resistors were still cool to the touch. Though I must admit, I installed these @ night with an ambient temp around 21F. My only negative is that as another reviewer stated, the ends of the resistors are just too short -- about 3" on each side -- for my liking. Made mounting them that much difficult. Ended up zip tying them to certain positions so they don't wiggle and burn surrounding plastic
Raluca Luiza
Easy install, works like a charm
I needed resistors to solve the hyperflash in my Jeep Wrangler JKu after installing LED front signals, this did the trick. Install took about 10 minutes and was painless. I mounted these to the metal fender braces as so many reviewers talked about the amount of heat they generate. Mine are on the flasher circuit, and I get no heat at all. This was an easy, low-cost fix that allows me to enjoy my LED lights.
Valinte Jesza
fixed the hyperflashing
put leds in my tail lights for my breaks/turning signal and my car didnt like it. so through these on the + wire for turning signal and the - for the turning signal and fixed the problem. no install instructions but all you do is crimp the connectors that come with them on the + and - of each turning signal wire (use volt meter to find the + for the turning signal) and your done. a simple youtube search will show you it being done
Emellyam Lynne
Great bang for buck.
You can easily find resistors costing way over $15 usd for a pair these are a nice cheaper alternative and only take a few extra moments to install. If you've never spliced wires before the first few may take you a while as you reference a youtube video, but after that the process is a breeze.