


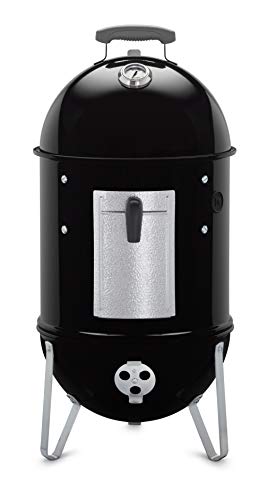
- Porcelain-enameled lid, bowl, and center section retain heat and won’t rust or peel
- Two cooking grates provide ample room for smoking two large items at once
- Silicone temperature grommet monitors the internal temperature of your smoker
- Control the temperature of your smoker by easily adjusting the dampers
- Fuel door comes off to make adding charcoal and wood easier while smoking
-
Information
-
Twitter
-
Pinterest
-
Youtube
-
Facebook
Jenny Lynn Marshall
Cheapo BBQ smokers v. WSM -- NO COMPARISON!
WOW! Used mine for the very first time today. After years of use with cheap smokers and combo units, I decided not to replace my prior smoker with another cheapo unit. The price was right, pulled the trigger and choked up the $$$. I'm very glad I did. I'm not going to go into all the technical aspects of this smoker, but I will say this -- set up (excluding the silicone temp probe grommet) took me about 30 minutes. The silicone grommet took far longer. The trick -- use some silicone spray around the opening. Fold the one edge over the through the hole, starting the lip on both sides. While holding the grommet, work your way around from one side, while holding the grommet steady on the back side. A tricky maneuver, but that is the only way to get it in. Don't worry, you will not tear it! Started today with Mesquite Lump Coal (El Diablo brand). After picking through the logs, I had enough to fill the ring and chimney starter. Poured the burning coals on the bottom pot and I was off and running. Setting temp is super easy. Other smokers require constant watching, not this one. Load it up, set the dampers and watch the temp fro afar. In the past 1.5 hours, my temp varied only 4 degrees and that was due to the wind changing direction. The water bowl is a problem. It sticks down way too far into the bottom of the fire pit. Like others, I will get a 14½" pizza pan and stick it in as a heat deflector. Then I will have better access to my fire box to place more charcoal in, when needed. In 2 hours of use, the coals look like they barely burned down. Overall, I have never used a smoker that has been so easy to operate and maintain. I should have purchased this one years ago and foregone the frustration and pain of less expensive smokers. It has brought the joy's of BBQing back to me once again. Looking forward to having Beef Ribs in a few hours. ******* 06/21/2016 - Update Two more months have gone by. More cooks with lump and briquette charcoal. Each cook makes me appreciate the easy of BBQing with this smoker. The joy has definitely returned! I'm happier with my purchase today than I was two months ago. If you are on the fence, jump over and buy this smoker -- you will not be sorry! ******* 01/14/2017 - Update The cooks continue. I'm blessed living in Las Vegas, NV since I can cook BBQ year round, not having the extremes in wind and cold unlike Michigan. I continue to do just that. Brisket, Tri-Tip (a favorite here in the west), Ribs and cured Pork Loins have all been done since I bought this smoker. All turned out great and with far less effort on my part than with cheapo smokers or combo units. One cook was with my son who flew into town for a long weekend. I gave him basic operating instructions and turned him lose to BBQ a 12 lb packer brisket. A second load of charcoal was needed, but in the end, we had excellent results. He is now sold on purchasing this model smoker. Paint still looks great. I have to clean the smoke off the dome this spring when it warms back up. Other than that, not much else has been done. My recommendation still stands. You will not have buyers remorse with this smoker!
Jennifer Krupa-Hawk
14 is pretty small. I switched to the 18 once I saw it.
I’d go with the 18” at a minimum. I relied on a couple reviews that said 18” was more than they needed. This unit is pretty darn small. If you only do port butts, fine, but no way you can do a full pork belly or spatchcock turkey or big rib rack on the 14. I did not even take this unit out of box. I could tell the grates were too small for pretty much anything I want to cook. I’m sure it works great but it’s pretty limited due to the size. Draw a 14” circle on a piece of paper and if you first reaction is “that’s too small”, like me, get the 18 or 22.
Cho Pyone
Easy, reliable, and works perfectly, every time
If you get a Weber Smoky Mountain, join the Facebook "Fans of the Weber Smokey Mountain Smoker" group and/or the Virtual Weber Bullet group at virtualweberbullet.com. Not associated with Weber, both are populated by enthusiasts. What I love about my WSM 18: - Excellent temp control. The water bowl inside makes it easy to maintain 225-250°F all day with very little fuss. - Air control is awesome. One load of charcoal can smoke for 6 hours without reloading. - Quality is excellent. As with all Weber products I have owned, everything fits perfectly and will last for years. - If it ever does need maintenance, Weber stocks parts for decades. - Easy to get great results. - Double-decker racks mean you can do a lot of food. The 18-inch is perfect for me -- I can make 3 racks of ribs (using a rack rib that stands them up vertically) and a shoulder, a couple of potatoes, and maybe a turkey leg.
Jeannette Chambers
28 Grand Championships on this smoker and counting
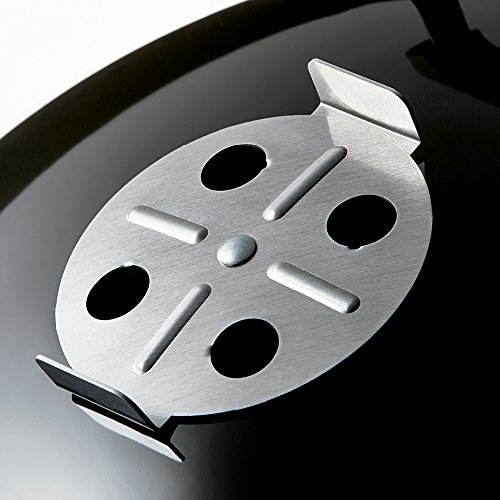
November 2017 Update: All it takes is one WSM-18 to win a Rib Championship, even caveman pitmaster style when no foil or electricity is allowed. See pics. ----------------------------------------------------------------------- My BBQ team Slap Yo Daddy BBQ from Diamond Bar, California, has been competing using these smokers which I bought off Amazon with free Prime shipping. They work flawlessly and are easy to use and clean up. Our WSMs regularly allow us to win Grand Championships even when we go up against other smokers costing over $15,000. The key step once your smoker arrives is to ensure you season it properly. New WSMs will tend to overheat until you are able to get grease and gunk on the inside and around the rim where the lid sits to ensure an air tight seal. The fastest way to season is to do the following: Phase One - cover the water pan completely with aluminum foil and run a full load of lit Kingsford briquettes and let it run as hot as it can with no water in the pan (over 350 degrees) to burn off any manufacturing residue. Clean out the ash and proceed to phase two. Phase Two - fill the charcoal basket 1/2 full of unlit briquettes. Then put in a 1/2 chimney of lit Kingsford briquettes in the middle. This will allow a slow burn for 3-5 hours at 72 degrees outside temperature. Adjust the vents to get 275 degrees on the dome thermometer. Put bacon strips, chicken parts, pork fat, or any other scrap meat you don't plan to eat. The key is to get fatty meats to generate lots of grease. Toss in a couple of tennis-sized wood chunks to generate smoke. Repeat Phase Two at least twice before you cook meat that you want to eat. Phase Three - When you cook meat you plan to eat, take a tip from me and don't use any water in the pan. When I cook, I just cover the water pan with foil top and bottom. I foil it twice so I can remove the second layer after the cook and refoil it. That way, I don't have to clean my pan. It works just as well, AFTER YOU SEASON YOUR WSM, when you cook without water in the pan. Dry heat allows the crust to form faster on the meat (called the bark). Once the crust forms on the meat, you can introduce moisture. I just spray water with a regular spray bottle to encourage bark formation after the initial crusting (Maillard reaction) has begun. To test for properly formed bark, use your finger nail and scrape the meat surface. If the crust has formed, it will not come off when you gently scrape it with your fingernail. If the crust comes off, the bark has not set (still wet) so don't spray until it sets. Let it cook longer and check back in 15 mins. You'll get much better results this way. We've won many awards with this technique. When it comes to cleaning your WSM, never wash the insides. Get a good grill brush and scrape down the insides and dome. You need the "aroma" which takes several years to build up. I NEVER mix my meat WSMs from my seafood and hotdog WSMs. Nothing destroys the aroma faster than cooking fish/seafood/hotdogs in a WSM used to cook chicken, ribs, pork, brisket, and tri tip. That's why you should buy a pair if you plan to cook seafood/fish/hotdogs. Better yet, get a Weber Kettle for those meats. Remember to always empty the ash from the bottom and grease on the foiled water pan to avoid fires and any rancid old oil smell before you cook. When you need to clean the grates, put the grates in a big plastic trash bag, put on gloves, and spray oven cleaner on the grates while in the bag and let sit for 1/2 hour. Hose off the grates. It's as easy as that. To clean the outsides, I use Simple Green spray. Enjoy your WSMs. They are awesome and built to last. -------------------------------------------------------------- Updated March 18, 2014 - in response to questions on fire and temp management on the WSM-18, I added a link with more tips [...] OK. A reader notified me that Amazon deleted my link to my bbq team website where I feature easy recipes of the backyard cook. No worries, you can find it if you Google my team name. It's got pics and such. For the words, I cut and pasted the info for you as follows: Fire Control Before I describe how to season your new WSM, I want to explain the basics of fire control in a barbecue pit. Regardless of the pit you're using, they all have three major components that you'll need to learn to control to maintain proper cooking temperatures: 1) the air intake, 2) fuel you're using, and 3) the exhaust vent/chimney. I use Kingsford Blue briquettes so my description assumes you use the same fuel. If you use something else, your mileage will vary. I've used KF Blue since I started competing in 2008 and with over two dozen Grand Championships and 80+ first places including a first place USA in chicken in the Kansas City Barbecue Society Team of the Year 2012; I know KF Blue works well. Besides, I buy them on sale in the summer months for half price and stockpile them for my classes and contest year where I use over a hundred 20-lb bags annually. Yes, I do use other types of fuel like lump charcoal and pellets but I like to compete using KF Blue (no, they are not my sponsor) because I can fly into any city in America and drive my rental car to Walmart to pick up one bag of KF Blue and win a Grand Championship. In the WSM, there are three circular intake damper vents at the bottom that can be opened or closed as needed to allow more or less air to enter the pit. More air and the temperature goes up and less air causes the pit temperature to go down. The circular fire steel fire ring holds your charcoal and you can adjust the amount of charcoal depending on how long you need to run the pit. If you run it for chicken (2 hours), you only need to fill the ring about 1/3 way. If you want to cook ribs (6 hours), you will fill it about 2/3 way. If you're cooking brisket and pork butt (> 12 hours), you want to fill it all the way going past the top of the charcoal ring until it is overflowing. Be sure to remove the excess briquettes that have fallen over the side of the charcoal ring. Do a bit of Jenga and create a volcano shaped crater at in the middle of the overflowing mound of charcoal by removing excess briquettes and returning them to the charcoal bag. When you're ready to start cooking, carefully dump a half charcoal chimney of lit briquettes into the crater. Over the next 12-16 hours, the briquettes will burn gradually outwards as the temperature stays constant. I cook my long haul meats at 250F and everything else (chicken, ribs, tri tip, beef ribs, etc) at 275F. If you are using a full overflowing load of briquettes for a 12+ hour cook, the standard deep WSM water pan won't work because it sits too low and will bump up against the top of your briquettes. No worries. Just remove the deep water pan and use the silver aluminum heat shield instead. You need to unsnap the heat shield and wrap it in double layer of aluminum foil and use that ultra-light pan in place of the deep water pan. If you have access to a WSM circa 2008 and earlier, those older WSMs come with a shallow water pan that does not bump into the briquettes. Alternatively, you can go to Home Depot and get yourself a terra cotta planter base that's the same diameter as the WSM water pan. I don't like the terra cotta approach as it's added weight I have to carry when I transport my WSMs which have already accumulated over 100,000 miles of travel all over the US. Of the three components I mentioned: intake, fuel choice and amount, and the exhaust, the most effective component to maintain constant temperature is not the intake nor the fuel. It's the exhaust. Many beginners I come across are not aware of that. All seasoned pitmasters know how to intuitively draft their pit using "clean" smoke to color and flavor their barbecue meats. The draft refers to the vacuum effect when you open or close the exhaust vent of your pit. When you open the exhaust vent on the WSM, you allow hot air to leave the pit and this creates a vacuum suction to draw air in from the bottom intakes. Thus, by skillfully manipulating the top vent, you can control your WSM like a pro. Many beginners constantly fiddle with their intake dampers in hopes to maintain a constant temperature with less success than leaving the bottom vents untouched and fiddling with the top vent to control the draft within their WSM. In future articles, I'll address the mechanics of damper control on the WSM (e.g., old school versus automated blower systems) and the science on dirty smoke, white smoke, clean smoke, blue smoke, sour smoke, etc. For now, just give my technique a try and see if it works for you. Once you have seasoned your WSM using the steps below, follow my technique to light your pit and leave one bottom vent open and the top vent half open. Allow your pit to come slowly up to temp (it may take 30-45 minutes). If the pit starts to over temp, gradually shut down the top vent and it will calm down. New WSMs invariably overheat until after half a dozen cooks so be prepared to cook with top and bottom vents all completely closed in your first few cooks. If you have the top vent completely open and one bottom vent completely open and your pit does not come up in temp, you can open a second bottom vent, followed by a third. Usually when you open the second or third, it means you're out of fuel. You can toss 20 briquettes through the fire door and be careful not to snuff out the fire. If your fire is already out, you have to light your briquettes before you toss them into the WSM. Here's are a couple of tips if you need ramp up temps quickly. You can prop a ½ inch piece of wood to keep the WSM dome lid ajar. Alternatively, you can open the WSM fire door and let air in to crank up the temps. With both of these quick fix approaches, do not leave your WSM unattended as the temps could rise fast and you'll burn your meats.
Sarrah Johnson
Greatest smoking grill out there with a few upgrades
This is such an amazing grilling tool! Make sure to check out Slap Yo Daddy BBQ for info on how to season it and for tons of great recipes. Also, make sure to buy the Party Q temperature controller. Once you get your grill to about the right temp, turn it on and you won't have to check, adjust or do anything to keep the temperature constant. I also bought the Tappecue four probe remote sensors. These are very accurate temperature probes that hook into your house wifi. I can leave the house, visit friends, buy groceries and can keep an eye on my temp. One temp measures the ambient temp of the grill and the other three can be in the different types of meat that I am smoking. Lastly, I upgraded the door from Cajun Bandit. The door that came with my WSM was pretty flimsy and smoke poured out. The new stainless steel doors looks much better and locks the smoke and heat in.
Garcia Matias Lee Harvey
Purchased 14" version for smoking for 2-4 people. Excellent quality and price
Purchased the Weber 711001 14" Charcoal Smoker. It is built like all Weber products, quality and ready to start cooking on. No pre-seasoning required due to porcelain rather than the typical el' cheapo other products with black spray paint over metal. Weber's never paint peel either. The 14" model is perfect for my intended use. I only cook for 2 so it's usually 1 rack of ribs, which you cut into half. Two halves on upper and two on lower if you want to cook a lot of them. Most likely, I will only use upper rack. Already have a Traeger Pellet Smoker + Big Oklahoma Joe Highland for bigger cookouts. Only downfall is the limited size of the charcoal area for ashes. A trade off for the compact size. The 14" will be perfect for 4-6 hour slow cooks. Only wish they had though of putting a cleanout on bottom like the Webber Kettle series. Since ash buildup varies brand to brand, it will be interesting to see if the ash area is deep enough for my intended 7hr 225 degree rib smoking. I did one modification to the charcoal grate. Like I have read on the internet, the grate has large holes where when a piece of charcoal get small, could fall thru. I am also going to be using small amounts of Lump charcoal on top of a layer of typical charcoal for flavor. And add wood chunks for smoke effect. See attached photo for charcoal grate mod. Went to Home Depot, purchased aluminum gutter shield. Cut to fit under charcoal grate and attached to bottom with stainless wire. This will keep smaller pieces from falling thru into ash area. The aluminum will not restrict air flow due to the holes. I have used same material in my big wood smoker to keep ashes from falling out side vents. The aluminum has been subjected to 600 degrees several times and never warped or melted. Since this smoker does not get even close to that kind of heat, the gutter guard will work perfectly. Cooking a Pork Butt on it this weekend if weather clears up. The wire to attach the cut aluminum is for making necklaces, $2.00 at Walmart. The gutter guard was $2.50 for 4 feet. Placed it over grate and marked outline with perm marker. Then tin snips to cut into circle. Hoping to figure out something to attach to outside of main chamber for lifting middle section when needed. Would make things easier to tend to fuel source rather than large hands thru small door.
Monalisa Basu
great smoker! Bought to smoke my first Turkey
great smoker! Bought to smoke my first Turkey! Smoked two 22 pound birds and they turned out great! About 4.5 hours at 325 and water pan was empty with foil lined in it.
Kolby Cook
Will make you a better person
Ok, maybe a better BBQ person. I bit the bullet and finally bought one. They are so worth the price. I had started with a cheap-o Home Depot smoker, used it two times and bought this. The medium has tons of room to smoke meats. Comes with a nice cover, easy to clean the grates and water bowl. I use Kingsford charcoal, create a donut ring in the bottom, add the wood chunks of choice, use a charcoal started for the hot coals that get poured into the center of the donut ring and off you go. Just use the three vents on the bottom to regulate the temperature, it has a temperature gauge in the top and also a smoke range. Easy to use and you end up with amazing meats. Head to Costco and buy one pork loin and one beef tenderloin, buy some rub and season those puppies. Put one on the lower grate and one up top. Invest in a probe thermometer and you are good to go. Last piece of advice, buy a vacuum sealer for the left over meats. I usually smoke once every two weeks and vacuum seal and freeze the rest for lunches and dinners. I also have nice neighbors that ask if I have anything they can try, the smells on the weekends travel!!
Desirae Beck
Best Family Smoker on God's Green Earth
This thing is the bomb if properly configured. Here are my Mods: Replace factory thermometer with 4 inch River Country thermometer BBQ Gaskets gasket mod for the lid Cajun Bandit Door and Coal Ring WSM Water Pan Cover Weber 7440 Additional Charcoal Grate (This helps the charcoal to burn longer) UnKnown BBQ Hinge Kit for the Lid Weber 8835 Hinged Cooking Grate Weber 7403 Charcoal Briquet Holders Char-Broil 18 inch Additional Cooking Grate Phil-in-Florence Ultimate Mod on YouTube FireBoard with 20 CFM Fan for Auto Temp Control As you can see the WSM is like a Tacoma or Jeep - its been around long enough that people have come up with new and innovative ways to enhance the basic WSM cooker. My Mods allow you to use the WSM as a smoker or as a direct/indirect grill. The FireBoard and Cajun Bandit charcoal ring allow for overnight cooks and sleeping at the same time. Longest cook so far is 18 hours using Kingsford Blue. PROS - 22.5 is the perfect size because of fuel capacity. You don't skimp on charcoal when buying $60 brisket. Versatile - Can be used as a grill or smoker with appropriate mods. Your friends and family will like you more simply because of the food... CONS - The side access door is flimsy.
Sam Holder
14inch is way to go, 22 & 18 too big
First off after reading all the reviews I was convinced to go with the 22inch version and call it a day. That would have been a big mistake - that is the problem with buying products online, you don't get a sense of the product. Fortunately I have a bbq shop near my home that stocks the 22 & I can tell you it is huge (like a New York style round trashcan) and heavy (50-60 pounds?) Looks like more for commercial purposes than home cooking. Once I saw that monstrosity, I realized my choice was between the 18&14 inch size. After much research and measuring, I realized the 18 inch version was too big as well (& must be equally heavy) - the 18 inch seems like the right size for someone who entertains for 40+ people regularly - overkill for someone wanting to invite his family over or cook for his own family. To put it in perspective, you can fit two pork butts on the 14 and 4 butts on the 18 - I recently did one butt and had enough pulled pork for 6 adults and 6 kids, and there were left overs that could have fed at least one more family (2 adults and 2 kids) - this means I can feed 12-16 with one butt and 24-32 with 2 on the 14 - more than enough. There is a reason Weber started making the 14" again - it is perfect for a small gathering. Also, the 14 uses less fuel and will cost less per use in the long run (for example if you smoke 2 butts in the 18 (versus its capacity of 4) u need to use more fuel because of the bigger space to heat up. Remember the unit is engineered/designed for use of Both racks (which makes the 18 more efficient for 4 pork butts versus the 22 for example). Another bonus is the 14 kept the temperature very consistent and did not overheat like some have noticed with the bigger models (must be all that charcoal) Finally the 14 is portable (and used around the world by bbq teams that compete) and easier to clean given its smaller footprint. My 14 had enough room for us to cook a slab of 5 pound brisket bought at our local warehouse club and an entire slab of baby back ribs cut up into 3 parts. The ribs were perfect and moist - the brisket was perfectly smoked and tender. I did this for my family and we could have easily fed another 8 people. Using the minion method of heating coal (in middle area) there is was enough fuel for an overnight cook 13+ hours at 200-210. I couldn't be happier with the 14inch size and am convinced it was the right call as it is efficient and portable. As a bonus cleaning it was easy as well. If you are on the fence, go with the 14" and use the 100 bucks saved on accessories and food. You will thank me as the others are overkill unless you have a business or cook regularly for 40 (18") or 70 people (22"). Happy smoking!