

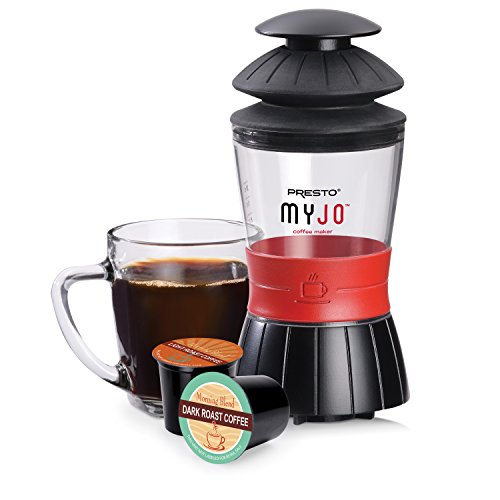
- The convenience of a single cup coffee maker without the high cost!
- Compact design lets you take it anywhere - home, work, school, travel or camping
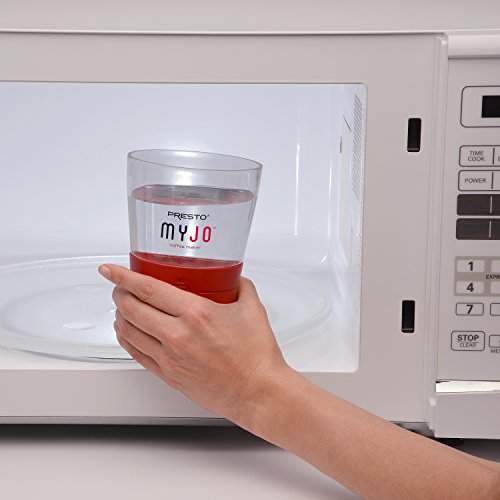
- Heat water, Fill reservoir with hot water from tea kettle or place filled reservoir in microwave and heat
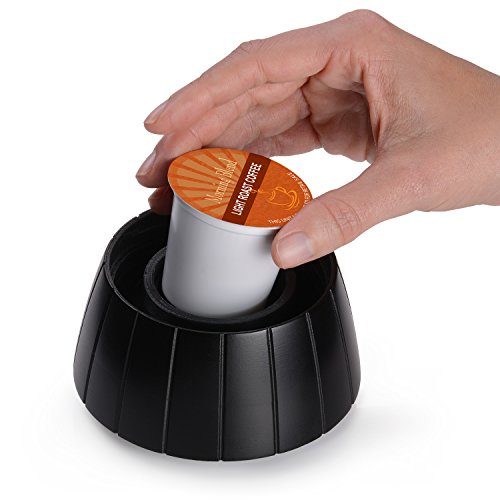
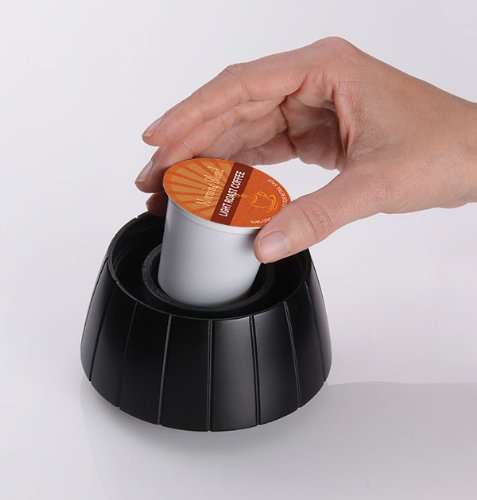
- Assemble, place K-Cup pack in base, attach the water reservoir and pump; brew and enjoy!
- Place assembled Coffee maker on top of your favorite Coffee Mug or cup and pump water through K-Cup pack to brew
- The convenience of a single cup coffee maker without the high cost!^Compact design lets you take it anywhere - home, work, school, travel or camping^Heat water, fill reservoir with hot water from tea kettle or place filled reservoir in microwave and heat^Assemble, place Single serve pack for the Keurig K-Cup Brewer pack in base, attach the water reservoir and pump; Brew and enjoy!^Place assembled coffee maker on top of your favorite coffee mug or cup and pump water through Single serve pack for the Keurig K-Cup Brewer pack to brew
-
Information
-
Twitter
-
Pinterest
-
Youtube
-
Facebook
David Hiner
Easy tasty coffee
I bought this as well as an aero press just to compare. I needed something small for travel as I am usually unimpressed with hotel coffee makers. Plus you never know if people have cooked meth in those things. This myjo is made in China, whereas the aero is made in America. Myjo was designed in Wisconsin though. I try to buy American-made when I can, but this Myjo is just so well designed. Here are the advantages of the myjo. Very few parts to keep up with. And when not in use, those parts all fit together in one compact little setup. I could pack this easily in a backpack for a weekend hotel stay or even a small suitcase and still have room for clothes. I like the fact that you can microwave water in the reservoir for two minutes and then just put the fun rubbery thing on top of that same reservoir and then press 2 to 3 times and be done. You just set that all up on top of your cup. The rubber thing you press down on doesn’t give the strong resistance that a plunger would (the aero press uses a strong plunger). So the Myjo is very easy to use. And less of a burn risk than the aero press, in my opinion. Another plus - the Myjo comes with its own little permanent filter- no need to buy any paper filters. And you can use one of those k cups in lieu of that. It’s easy to clean. I think I will buy a few more of these so I can replace my drip coffee maker and give one as a gift. Since I drink 1 cup of half caff in the morning and 1 cup of decaf in the evening, this is perfect for me.
Romel Ore
Great Product for Traveling People that love Thier Keurig K-Cup Coffee
This thing is great! Works very very well. I got this so that when I traveled I could still use my kcup pods anywhere I went. While the instructions say to heat up the water in the cup, I prefer to boil the water in a coffee mug instead.then add it in. The pump top works great I only need to push it down slowly 1-2 times to get a 6 oz cup of coffee. The thing is super easy to clean too. I just rinse it and air it out to dry. One issue I encountered (not their fault) is that some coffee manufacturers use recycled plastic for their kcups (like Independant Coffee Co.) and they do not puncture from the bottom. These types of kcups will not work in the MyJo. I have not tried using the self-filling cup with the MyJo.I highly recommend getting an immersion water heater if you use this while traveling & staying in a hotel: Lewis N. Clark Lewis N. Clark Immersion Heater 120/240V, White, One Size If you have any questions, please comment on this review and I will answer them. I hope this review was helpful to you.
Beth Davis
I was very pleased with the way it functioned and made perfect coffee
This review is for the Presto 02835 MyJo Single Cup Coffee Maker I took this little guy out this last weekend to Beavers Bend National park in Oklahoma to try it out and see how it would do to fulfill the need of coffee on the go. I was very pleased with the way it functioned and made perfect coffee. I did not get a chance to try it out with premade K-cups but instead used the provided refillable canister and brought my own grounds. This unit was very simple to use It was a bit hard to press the water through the grounds after the first pump I then realized if i tap on the bottom after the first pump to loosen the wet grounds it finished off the brew on the second pump. Very simple and will be added to my camp bag.
Angie Parker-Brown
A Slit in Time ... Saves Headaches. Importance of Using Coarse-Ground Beans
UPDATE: Have been using it for quite a while now and have some insights. The first time I pushed on the pump, no water came out of the reservoir. Then I remembered what another user had said, and, sure enough, the problem was that the small, rubber plug that's supposed to have a slit in it, didn't have one. You could see a thin line where the slit was supposed to be. Using a sharp knife, I carefully cut a slit where it was supposed to be, and after that, the unit worked fine. On its troubleshooting list that accompanies the unit, the manufacturer talks about things to do if the pump doesn't seem to be working, but the slit problem isn't mentioned. I guess they don't want to admit to the potential problem. One thing I learned is the importance of using coarse-ground beans. Too-fine ground beans clog up the small cup insert that comes with the unit. It's hard to keep the grounds coarse enough when using a blade coffee grinder. Instead, I bought a small, hand-crank burr grinder that can be adjusted for coarse grinding. That works great and such units usually are very inexpensive. If you like strong coffee, when you use coarse grounds you can run the coffee through the grounds a second time to strengthen the brew. Just pour the coffee from the cup back into the reservoir and repeat the process. One other thing: Be sure to clean the pointed puncture-tip at the bottom of the upper (reservoir) section each time you clean the parts. Coffee grounds tend to accumulate there and clog the unit. I clean all the parts just with plain water, no soap, to avoid a soapy taste.
Leni Baliza
BEST TRAVEL K CUP COFFEE MAKER, Most Like KEURIG!
Steven Williamson
Wonderful. Good for Home, Camping, Road Trip.
Long ago, I decided to not buy a pod coffee maker. I love my collection of various coffee making things, but the pod life still seemed attractive to me. So I got this (low cost) and I got k-cups from this site also. It works really well. I get the water up to 195 degrees on the stove. The k-cup is easy. Just put it into the spot in the bottom part, push it down to get punctured by the pin, screw the parts together. Put it on top of a mug. Then pour the water in, put the top on by pressing around the lower ring to seal it on the edge of the water container. Put the top cap on and start extracting coffee by pressing down on the flexible top. It takes a very little bit of effort to push. Then release the cap to allow air in, put cap back on and push again. You are done when you hear a whooshing sound. It is easy to do and produces a good cup of coffee. Clearly marked lines for 6 oz, 8 oz and 10 oz of water. It comes with a little basket to make coffee with your own grounds. I haven't used it.
Wanda Cantero
Love this little dude
I didn't even drink coffee, for some reason I was fascinated by this product so I got one. Got one I've those famous one cup coffee makers the same day. It is still in the box. I enjoy fooling with this so much and getting what I think is delicious coffee immediately. I get my hot water from my water cooler/heater 5 gallon bottled water thingy, place a cup of various kinds of coffee in the bottom of the unit, (press it in firmly so as to puncture the bottom of the cup) press the rubber pump carefully on the top of the transparent water receptical and screw the two pieces carefully together. This next step is very important and possible to forget if you are as goofy as yours truly. Place entire unit on top of your coffee mug! (Yes is forgot this step once 😳.) Thus making sure warm coffee goes in your cup and not in your lap! Press rubber pump dome firmly straight down on your mug (perhaps 4 or 5 cycles necessary to empty all you water) it will make a hissing sound to let you know it's empty. Enjoy your coffee! This may sound like a lot of steps or aggravation but I find it is actually fun and much faster than the electric models.
Tyana Smith
Finest K-cup brewer on the market.
This might be the *best* K-Cup machine on the market. Pros: * Lightweight and durable. I keep this in my backpack. * Easy to clean. * The ability to control the water temperature has shown that K-cups can make a fantastic cup of coffee. ** I use a Thermapen for testing and found that anywhere from 200-205f brews fantastic coffee. * Included K-cup filter adds another dimension of use. * Measuring lines on the brewer makes it easy to measure water. Suggested uses... Travel much? K-cups are light and pack easily. When I'm somewhere that has bad coffee this saves the day. Want to have something different but not very often? I use this at home for decaf coffee in the evening. During the day I'll pull shots of espresso left and right but if I want a nice evening cup of coffee after dinner or with a sweet this allows me to make something that is more than acceptable. The lack of selection of decaf K-Cups is a bummer but Starbucks House Blend Decaf is fine, for a nice strength I like to brew 7.5oz. After using this for a couple of months I cannot see why anyone would want to use the overpriced machines. It's clear they cannot warm the water up hot enough and produce an inferior cup of coffee compared to the Presto MoJo. It might take a little more attention to detail (water temperature) but is well worth it. Just boil water, add to MoJo, count to about 20 which should allow the water to cool enough in a 72f room and PRESS SLOWLY! Just like pour over brewing I've found slow pressure while "brewing" produces a good cup. Take your time.
Jeffrey Nii Armah Adamah
Awesome portable Kcup coffee maker
This is a fantastic way to travel with your kcups or if you want a quick and simple way to make a cup of coffee, tea, or hot cocoa at home. Make sure you use the correct size cup with the proper diameter of the top of your cup. I usually use the mega size cup that could hold 16 ounces but those are entirely too large to use with the MyJo coffee maker. It comes with a refillable coffee filter. I've used this MyJo coffee maker to make my Kcups, loose instant coffee, espresso. tea bags, loose tea, and cocoa. I've used hot water and hot milk in this coffee maker. You make a second cup of coffee by using new hot water, but reuse the grounds from the first if you put an extra amount of grounds for the first cup of coffee. Be sure once you place the coffee maker on top of your cup, slowly push the plunger down for best results. The container is BPA free, plastic. The container will hold three different amounts, 6oz, 8oz, 10oz. The refillable filter will hold approximately two tablespoons of ground coffee. Keurig pods will also fit easily into the bottom of this. Clean up is extremely easy, I rinse out each piece with hot water and allowing it to dry in the dish drainer. I would recommend this MyJo coffee maker to the casual coffee and tea drinker. If you drink several cups everyday this will not be for you. I enjoy making different teas, coffee, and flavored cocoa with the Myjo coffee maker and have not experienced any problems.
Jeff Gray
Taste just as good as a Keurig, but no fuss, maintenance and waste of counter space.
I bought this after my Keurig died. It was my second Keurig in 5 years (which only received moderate use at home). I also have a Nespresso, so I didn't really want to buy another Keurig, but I still have quite a lot of k cups left. I bought this, and this works as well as my Keurig, if not better. Pros: Portable, and easy to store. I do not have to waste precious counter space. Does not need de-scaling. No need to buy the Keurig filters either. The best part is - the flavor is exactly the same as a $100 Keurig. There's no nasty taste that comes from a coffee maker that has too much residue inside (and needs descaling). Cons: It takes strength and agility. Really not manageable for the elderly or children. Child can pop in a cocoa in a Keurig, but there's no way a kid can hold the device on top of a cup and also pump. You do need some strength to pump and force the air / water through the k cup. That's it's only drawback. I have some concerns about putting boiling hot water into a plastic device, but so far, the device looks fine. I keep my water at 208 degrees.