


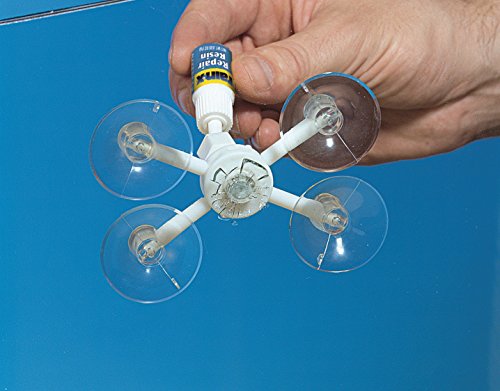
- Easy to use - takes only minutes
- Repairs all types of laminated windshields
- Minimizes the appearance of chips and cracks and stops them from spreading
- Crack vanishes when examined at 45 degree angle, poor resin are achieved when repair resin is applied quickly, leaving air pockets or when repair is attempted on a contaminated crack
- Advanced resin formula. Good for multiple repairs
-
Information
-
Twitter
-
Pinterest
-
Youtube
-
Facebook
Anila Qureshii
I would definitely recommend this kit if you are patient and can follow directions.
This was my first attempt at chip repair. Admittedly it took me a bit longer than it should have to get the technique correct, but eventually I got there. If you think that you are going to be able to make a chip disappear completely with a $10 DIY repair kit, you are delusional. It does however make the chip much less noticeable, and it filled the chip completely. I performed the repair 6 months ago on a bulls-eye/star chip , and it is still holding strong with out spreading or cracking any further. I am about to buy another kit for one of our work trucks. I would definitely recommend this kit if you are patient, can follow directions, and observe what is happening and not happening and make the necessary adjustments to get the results for which you are looking. It's definitely not rocket science, but common sense is a requirement. If your chip is like mine, you will need to repeat steps 4 and 5 several times. I see the negative reviews, and I'm inclined to believe that those are from people who either tried to rush through the repair, didn't follow the directions, or had unrealistic expectations. (Or some combination of all three) Rain-X 600001 Windshield Repair Kit
Neb Saitiam
Worked great for me.
Worked great for me. PRO: -Inexpensive! Great product to keep in your garage for quick repairs. -Simple method. -All tools included, along with detailed instructions that include photos. -Plenty of resin for performing 5+ repairs, potentially more than ten. -Resin cures only when exposed to UV light (e.g. sunlight), so is easy to work with and clean up. -Kit is able to inject resin deep into most cracks, displacing air bubbles and restoring the look of the glass. CON: -Instructions are very technical, more so than necessary. Also the pagination of the instructions is somewhat odd. -Kit cannot guarantee a perfect repair for any kind of breakage. In many cases, this will dramatically improve the strength and optical clarity of the damage, but cannot completely eliminate it. A new windshield costs hundreds of dollars. Asking insurance to replace it for you could raise your premium. For small chips, stars, or cracks, this kit can prolong the use of your existing (damaged) windshield to maximize the value of your windshield before you ultimately replace it. I would purchase this again for sure. Also, I would suggest that everyone keep one of these kits in their garage, so it will be available for use ASAP after a break. Don't wait until you have a crack to order a kit.
Delores Brunson
Be careful with WAXED windows
I have used this kit several times and it works good. IMPORTANT note - If you wax your window (e.g. RainX), you need to remove the 'wax' from the area around the chip to be repaired before you make the repair. The 'wax' somehow prevents or drastically slows the 'drying' of the crack filler liquid when it cures in the sunlight. It takes a really long time to dry. The crack fill itself might be OK. Use Acetone on a paper towel to remove the wax. In my case I put a little piece of masking tape (not Scotch tape, it might dissolve) over the chip and cleaned the surrounding area; then took off the tape and cleaned the chip area. If you look at the window against the light you can see where the wax is cleaned/rubbed off. Obviously you should NOT wax your window if you have a chip that you might want to repair at some future date. I have waxed a window a few weeks after a repair without apparent negative impact to the repair.
Jacob Martinez
Awesome product that I would recommend to anyone with small cracks and chips.
My windshield had been hit by a rock going around 85mph. It left a small chip that ended up turning into a crack that ran for about half an inch either way from the chip. That meant I had a small crack (approximately 1" long) and a small chip to boot. I read the reviews on this product and I was scared that I would either screw it up or it wouldn't be perfect. Honestly, I couldn't have asked for better results. The crack is invisible now, unless you REALLY try to find it, and the chip is completely gone. I did as the instructions said, applied the product in the shade and moved my car into the sun. It took me about 5 minutes of real work and about half an hour of not paying attention to make my windshield crack disappear. I'd recommend this product to anyone who has small cracks. It yielded unbelievable results.
Angela Akenson
Be realistic, and you'll be satisfied.
Product worked great! However, it will be important that you set reasonable expectations. If you go into this thinking that it's going to look like nothing ever happened to your windshield, you may be disappointed. The goal is to prevent the damage from spreading, and touch up the cosmetic appearance of the glass. From the outside of my windshield, all you can see are the chips where the rock made impact. From the inside (pictured), you can only notice there was a crack there if you're looking for it. Best way I can describe this product is like touch up paint. Repair looks like covered up scratches, but clear. Works just fine if you follow the instructions, have patience, and don't get cocky in the process. Chances are, if you're like me, you've never done this repair before. So, be realistic in your approach, and you'll come out of the whole 20-30 minute process satisfied with the results.
Janet E Mountcastle
I am 95% happy with my repair
I had never used this, I regret that now, I am 95% happy with my repair, 100% with the product, follow the good instructions, thirty minutes tops and your damage is virtually invisible, I had a rock chip smaller than a dime, by the time I completed my trip it was slightly larger than a quarter star pattern, it is only visible to me because I know where it is, the center could take a bit more resin and I may not find it, the visible area is about the size of a dull pencil head, by the way, no measuring necessary. Five stars is right.In the photo there is too much reflection to find the place, it does not show at all, matter of fact, it took me a minute to find it, it is part of the blue sky reflection, but it would be harder than finding Waldo,
Janet Castillo
This kit is a really easy repair whether you're an expert or novice
This kit is a really easy repair. For a first attempt, I'm really impressed with the ease of use, results, and cost. I wasn't sure how this was going to go down. Epoxy resins are usually hard to work with but the kit supplied with the package makes the whole process really simple. The instructions are daunting at a glance but you can break it down to these steps: Clean you window of foreign debris Force the resin into the crack/chip with the applicator (IN THE SHADE) (even if you make a mess by overfilling, it's OK) Let the resin cure with the cure strip (really just a fresnel polarized lens to maximize UV light exposure) Peel off curing sheet and scrape the glass with the blade perpendicular to the glass Done!
Bishandassgupta
Works great
I used this kit recently to repair a crack in my windshield about 1/2 inch long. The instructions are pretty simple to follow. The hardest part is getting the mounting tool centered directly over the break. It's best to check it from inside your vehicle to make sure it's lined up properly. Once that's done, you screw in the part which contacts the windshield and where you put in the liquid resin. Again, make sure it's directly on the break. Add a few drops of resin and then screw in the driver which pushes it into the crack. Wait a few minutes and then repeat adding more resin and screwing the driver in again. One trick they tell you in the instructions is to heat the windshield from the inside with a hair dryer in order to get the resin to flow into the crack better. That helped a lot. Once you can see the crack is totally filled in, you remove the tool, put one drop on the hole, place a clear plastic piece over it and put your car in the sun for 15 minutes (or 1 hour if it's overcast) and the UV light will cure the resin. Finally remove the plastic and scrape away the excess from your windshield using the enclosed razor blade. My crack was tiny and I almost can't even see it any longer. This kit really does the job and can be used multiple times until you run out of the resin solution.
Melissa Longuet-Higgins
Easy to use and worked like a charm!
I had a small (like 2mm) chip in my windshield thanks to a rock kicked up by a semi driver. Before it turned into a crack, I decided to get it repaired. I called a repair shop and the man who answered had me describe the chip (size, if it went through the windshield, etc) and then recommended I use this product instead of paying $50-60 to have the chip filled. Altogether it took about 15 minutes to make the repair and while you can still see the edges of the chip where the glass ended up sort of frosted, you can't feel it anymore. The windshield feels perfect and the little blemish isn't significant enough for me to worry about it. As the repair guy said- this product's negative reviews seem to mostly come from people who tried to use it to patch a big hole. For a simple little chip, it was absolutely perfect and took a load off my mind! I highly recommend it!
Eun Hee Lee
Chips from MT
I live in Montana where you regularly get various chips on your windshield as a way of life. In 2 years I can get up to about 8 or 9 chips on my windshield. It is like I have a rock magnet in my car. Amazingly enough, this works to fill them in and make them so they are hardly noticeable. The biggest thing to remember when doing the repair is to do the first part in the shade and then move to the sunlight. The biggest downside to this kit is that is doesn't have a pushpin to remove some of the center crushed glass. On the positive side, it does have extra resin to do more then one chip.