

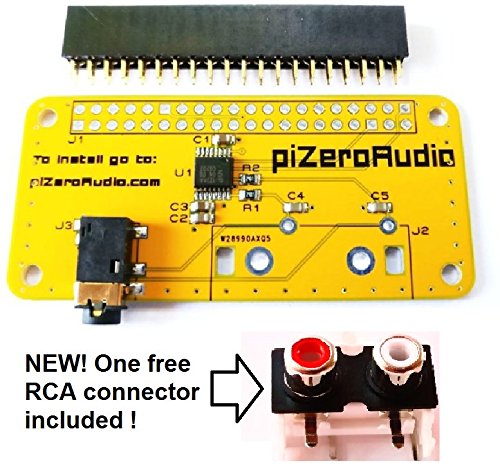
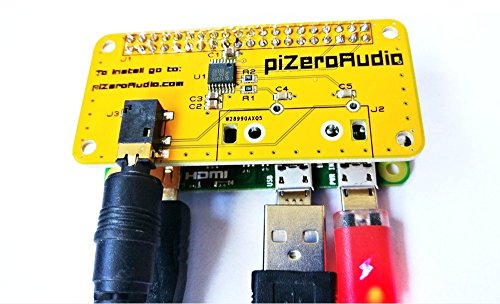
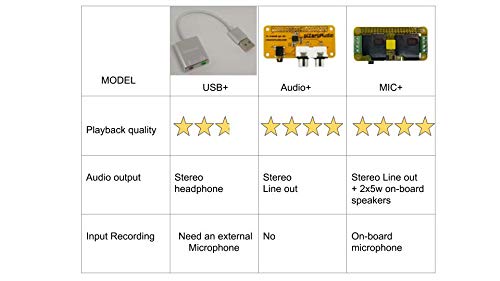
- DAC I2s 24-bit audio with studio sampling quality
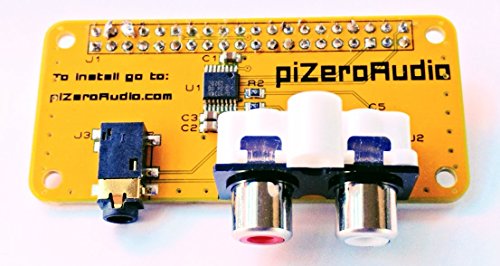
- Line out stereo 3.5mm jack for stereo input
- software volume control
- Free RCA connector included
- Compatible with Raspberry Pi Zero / PI3 / PI3B / PI3B+ / Pi 2
-
Information
-
Twitter
-
Pinterest
-
Youtube
-
Facebook
Zaini Asma
Easy to use
Pros: - Easy to use! 1. Plug the board onto the Raspberry Pi 3 B+ hat pin header 2. Install the required software: sudo wget -O - script.raspiaudio.com | bash 3. After rebooting, test sound output: sudo speaker-test -l5 -c2 -t wav 4. Optionally install sound software of your choice (for example): apt-get update apt-get install -y espeak espeak "Hello world" Cons: - The board covers my Raspberry Pi 3 B+ main CPU fan :(
Hamid Zahir
Very cool board.
Super simple setup using a RPi zero wifi and Volumio OS. The sound is better than any of my other DACs and sound cards. This is an earlier version that is said to be missing pure software volume control but, I've tried it with and without and am unable to detect any degradation in the quality of the output. Money well spent.
Kristina Marie La Vallie
Well made, great sound quality, total bargain!
This is a surprisingly great sounding board, my original plan was to use it as a sound output for a retropie set up but I changed my mind and have it streaming sound cloud and Spotify at the minute through a monoprice tube amp and it sounds lovely, at some point I'll be adding my spare external drive to the set up but I need to figure out how first ;) but this board is well made, very neat and other than my terrible soldering looks great too....if you're on the fence about buying one, just do it, you'll not regret it!
Donald Daniel Smith
Sounds Amazing
I was skeptical at first, getting descend sound from a pi zero sized DAC board. Well, I was blown away how good it really sounds! After I solderered the header, tested the line out (sounds really good btw), and listened for a few hours, it was time to solder some RCA Phono inputs. The photos attached are works in progress, but the sound from the RCA Inputs are just as good as the line out port. Definitely will buy anohter DAC HAT from pizero audio!
Stephanie Muschamp
Excellent support
When I first plugged it in the Pi and did all the instructions to do from the Raspiaudio website it didn't work. I then contacted the seller and immediately received an answer back to check a few things and it turned out it was my Raspian image that was the problem, after re-imaging the SD card it worked like a charm. The only real issue I had with it was the pins used when moving the mic off the board was right where a heat sink was located on the Pi. I just cut off the fin on the heat sink that was in the way and problem solved
Jessica Schoenfelder
Roll your own door intercom
Flawless. A lot of thought and care went into this-- effortless to install and configure. I especially appreciate the detachable mic and included wire. I plant to have it running 24/7 intercepting would-be solicitors at my front door. We'll see how long it lasts in the elements. AWESOME PIECE OF KIT
Crystal Black
Diy soldering project
Neat little diy soldering project. Soldering, installation, setup all in about an hour. Fun toy, sounds great, now all it needs is a case. Also pictured in the stack is a MakerSpot USB hub board.
Casey Strunk
It works on Raspberry Pi 3 well. Just use ...
It works on Raspberry Pi 3 well. Just use script provided by manufacturer! Got problems with standard installation of Max2Play. Does not work with any pre-configured card setting. Was able to setup it manually. Finally I dropped Max2Play for standard raspbian with mpd/mpc/ympd installed. Works well and the box is ready to be connected to amplifier.
Tiffany Pettitt-Porter
Works well. Excellent value.
I bought this little DAC for a weekend project to upgrade the audio in my Subaru. I use it with a Pi ZeroW and built them into a little "stack" that I installed into the dash pocket. I use Volumio and control it with my phone. The sound is very good, especially for the price. Perfect for my application.
Harry Howard
Used for a WiFi streaming speaker.
I’m not an “audiophile”. I used this to add sound to a Raspberry pi Zero. I haven’t had any issues with it. Was able to make a WiFi music streamer with the RaspiAudio board, a Raspberry Pi, and an old pair of speakers. * purchased another board (for another project) works great and product support is very helpful! Thank you again.*