


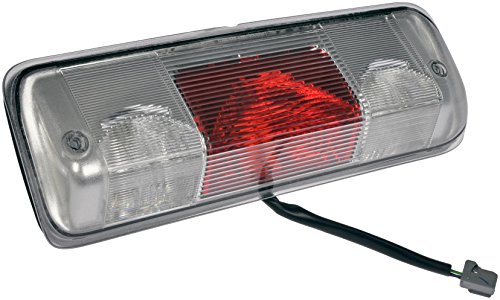
- Ideal replacement - this third brake light assembly was specifically designed to look and function like the original light on specific vehicles
- Quality construction - made from quality materials for excellent visibility and illumination
- Trustworthy design - backed by team of engineers and specialists in the United States
- Thoroughly tested - this part has undergone extensive testing to help ensure a secure fit and long service life
- Ensure fit - to make sure this part fits your exact vehicle, input your make, model and trim level into the Amazon Garage
-
Information
-
Twitter
-
Pinterest
-
Youtube
-
Facebook
December Joy McGowan Herrera
Great Light And Here's My Lessons Learned To Save You Time
For reference, I have a 2007 F-150 Lariat. This product fit perfectly. Here is what is great about the product: 1. It looks just like the factory stock third brake light. 2. The quality was great on mine. 3. It came with a great foam seal on the base, and the plastic is epoxied to the seal as well. 4. The wiring harness is included with 3 bulbs. Hopefully this will save you some time on how to install: 1. You will need: medium sized Phillips screwdriver, several paper towels, some water, some rubbing alcohol (Isopropyl), and a little patience. 2. Before starting, take your screwdriver and try to tighten the screws on your old light to gauge how much torque is needed to install the new one. You'll need to remember how this feels. Your current brake light should come off fairly easily. Just remove the 2 screws and hold on to them as you will need them. With the screws removed, give the old light a nice tug and wiggle to break it free. 3. When I removed my light, there was crud all the way around the seal area. You must clean this area well before installing the new one to make sure the new seal doesn't leak. If it leaks, you'll get water inside your truck and possibly ruin your headliner, seats, carpet, etc. 4. Clean the seal area metal with the rubbing alcohol and paper towels. Then wipe it really clean with water and towel. It took me 5 minutes to clean mine with a lot of elbow grease, but I got it looking great. 5. If you just want to replace the plastic light housing, you could re-use your old wiring harness. This saves a lot of time. Simply remove the 3 lights from your old housing and substitute the new housing, which means you'll have the new wiring harness left over when you are done. It's probably a good idea to change the bulbs with the new ones while you are at it. 6. Sadly, hail had destroyed my housing, and water had gotten in an shorted out the middle red light, burning the bulb socket to crispies. That means I had to replace the wiring harness. Glad it came with one! 7. To replace the harness, you will need long fingers and slim hands. If you take your time, you can get it fine. I panicked at first, thinking I would have to remove the inside headliner to access the plug, but luckily that wasn't needed. I have a picture of this: If you look inside the cavity, you'll notice two bigger holes in the back wall. Right past the right hole behind the panel is where the plug is at. You can see its location by the plastic fasteners poking through. Take your left pointer finger and go in that right hole with your pointer finger wrapping to the right and you'll feel the connector of the old harness. All it takes is a little pressure towards you and to the left and the connector will come loose. Slowly remove it and make sure you look at the orientation of the connector as it passes the right hole. Mine happened to have the flat side facing me, which is probably what yours is too. Fish out the old harness. Take the bulbs out of your new harness to protect them, and then feed in the new harness through the middle hole first and then feed it over past the right hole behind the panel. Take your left pointer finger again and make sure the connector is the correct orientation as discussed, then work it toward you against the wall and upward until you can get it to mate with the connector. Once I did that, mine went in easily and I didn't believe it happened that quickly. I heard a little click, then gave it a little check with the finger to make sure it was secure. 8. With the harness connected, reinstall your 3 bulbs. Now check your truck to make sure all 3 lights work properly before installing the housing. Click the unlock on your remote key to check the side white lights. If you are a one person show, I had to put something heavy on my brake pedal to check the middle red light. 9. Now it's time to put the light sockets in the new housing. Then you can install the housing. When you get the new housing installed and put the screws in, be careful not to go too tight. Otherwise, you will break it. You want them snug. Good luck! It took me about 45 minutes to an hour to do all of this and I'm decent with this kind of stuff. I took my time and went slow so I wouldn't break anything.
Angelita Nipales
Prepared for the worst, but hoped for the best!
I was a little worried when I realized this item (listed as a direct OEM replacement) utilized LED bulbs where my original equipment had standard automotive bulbs. Rather than panic, I began scrolling through buyer reviews & the Q&A section. I found that others had successfully replaced the original assembly with this item & there were no issues. Luckily, upon arriving, the part was unboxed, installed, & working perfectly in under 30 minutes! (By my husband, after dark, with only light from one mini flashlight... in the snow, while fighting a grizzly bear...) ok ok I’m kidding about the grizzly snowy show down but the assembly fit perfectly & works well. Assembly included Wiring harnesses w/ pin plug installed no cutting, no splicing, no problems! LED bulbs & gasket also included. Extremely pleased with the item.
Harsha Mehrotra
Perfect Fit, Better Price than Retail
I purchased this assembly to replace a cracked and leaky third brake light cover on a mid 2000s F150. The plastic cover installs in a matter of minutes and fits perfectly. Since I installed the cover, I haven’t noticed any more leaks. I did find it difficult to swap out electrical harnesses from the outside of the cab so I chose to use the existing one and I haven’t had any issues. This does not come with the necessary screws so be sure to keep your old ones or try to find some in a wrecking yard in order to properly secure the cover. I highly recommend hand tightening these screws (with a screwdriver) so that you have less of a chance of cracking the plastic by tamping down the screws too tightly.
Marli Jeneka
Good Quality Brake Light Assembly Equals Original Ford Equipment
Brake Light came well packaged in corrugated box lined with foam and was in perfect condition. Purchased to replace 2007 F150 Supercab brake light assembly that had small cracks in surface which allowed moisture to enter housing, causing bulb burnout. The fit and quality level of this Dorman appeared equal to the original housing supplied by Ford. For my application, I choose not to use the wiring harness supplied by Dorman, if I did it would require a lot of labor splicing together wires. The Dorman's supplied with wire harness that has a male plug-in connector my F150 doesn't use. My solution was to simply re-use the existing Ford wiring harness and use the new Dorman plastic housing and the bulbs only. Transferred the bulbs from the Dorman to my existing Ford harness and assembled Ford harness into Dorman housing in less than a minute. Overall, the job was completed in about 15 minutes and was not difficult. Note: I did run a bead of clear silicone around the Dorman seal. I tested the Dorman brake light and it works flawlessly. Very pleased with this housing and recommend it.
Grace Harris
Worked like factory original
I ordered this through Amazon and, as usual for Amazon orders, it arrived promptly. It fit perfectly looking exactly like the original one. The main connection appeared to be inside the headliner so rather than look for that I disconnected the wiring harness from the new unit and used the original harness. My original unit had a hole melted in the center of the lens. After removing the existing light assembly it was apparent that the brake light socket in the center had obviously gotten very hot at some time. It was discolored from heat so I replaced that socket with the center socket out of the new unit. Before working on my third brake light I did an internet search for installing a 2007 Ford F-150 third brake light and found some useful youtube videos.
Nunik Milagros Bekasi
Have bent needle nose pliers before begging installation.
Installation should be pretty straightforward but Ford (in their infinite wisdom) used two retainer clips to hold the female end of the harness well away from a usable position in my 2005 F150. After futzing with it for 45 minutes I was finally able to chisel the precariously placed clips off with an 18” long screwdriver. This allows just enough slack to bring the harness to an almost usable position. After gaining access to the female end installation is a snap. Be sure to save your original screws as this part doesn’t come with them. The entire process will be much easier if you have a long handled pair of BENT needle nose pliers. This must be why every mechanic has these pliers.
Nick Smus
Works great and fits perfectly, but a pain to install.
The brake light part itself was a perfect replacement and it works. The seals on my stock third brake light were old and failing, letting in lots of water during storms or at the car wash. So far, no worries with this new brake light. Perfect fit. However, the installation was a little tricky and frustrating, but only because of Ford's wiring harness placement and the narrow openings in the sheet metal to operate within. There are no instructions that come with this part when you receive it, so check out YouTube for videos on how best to install this piece on the F150 first.
Cassy Heichel
Fits and looks like OEM
This third brake light looks and fits identical to the original light from Ford. Installed on a 2005 Ford F150. Install was a little tricky. I found it fairly easy to remove the 2 retainers that hold the rear of the interior headliner in above the rear window. Carefully pulled the headliner down just a little and used a mirror and flashlight to locate the harness for the brake light. I carefully placed both hands in and disconnected the old light harness and pulled it out. Installed new light assembly and using both hands was able to pull new harness thru and attach to vehicle harness. Just be careful that you don't pull headliner down too much or it can get damaged. The most difficult part of the process for me was removing the two retainers that hold in the headliner.
Maria H Olivera
Great replacement for F150
Fits perfect on my 2004 f150 super crew. I used the existing bulbs that were in my previous light. Has a nice foam gasket as well. The plastic is clear and allows the bulbs to be clearly seen. Two screws and that's it to replace whole unit. Couldn't be easier.
Ladyc Evabless Hayles
Great replacement
Excellent replacement, especially to fix any leaks you might have, I had a broken lens. As others have said the part of the wiring harness that is in the truck is very hard to get to. All I did was un screw the old light fixture and removed the wiring harness from it while it was plugged into the truck, and then just re-attached the harness to the new fixture. Worked perfectly. I saved the new wiring harness in case something goes bad in the future. The vehicle wiring harness is not Dorman's fault, Ford put it so far away as to make it impossible to reach easily, otherwise it would have been plug and play.