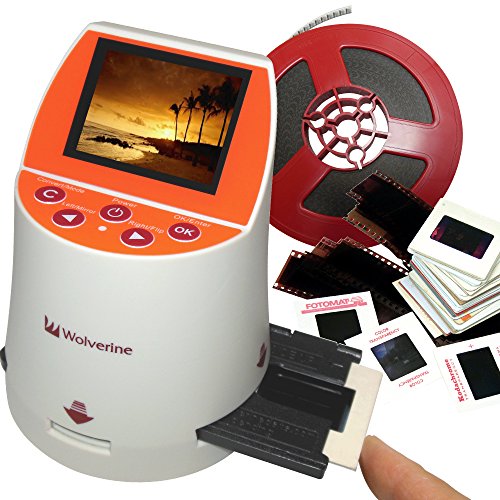
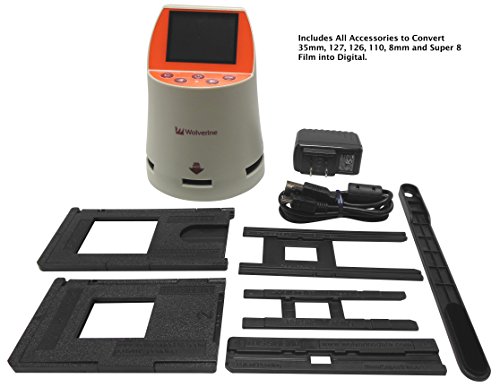
- Convert 7 type of Film into Digital in SECONDS. Converter of Slides & Negatives into digital JPEG’s for 35mm, 127, 126KPK, 110 and 35mm library Archives.
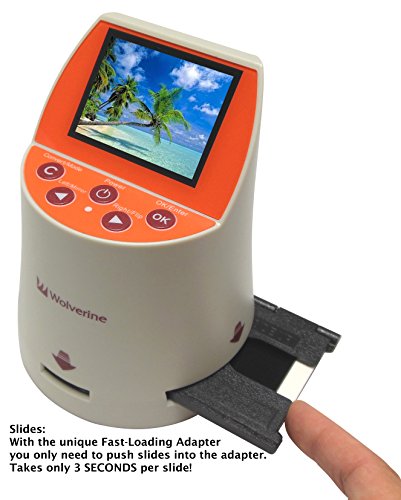
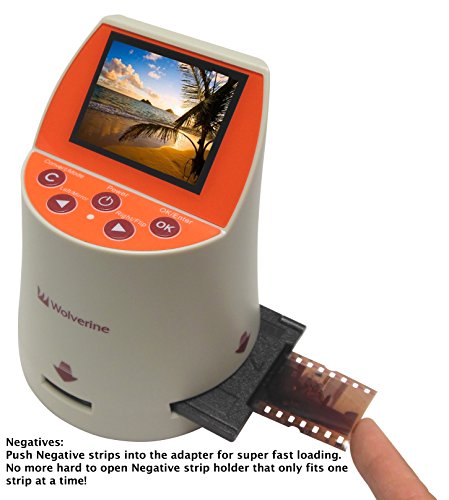
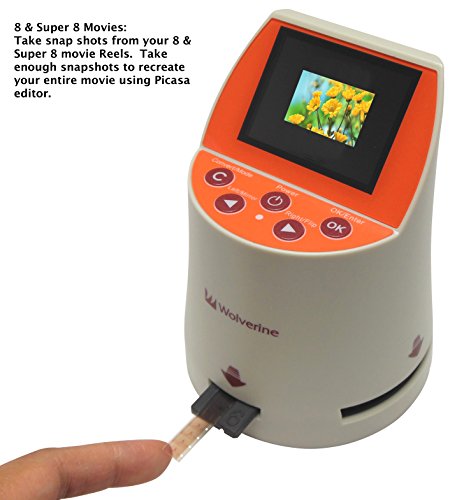
- Take JPEG snapshots from your 8mm and Super 8 Reels and recompile into a video. UNIQUE Speed-Load adapters for fast loading of slides & Negatives.
- Stand-Alone no computer required. Save images to internal memory (holds min. 40 images) or optional SD/SDHC cards.
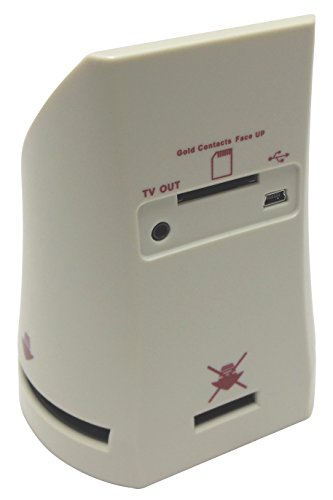
- 2.4" Color screen.TV-Out jack to view images on TV (cable not included).
- Brightness and color auto & manual adjustment. Compatible with all Windows and Mac Operating Systems.
-
Information
-
Twitter
-
Pinterest
-
Youtube
-
Facebook
Linda Poodledog Taylor
Easy to use and once uploaded to my laptop just ...
Easy to use and once uploaded to my laptop just a few adjustments to bring the slides into focus that were very old. The slides that were still very colorful I didn't have to touch. I only used the basic windows picture software so anyone with other jpg image quality photo program could probably get very results. I just wanted to finally see old family photos over 70 years old and this machine did a great job. I am looking forward to trying some negatives soon.
Aira Alexis Tapel
Tedious to Use but Yields Excellent Results
For the price this little machine yields excellent results, albeit with some time and effort. When my mother passed away I came across ten (10) carousels with 140 “Instamatic Camera” color slides in each, some of which were over forty (40) years old. There were slides from numerous vacations that my mother and dad had taken including a trip to Hawaii. All 1,350+ slides were badly faded and washed out. I really wanted to restore and/or preserve these slides but it was something that I couldn’t put off; time was their enemy. I checked around locally for a place that would copy these slides to digital format and possibly restore them, but I found the going rate was $0.65 to $1.00/slide, so I quickly eliminated that option. I began looking for a machine that I could buy to do it myself and found this one. It’s seems well made and works with all slide formats and film negatives. It is tedious to use in that you can only copy one slide at a time. It copies the slide to a SanDisk Class 4 SDHC Memory Card, pre-assigning a file name, which you have to buy extra. I bought the 32GB card and I was able to get all 1,350+ slides, plus 100’s of test slides on it with room to spare. I put the card away in the safe deposit box as a back-up. I selected a badly faded slide from Hawaii that had a lot of colors in it, so I could play with the machine’s brightness and color adjustments on that one slide to darken the image, reduce the blues and enhance the reds and yellows, to restore it image. There is a really wide range of adjustments here but I didn’t require the whole range. I set up a table on Excel for all the permutations and combinations of +/- settings of each of these four (4) adjustments and I wound up with a table of 125 slides. After some trial and error I made 125 copies of the same slide and saved each with the +/- settings in the title for each slide. Then I put them all up on the screen and began eliminating each bad one until I got down to four (4) or five slides (5) slides that looked the best. I used the +/- settings from these test slides on a few other faded slides until I narrowed it down to what looked like the best +/- setting. I planned to use this setting for all the rest of the carousels, as they were roughly the same age, and hope for the best, as the above process took me a couple of days. Then I began the tedious and arduous process of copying, changing the file name and saving one slide at a time. You have to remove each slide from the carousel and insert it into the machine, one by one, center it, and push two (2) buttons to copy it, wait 5 seconds, remove it, and then put it back in same slot in the carousel. Not a job for fat fingers. As I mentioned earlier, the machine copies the slide to a photo data card. You remove the card containing the copied pictures from the machine and plug it into the computer to copy the pictures over to your computer. Mom wrote a title on each slide so once I have the digital copy on my computer I again removed each slide from the slide tray, transcribed the title mom wrote on the slide into the file name of each picture as I saved them; then I put the slide back in the carousel.… again. This whole process took me three (3) weeks working a couple of hours a day, or until I couldn’t stand it anymore. It was a lot of effort but the results were outstanding and well worth it. I now have a digital record of a number of years of my parent’s lives, in vivid color, that I wouldn’t have otherwise, had if not been for this wonderful little inexpensive machine. Thank you Wolverine! The first two (2) pictures below are before and after enhancement. Note how the blue color remains as the reds and yellows fade away. The next three (3) pictures as just examples of what I was able to obtain from originals that looked like the first picture.
Wildel Garcia
Good Gadget
I had to return the first unit sent to me because the scanner didn't light up. I received a replacement unit in two days.Beyond that frustration, the new second unit works perfectly. I like doing this better than on a flat bed scanner because you can clearly view each slide individually and decide whether or not you want to convert it to digital, make light or color adjustments, and save it. I have a huge project - 27 slide carousels to convert, so it is tedious, but how could it be otherwise? I'm very happy I bought this. I am saving the slides to a memory card, and my elderly father will be able to view the slides he took 60 years ago once again. The color and exposure adjustment mode works fine. You just have to remember that the adjustments remain until you change them back. One more note: the manual urges you to use the cleaning brush to clean the scanner before use. I learned the hard way that they really mean it. I did use the brush, but with the tiny screen, it's hard to see if there are specks. On my first scanning session, which lasted several hours, every photo had a couple of the same specks on them. So really clean the scanner screen carefully. Post Script: I have completed the scanning project of 27 slide carousels. I found that the device worked quickly and you get into a sort of rhythm. Today I downloaded the photos from the memory card to my computer, and they look great.
Dan Morrison
Nice product for the Price!
Overall, I love this little converter. I bought it primarily to convert old 35mm slides and some negatives to digital. As others have said, it comes with instructions, and there are some good videos on their website. It works quickly, no long waits for it to save a file, and once I got into rhythm I was surprised at the flow. My saved files were just a tad over 2mg and there was enough detail to make me happy with the results. I did not think I would b playing with the adjustments as much as I did, I was nice to be able to bracket photos that were important to me. I found I could make them better than the original prints from slides that I had using my computer software. I have attached a scan of a print and the same file taken from the original slide with the Wolverine, I think you can see the benefit. Watch the dust on both your slides and the machine, I got a hand blower Giottos Rocket Air Blaster Air Blower, Large and a camel hair brush LensPen NLP-1C Lens Cleaner (Black with Gold Rings), that seemed to do the trick along with the screen cleaner that is included with the wolverine. I can't speak for 110, as I don't have any, but I will tell you this is not the solution for 8mm, I had an old roll I thought I would try out, there just wasn't enough detail to be worth it.
Bart Bicknell
Does a generally good job of converting color slides and negatives
This unit does a generally good job of converting slides and negatives to digital. With slides, you insert the carrier and push the slides through it one at a time. It is necessary to press two buttons to convert and save each image. This is a actually a strange process- be careful NOT to move the slide while the unit is "saving" an image, because that is when it is actually scanning it. The focus is sharp. It is possible to adjust exposure, and R, G, B individually. However, the settings are too coarse to be useful. I have found that most scans have way too much contrast. This can be fixed, to some degree, by using a photo editor on the resulting image files. The internal storage is fine for converting 36-exposure boxes of slides at a time. You do NOT need an external SD card to do this. Just convert the slides, connect to your computer to save them to your hard drive, erase the internal storage, and do the next bunch of slides. If you are converting 140 slide trays, then yes you should use an external SD card. Some claims made for this product do not stand up to close inspection. For example, the claimed 20 MP image resolution would make you assume it has a 20 MP sensor. It doesn't. The sensor resolution is not disclosed. Interpolation is used to generate a 20 MP file size. Also, it is misleading to show movie films with the product, which may lead the buyer to assume it converts films. It can only digitize one frame at a time from movie films. If that meets your needs then fine. Otherwise, send your films to an outside service. UPDATE: I have now used this product to convert 3,400 slides to digital, and I still have more to do. The focus is perfect, and if the slide quality is good, the conversion quality will also be good. Based on my god experience with this many conversions, I am increasing my rating to 5 stars. TIP: I found it increasingly hard to push 35MM slides through the carrier. I decided to file down the several raised guides that press against the slide as it passes through the carrier. This fixed the problem. Do NOT file down the guides where the slide exits the carrier, or a slightly warped slide will hang up on the plastic bar that goes across the exit opening. I actually removed that too, and now slides move freely through the unit. ANOTHER TIP: Avoid using the RGB controls. Even one notch of correction will put a red, green or blue cast on the entire image. It's better to do color correction using external software. However, DO change the exposure value based on what you see in the display. I found that people's faces tended to be very dark if there was any backlighting at all. Increasing the EV brings out the faces, and that's more important than whatever might be in the background.
Crystal Marie Perkins
Suit My Purpose
My understanding is that the Wolverine Film to Digital Converter is a fixed focus digital camera which takes pictures on the film. Upon recieving the Converter, I quickly tried the Converter out on 135 and 110 negatives and slides as well as Super 8 mm film. It worked! The super 8 mm film conversion function is more like a gimmick since it is impractical to really convert even a short film to prints because the included 8 mm film adapter does not come with spools to wind the film. It is impossible to locate and convert even a single frame in a 3 minute film. Since the physical area of the 8 mm film is so small, as expected, the converted print resolution is much inferior compared to 135 negative. By the same token, the print from 110 negative is not as good as the 135 negative. I bought the Converter (July 2015) primarily to convert all my negatives and slides from 1970 to 2005 (~ 9000 prints). I found that the quality of the resultant print directly depends on the age of the film. The print from a 2005 negative is definitely better than the print from a 1970 negative. Actually, the jpg file resolution (20 MP) from a 2005 negative is higher than the jpg file resolution (3MP) from the earlier-day digital camera. I did not bother to use any of the brightness control during conversion. It is much easier to use a freeware like IrfanView to adjust the quality of the jpg file later. However, I noticed that since the converter is high resolution, it is extremely sensitive to any minute dirt on the negative. Overall, I found that the Converter fulfills my need to convert all my negatives and slides to digital form (Dec 2015).
Joshua Berry
Beats everything else I've looked at/tried
I was going to give my slide trays to a friend to use, so thought I'd copy the slide that are sitting in there before storing them. I have used my scanner bed in the past for digitizing some slides to share on the net, and it was a pain, with a dozen slides taking 20 minutes between loading, unloading, scanning time, storing etc. This thing does them almost as fast as you can feed them. I think I had 2 jambs in 24 slides, and it was quick to fix that, not a long process and frankly, I'd take the blame for at least one of them. I stored them on a card for ease, you can plug it directly into your computer if you prefer, but I just had this thing sitting on my knee while I grabbed slides and fed them in. If you get one in wrong, just push another one in and refeed the one you did wrong. You can manipulate the image orientation but why bother when it is so easy to refeed it? I have to be honest I cannot comment on the photo reproduction quality since when I loaded them on the computer from the card I just glanced at them and they looked fine. In my opinion you certainly get a good enough image for use on a computer. If out of 1,000 slides you have 10 you want in super quality you could always pick them out and send them off if you aren't happy with the results from this thing. I'm going to bring this to my friend and let him try it. I think he is going to find that it is nearly as fast to scan slides with this thing and create a slide show than it is to load slide trays. Sorry can't comment on the other film type capabilities as I only have 35 mm slides.
Maria Lopez
This little thing is FANTASTIC. You are not going to get HD quality ...
This little thing is FANTASTIC. You are not going to get HD quality from slides.... they are old slides. But you do get HD quality OF the slide itself. This little booger is easy to use and transfers slides wonderfully. Just finished 800 slide transfers!!! Time consuming yes. But I'll never have to break out the projector again to look at these slides. You get to view them on your HD TV or computer and they look like the slides of ole. Thanks. Great product. Left some samples of slides that were transferred of my parents. You can see the difference in quality, not because of the transfer, but because of the slide itself, or the how the pic itself was taken. Some came out so perfect.
Lyka Habal Belisario
VerySatisfying !
This little gadget has worked beautifully for the past two weeks while I reviewed about 7000 images from the past 54 years. In spite of being an emotional wreck, I am very satisfied with the Wolverine. Slides, color negatives, black & white, 35 mm, 127 and 126, it handled them all very well. Of course the resolution didn't improve, but the images retained whatever sharpness they had originally. The Wolverine also performed a modest amount of correction for both exposure and color - not professional quality but enough to correct for time-discolored negatives and change the exposure quality of high-contrast slides. Rather than using a memory card, I connected the Wolverine directly to my computer and uploaded to a separate file created for the converted images. I now plan to transfer the images to a little thumb drive - the file size is 680 MB with almost 300 images - and send it to my son. If you get one of these, have fun ! ! By the way the attached photo was taken with a Kodak Starflash using 127 Ektachrome back in 1965.
Yoseph Shiferaw
Works with all grains and films - solid double plus good
This is a great product. It is not flimsy or delicate.Sliding in the film holders and negotiating the media is easy as pie. The negs are held firm and flat. A computer digitizes the thing in two seconds then push to the next. I found the controls to be easy and near self evident. Just press a firm button to select or scroll. It makes sense to pick up a memory card along with it and I'd suggest a can of air. The brush stick works fine but a can of air is handy. In terms of reproduction I would say that whatever grain I originally shot with or colour is correctly reproduced. I did a lot of T-max 100 and 400 b & w and I've very pleased with what I see on the computer monitor. It does pick up the faintest images. I was shocked at the quality of the image. I'm glad I waited until this long to get one because it goes to 20mega pixel. You don't need a computer in order to see what you are doing or to load the card. If you are or were a serious photographer you won't find fault with this unit. On a 32GB memory card I put over 750 images so far, colour, b & w and slides. It's pretty easy to mess around with the colours and lighting as well. It came with everything required in the box except the memory card which is extra. It really was plug and play. Easy instruction booklet. I recommend it and I just don't see how you could be disappointed. Photo here is T-Max 100 asa, shot with Pentax Program Plus.