


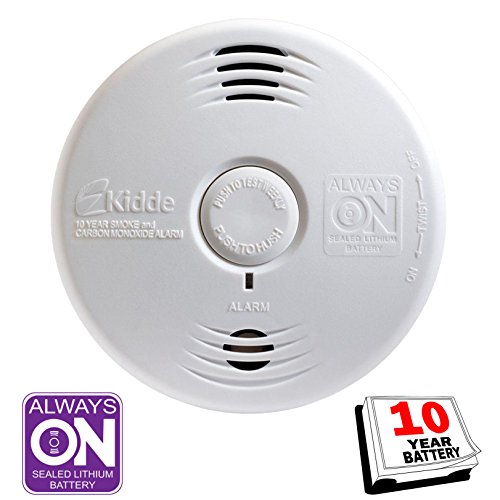
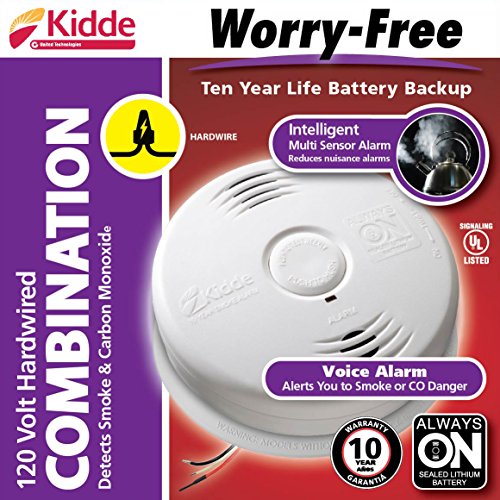
- Provides Protection from Two Hazards - Fire and CO in one unit with 10-year sealed lithium battery backup.
- Sealed-In Lithium Battery Backup - No battery replacement required over the 10 year life of the alarm. Eliminates worry about removal or unauthorized deactivation of alarm.
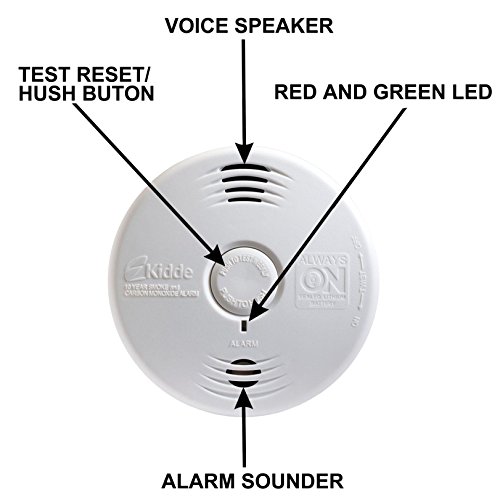
- Voice Warning System - Verbally announces “FIRE!” or “WARNING! CARBON MONOXIDE” to help distinguish between threats. Audio Alarm: 85 dB at 10 feet
- Ionization Sensing Technology - Ideal for detecting fast flaming and other types of fires. Temperature Range : 40 degree F (4.4 degree C) to 100 degree F (37.8 degree C)
- Hush Feature - Temporarily silences nuisance alarms for approximately 9 minutes and will not allow hush mode unless the unit is in alarm mode.Interconnects - Up to 24 Kidde devices (of which 18 can be initiating).Flashes once every 60 seconds to indicate battery only mode
-
Information
-
Twitter
-
Pinterest
-
Youtube
-
Facebook
Nancy Ward
Excellent replacement for old Kidde alarms
These alarms are exactly as described, and appear to function properly out of the box (I bought 3). I guess I will find out if everything is OK over the course of the next 10 years. An important consideration for me was ease of replacement. I had old Kidde alarms already wired into my house. These new ones were fully compatible with the quick-release wiring harness in those old units, so I didn't have to do ANY wiring work. I changed the old mounting rings (which are flush to the ceiling), but even those MAY have been compatible with the new units. In any case, changing the rings was as simple as loosening the two screws holding them, sliding them off, and re-tightening the new rings in place. I changed the rings because you must rotate the units clockwise fully in the rings to avoid getting a false indication of "low battery" or something else. Some people have reported this, and it is emphasized in the instructions. it is NOT optional, and I wasn't sure that the old rings were fully compatible. Better safe than sorry. So far, so good.
Jessie Rankin
Convenient and reliable alarm
So far so good; this combo alarm had the features we needed (hush, battery backup) and was easy to install. We did not want to have separate CO2 and smoke alarms cluttering up the ceiling, and this one meets all the safety standards required. I read other reviews and can only speak to our experience, which has been complete satifaction. We ran through the tests, and there are distinctly different alerts for fire versus the carbon monoxide. We have purchased Kidde products throughout the years with confidence, and always been happy with them.
Laraib Khan
LOW Battery is NOT NOT NOT a problem!
A correction to my previous post. Bought 10 units. 3 were "Low Battery" alarm immediately. I called the company and found out that there is a procedure how to activate the battery: 1. connect the unit to wall without attachment to 120V, i.e. do not plug in connecting pins. 2. The unit should beep (battery ready). 3. Push test button to make sure unit is working properly. 4. Disconnect the unit and plug in the connecting pins. 5. Mount the device and test it.
Kaitlyn Shepherd
They Talk!
This will be the best smoke alarms I've ever installed, and they detect CO too. Like any smoke alarm, they sound a loud alarm when they detect smoke, or carbon monoxide. However, they also "speak". In the case of smoke, they say, "Fire". If they detect carbon monoxide, they say, "Carbon monoxide." And finally, if the battery is low, they say, "Low battery." I love living in the 21st century! I replaced all 10 FireEx smoke alarms in my home. Yes, you have to remove all the old quick-connect harnesses, and you need to remove all the old mounting plates. Even then, I replaced all of my in about an hour. That includes clean-up time. To replace your existing alarms: 1. Disconnect power to all your existing smoke alarms. If you home is wired properly, they should be on the same circuit. If not, you will need to verify the power is off to all of your smoke alarms before continuing. 2. Remove all of your existing smoke alarms. Since all of mine were FireEx brand, I had to also remove the existing mounting plates and quick-connect harnesses. They are not compatible with this smoke alarm. 3. Install your new smoke alarms, replacement quick connect harnesses and mounting plates. If your house has an inter-tie, you will connect the red wire to the red. White to white. Black to black. make sure the wire nuts are all tight and the wires are connected snugly. If you do not have an inter-tie, then leave the red wire from the quick-connect harness capped. (It comes capped from the factory.) 4. Connect the plug on the quick connect harness to the smoke alarm. Place the alarm on the mounting plate and rotate clockwise until snug. if you do it properly, you will hear a "Beep", followed by a voice saying, "Push test button." If you have more than one smoke alarm to replace, I recommend installing all of them before pushing the test button. 5. Once all of the alarms are installed, Reconnect A/C power. The LED on ALL of the smoke alarms should be glowing green. If not, something is wrong, and you will need to troubleshoot the issue 6. Tell your loved ones, "You may want to leave the house for a minute", and proceed to test smoke alarms. Press and hold the button in the middle until it beeps once, then release the button and step back. In about three seconds the testing process will begin. Because of the inter-tie, all of the alarms in your house should follow the same testing sequence along with the one you are testing. I recommend walking from room to room during the process and verifying that they are all following the test process. This helps you verify that you wired them all correctly.
Balint László Eduárd
The detector was easy to install once I watched some videos about how ...
This alarm paired well with other Kidde smoke detectors we bought... 7 in total for our two-story house. I wanted one downstairs near the gas-powered clothes dryer and kitchen with its gas range that could alert the other Kidde alarms of a gas leak, and of course any fire. The detector was easy to install once I watched some videos about how to remove current 17 year old alarms and install new alarms. You can replace alarms yourself with a little knowledge. Just make sure you follow the advice to turn off power at the circuit breakers, and Amazon sells voltage detectors that beep if they detect you haven't shut off the circuits like you thought you did. I am very bad at such tasks, and yet was able to save hundreds on hiring a contractor. Note that it has a green LED to signify "I'm working ok," but it is quite bright. So if installing in a bedroom and if you are sensitive to light when trying to fall asleep, Amazon sells LightDims, which are stickers you can put on annoying lights... just enough to sufficiently dim them at night but still be able to see them -- you don't want to totally black out the status indicators.
Jeff McDaniel
Plugged right in
This is for smoke detector WIRED houses. Plugged right in when the old one started bipping that it was too old to be used. Sets off basically the whole house when you test it. It also yells "Fire" or "Carbon Monoxide" - nice to know the danger. Never have to change a battery with this one... so I guess thats good? The Dog however REALLY doesn't like it going off. I have NO clue how to throw it out when its done - lithium battery and probably something minimally radioactive inside?
Davey Abu Dhabi
Replacement for Kidde 1275
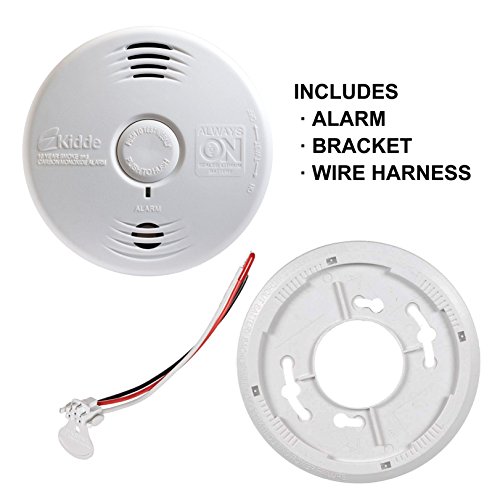
I purchased 7 Kidde i121010S to replace my old Kidde 1275. I bought the i12010S because of the 10 year lithium battery as opposed to the 1275 that used a standard 9V battery that were supposed to be replaced each year. I have a couple of detectors that are difficult to reach without a really tall ladder (one in a stairwell) and didn’t want to have to continue to replace the batteries every year. I am very happy with them so far. They seem to be working perfectly with no false alarms. Although, when I say working perfectly, it’s not like I’ve had a real fire to check them out. To answer a couple of questions that came up when I was looking for replacements for my old 1275. 1) Do you need to install the new mounting base or use the old one? The new detector will not fit on the old 1275 mounting base, at least not mine which were around 13 years old. Yes, the detectors should have been replaced before now. Plus the old bases were so yellowed, I would have replaced them even if they had fit. 2) Can you just plug the new detector into the old 3 pin AC power connector? The answer is a little more complicated and I did verify the information below. Yes, you can plug the old 3 pin connector plug into the new detectors and they do work fine except for one thing. The old connector has a larger flange around the 3 pin plug (please see picture). This is fine until you try to install the detector onto the mounting base. The flange on the old connector ends up between the base and the new detector which makes the detector very difficult to get on far enough in order to twist it in place. I did do this with a couple of mine before deciding it just wasn’t worth the difficulty of getting the detectors twisted in place. I ended up installing the new pigtail harnesses in all locations. I removed power by turning off the breaker to the smoke detectors (I know, most of you know that already). I removed the wire nuts from the old 3 wire harness and reinstall the new ones (all color coded). Pretty easy!
Hamza Khan
Hope it does it's job, hopefully I won't need to find out!
While I can't vouch for how well this alarm operates, I can vouch for how easy it is to replace my expired hardwired smoke detectors with this 10 year battery upgrade detector. No more buying expensive 9v batteries, no more climbing a ladder to change the batteries. If you already have a hardwired system, make sure that this alarm is compatible with it. The alarm comes with a connector if you need to swap it, Mine already had the correct connector on it, so that wasn't necessary. The mounting plate will need to be changed regardless of what is already in place since the new plate activates the alarm's built in battery. The plate screws into the electrical box that the smoke alarm should be connected to. The button in the middle of the detector is for testing. The unit has the traditional chirp alarm, but also has a voice alarm to indicate whether it is detecting fire or carbon monoxide or both. For those who are swapping an old detector for this new one the process is pretty much the same as putting up a new detector assuming that the electrical components are already in place. You just need to mount the plate, plug the detector in, and tighten the unit to the plate. The process should take no more than 10 minutes.
Raveena Kamal
Work, meets MA fire code, installed easily
Had to buy these to meet new fire code in MA. Sealed battery new requirement, came with new pigtails for new hard-wiring, but these were replacements for other Kidde smoke/co alarms and the plug fit right in to existing mount. BTW, read quick instructions about installing...I did not ;) so the alarm chirped for almost a week as it charged. My fault completely.
Gia Papiashvili
Great product
Over the years I've installed a large number of smoke and carbon monoxide alarms (electrical, battery, battery backup, etc.) in single and multi unit residences. Have concluded electrical with lithium battery backup is the way to go (saves time, effort, and money in the long run) and will certainly meet code in most, if not all, cities. In this case, I bought and installed 5. Quick and simple. I will continue to use these as they present a good value for the money. Do not anticipate any issues, but, will post updates if anything negative occurs. Quick note: After hooking up the electrical wiring, make sure you fully turn unit clockwise onto base to activate the battery. You know you did not activate battery if you get a low battery warning.