
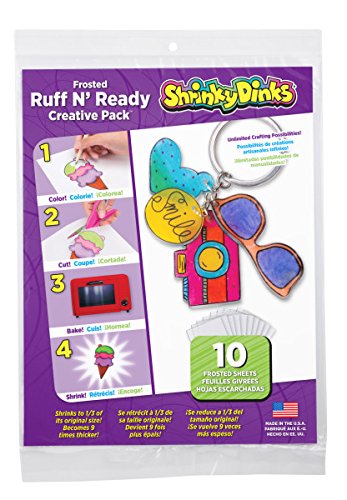
- Make trinkets that look like frosted glass
- Color, bake and shrink
- Blank sheets to create custom pieces
- Includes 10 8in x 10in frosted, transparent sheets and instructions
- Recommended for children 5 years of age and older
-
Information
-
Twitter
-
Pinterest
-
Youtube
-
Facebook
Dawn Klukowski
These are perfect and so cool!
Dana Newberry
They finally come pre-sanded!
I've bought several types of Shrinky Dinks over the years. They ALL say that in order to keep the ink from rubbing off later, that you need to sand them first. Sanding them is an extra step that nobody wants to take. Plus the sharpies run in the grooves if you sand them too long, and the plastic doesn't turn out evenly if part is sanded too much or not enough. These Shrinky Dinks come PRE-SANDED. That's what these are. And they are by far and away the best ones. I've made darling projects with the others that wind up rubbing off later because I didn't sand them first. Plus the finish that's not shiny looks much more professional. These are the Shrinky Dinks to buy.
Reina DE Sur
A Great Idea
Every now and then I have a really great idea. Last Christmas, I was looking at my kids Christmas lists. Another piece of paper for a baby book I may never get around to putting together. That's when I had my stroke of genius - I would have them write their Christmas lists on Shrinky Dink paper and then I could turn them into ornaments. I have to admit, they turned out so super cute. If you decided to try this, be aware that because the entire paper is being used, it will curl up quite a bit and you may have to flatten it out after about 3 mins in the oven. I put it back for another minute after I flattened it out. They didn't come out completely flat and did have a little bit of shape still to them, even after flattening out, but they are really cute and now I can start a collection of Christmas List ornaments. I think this will be something that my kids will really enjoy looking back on as they get older. It's memento of not only their writing skills through the years, but also of what they liked at certain ages.
Tamra Lee White
WORKS LIKE A CHARM- but DON'T PANIC and leave them in for longer!!
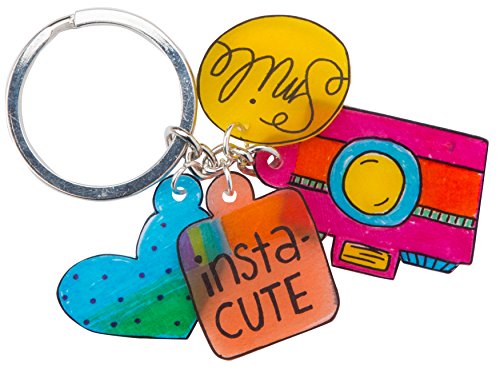
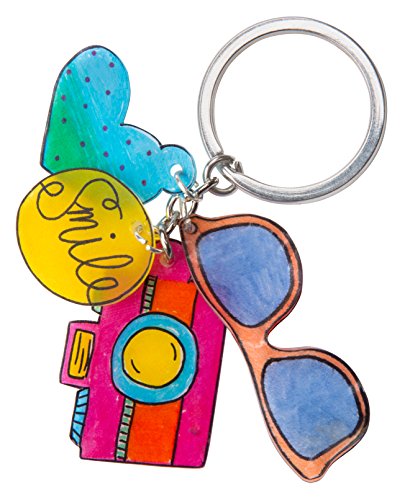
I'm a teacher and had my kids make shrinky dink keychains for Father's Day. They turned out AMAZING! **One SUPER IMPORTANT TIP: the package says that it only takes like 2-3 minutes to shrink all the way... I timed the shrinking and at 2 minutes the shrinky dink paper was curling up and looking like it was completely ruined so I panicked and tried various ways to flatten them- DON'T DO THAT! Just trust and leave them in there for about 5-7 minutes and they will go from completely curled up to completely flat and gorgeous. If you take them out early all curled up, don't worry, just stick them back in and they fix themselves! I cut the shrinky dink paper into fourths and used a hole puncher to punch holes before baking and it was the perfect size. I also made some super cute customized cat keychains! My students and I used colored pencil for the pictures and then I spray painted theirs to seal. Put clear nail polish on top of mine and that works too. So easy and looks great!
Keny Ewican
Lots of fun!
My daughter and I made these keychains for Mother's Day (plus one for dad because we had extra space!). At first I thought they weren't going to shrink enough, they sort of pause shrinking and I thought they were done. You'll see in the second photo that they were curled. I actually waited about 30 minutes before I had a mind to put them back in the oven to see if they would shrink more, and they did, as you can see in the third photo. Keep in mind that the colors get much more saturated when they shrink.
Wildel Garcia
Adult coloring group having fun with this blast from the past
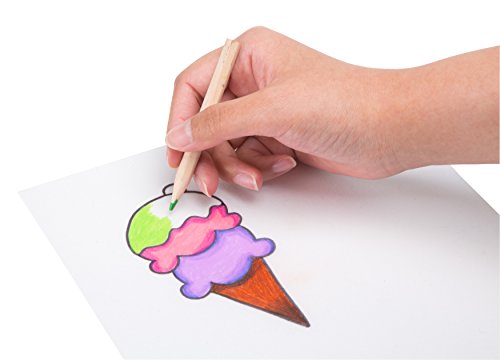
Adult coloring group having fun with this blast from the past! Still the same product we 40-somethings remember playing with as kids. Crystal-clear style works with permanent markers; Frosted style works with sharpies on the slick side and color pencil and/or gel pens on the frosted side.
Janie Riddle
Shrinky Dink is the way to go
I love this shrink Plastic! Before purchasing this item, I had only used shrink film from Graffix. I had been very unhappy with the results I was getting as it didn't hold color well and there was a large grain once baked. I was about to give up on shrink art, until I tried this! The sheets are sturdy, and once they bake they are thicker than the graffix sheets. I had no trouble with them sticking while baking. I used the ruff n ready, I was skeptical because I didn't think the colored pencil would do well, but they turned out beautiful. The colored pencil goes down very smooth and allows for a bit more control than using sharpies. I was very pleased with the item. I know it cost a bit more than the graffix film, but in the end the extra cost is worth it.
Lindsay Henderson
Fun for kids and adults too! Great Christmas gift and fun way to make a personalized keychain.
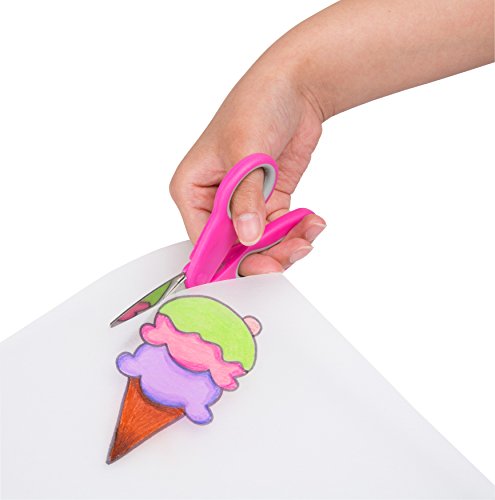
So cool! I bought this for my boys for Christmas so they could make their own keychains for their backpacks. I tested it out by making Chewie in the picture (forgot the hole for the keychain). Reading the reviews made it really easy! The instructions say to bake 1-3 minutes but mine was still curled up at that point. Thankfully I had read a review that said to leave it in the oven until it flattens out. The instructions also say to leave it 30 seconds after it flattens. Here’s how I made mine: 1. Print out a picture to trace. (This one was centered on about 1/4 of a page). 2. Trace on the smooth side with a Sharpie. 3. Color on the rough side with markers or colored pencils. (The directions say not to use crayons.) 4. I probably should have outlined on the rough side with Sharpie again because the outline didn’t show up on the back side. 5. Trim the edges. (Small scissors would be helpful.) 5. Use a hole punch if you want a hole. (It will shrink to the correct size.) 6. Place the rough, colored side up on parchment paper on a baking sheet. 7. Put it in the preheated oven and watch it for 2-5 minutes. You’ll see it curl up and then flatten out. 8. Take it out of the oven and remove it from the baking sheet. All set! Mine was only shiny on one side. Not sure if that’s normal or not. So fun— can’t wait for my boys to try this!
Debbie Elrick
Awesome Product!
Tested it out with a Tinkerbell. I drew first (on the frosted side) with a mechanical pencil (which erases on it very well) then used uni posca paint pens to paint with. I then used an x acto knife to cut her out and a hole punch a few times to make a good size hole to shrink to a proper pendant size hole and followed the instructions - set the oven temp to 325 and put her on a cooking tray lined with parchment paper. Put it in the oven when it was fully preheated. It said bake 1-3 minutes, but it needed longer. It does start folding over on itself badly, but let it keep baking until it flattens itself out. I think it really took about 5 minutes and it's still slightly bendy when you take it out for the first few seconds to fix some spots that might not have flattened completely. You need to watch it constantly and don't take it out to soon or it will stay folded.
Marvin Baluyot Velarde
Great craft item!
Great product! Does exactly what it says it does. I mainly used color pencil and sharpies on it and the color stays on well. Shrinks fairly quickly and it also shrinks a lot. I noticed that when I hole-punched shrinky dinks with a standard hole-puncher it's hard to put them on silver ball key chains. I suggest buying little rings to attach onto the item and then string them onto the ball chains. I ended up just adding little rings and then tying a chord string to it. Also when taking it out of the oven, make sure it's on a completely flat surface or the shrinky dink might bend.