


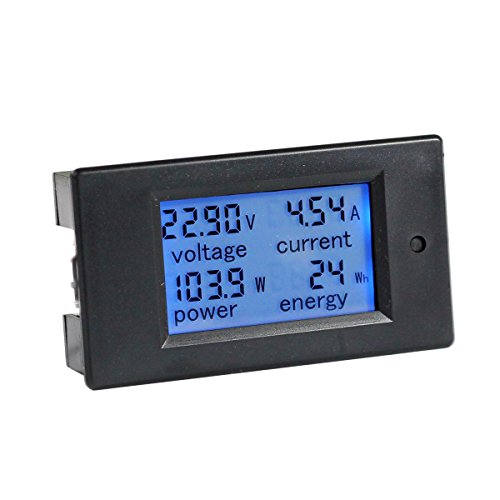
- Test range: Voltage: DC 6.5~100V; Current: 0~100A; Power: 0~10kW; Energy: 0~9999kWh
- Store energy data when power off(can be reset to 0). The blue backlight can be turned on/off manually
- With overload alarm function(If active power is larger than threshold, backlight and power will flash)
- 4 in 1 meter; Large-screen LCD (displays voltage, current, active power, energy at the same time)
- Note: Only display and shunt are included. It doesn't include any wire or accessories
-
Information
-
Twitter
-
Pinterest
-
Youtube
-
Facebook
Heather Eaton Biggs
Solar to Charge Controller to RV battery Installation Diagram
I finally got this installed between my solar panel and my charge controller. Im not an Electrician, far from it. I had to email customer service at Bayite with a few stupid questions. They were very prompt in their replies. They sent me a diagram of how to do what I wanted and it worked perfectly. I am attaching the diagram in case anyone out there is trying to get reading from solar to charge controller to battery. Worked great for me. There are quality people who know their products and take time to address installation questions quickly and courteously. The Product works well
Ni Ca
Fantastic
I put this in my camping trailer and am using it to monitor DC amps. We plan to do a lot of dry camping and knowing our actual draw (vs what websites claim) goes a long way toward battery management. This comes with all the needed parts and with a bit of electrical background is an easy install. Mounting this was not fun. I bought a wall plate at Lowes (used for light switch) and cut a rectangle hole in it for this. The tangs on the side of this unit didn't hold anything and broke very easily. I used hot-glue and it holds it tight.
Lai Yin Han Oo
Excellent for monitoring battery usage in my RV
Very happy with the functionality of this unit. I'm using it to monitor energy usage in my RV. I do wish I had a better place to mount the shunt (on top of the battery) , but that's not the fault of the unit. I can monitor both discharge and charging current by installing a DPDT switch on the leads to the shunt. By throwing the switch it reverses the polarity of the shunt connections, works perfectly. My one wish is that the reset button were not recessed. For the install I used a blank electrical plate cover. The mounting tabs are made for thin materials and since this is mounted into a 1/4 plywood cabinet sidewall I didn't think it would stay put. Though if I could subtract half a star from the rating I would because I'm also not thrilled with the mounting/housing. There's only 2 small spring tabs to hold the thing in place. I ended up epoxying it to the electrical cover plate.
Jordan LovesteslaforEva Guy
Great addition to my class B motorhome
So far, excellent. A huge improvement over the stock battery monitor, relieves my battery anxiety on my class B. It's accurate to my $150 Klein voltmeter. The backlighting is not overly harsh, so I may just leave it on all the time. Viewing angle is good enough, but of course test that out before permanently installing. My only beef is the pen button. I will probably try and glue a small extension on it, since it will get used regularly, such as for resetting the energy meter when setting up camp. From this I should be able to get a good idea of the total Wh of the battery. Voltage alone doesn't say much. The clips are designed for a thin panel. To mount it on plywood, I cut the back side at the plug in at an angle to allow clearance for the wire terminals, and just made the rest a friction fit within the wood cutout.
Peggy Hurst
I finally can monitor exactly what my motorhome battery system is doing - a must have for any RV owner
I purchased two of these bayite DC 6.5-100V 0-100A LCD Display Digital Current Voltage Power Energy Meter Multimeter Ammeter Voltmeter with 100A Current Shunt and installed them in my motorhome a month ago. I wired them so that one meter shows all current flowing out of the house batteries and the other shows all current flowing into the house batteries. I only needed to use one amp meter shunt at the negative terminal of my battery bank output to accomplish this. This arrangement has worked exceedingly well for me. Both meters show the identical voltage readings. With these meters I can keep easy tabs on what my electrical system is doing. I can tell what the current draw is for the various loads that I have (lights, water pump, standard dorm fridge, etc.) and the watt-hour meter lets me know how much my battery has been depleted (if you know the total capacity of your battery). It also lets me see what my battery charger is doing with regards to voltage and current delivery. The illuminated display uses hardly any current (3 milliamps) so I keep the light on all the time. It makes a great night light. So far both meters have worked great and were relatively easy to install. I can't believe I waited so long to install something like this. It's so inexpensive yet so helpful. A no-brainer. EDIT 7/13/2018 - Meters are still working great and are very helpful. This should have been standard equipment. I added a photo showing how I cut out mounting holes for the two meters in a standard light switch plate and mounted this plate over a cutout on the interior cabinet wall.
Sheteka Villa
Great for 12 volt PV solar applications
These devices are great for monitoring 12 volt PV solar system performance. I use two of these in my small RV. One is used to monitor solar panel output and battery charge rate using a 4P2T slide switch to select, the other to monitor battery discharge rate while running the DC-AC inverter. I compared the current and voltage readings to a FLUKE DVM and they were within 1% over much of the range (10-20v and 0-30A) of my application. It's really nice to see the accumulated solar energy from the PV panel array as well as total use by the RV. Just a couple notes to anyone with a similar application: First locate the solar charge controller as physically close to the battery(ies) as practical and use the heaviest gauge COPPER (not copper clad Aluminum-CCA) possible. Good MPPT charge controllers have a battery charge algorithm that looks at the battery voltage on the terminals of the charge controller. Under heavy charging conditions there can be SIGNIFICANT voltage drop between the output of the charge controller and the battery terminals which can result in a less than optimum charge state for the batteries. Second MPPT charge controllers can generate quite a lot of electromagnetic noise which I found impacted the readings on these meters if the sense cable to the shunt was greater than a few feet. Adding decoupling capacitors to the meter inputs helped a lot.
Rosa Murphy
Works perfectly in my RV!
Wow! This device is awesome! I installed this on my RV to monitor the house batteries. I'm able to tell at a glance exactly how much power is being used by any light, appliance, phone charger, etc. It has been especially useful to me because I'm converting every single light from incandescent to LED. The energy savings, by the way, is phenomenal! I've been able to track down parasitic loads that I didn't know existed! I installed kill switches on things like the TV and radio. They draw lots of power even when they are turned off! The whole device is super easy to install, and requires almost no tools or special skills. I'll echo a few things that have been said in previous reviews: 1. Follow the wiring diagram EXACTLY. It's very easy. Don't second guess the instructions, just follow them to the letter. 2. If you are mounting this on a wall, the wall thickness must be about 1/8" or less in order for the mounting tabs to work. Otherwise, a little bit of hot glue will keep it in place no problem. 3. You can only read the screen when your head is right in front of it. You can't read the screen at an angle. Keep that in mind when choosing your mounting location. Mount the screen at eye level if possible, otherwise you'll find yourself bending over to read the numbers. *If the seller reads these reviews, please try to do something about the screen! It's annoying to not be able to read it at an angle! That's my ONLY complaint about this device! Besides that, it's a wonderfully awesome product!
Sieku Chiri Sambu
Shunt Mounting
31 DEC 2018 One of the common complaints about this that I have read about concerned the mounting of the shunt. I installed two metes (two shunts) in my RV. I used a PVC cover plate that is normally used for a 4X4 junction box. I removed the two original 5 mm screws that were for the shunt wires and used new longer ones screwed in from the back of the cover plate and through the shunt to make a post to put the wire connector on to. Then the wire connector is held in place with a 5 mm nut. I also used longer 5/16" bolts installed up from the back to make studs for the large AWG Negative wires to be attached to the ends of the shunt. Then PVC cover plate gets screwed to a wood backing to hold it in place.
Emanuel Lee Warren
Perfect for 30 Amp RV
Installed in class A RV (30 Amp Service). Used 100 amp shunt. Wired with 22/4 stranded alarm wire purchased at home depot for .30 cents per foot. Mounted flush adjacent to rv systems control panel. Unit works as advertised and I am very pleased. Another reviewer mentioned using a DPDT swith to use one meter to monitor both charge and discharge readings. Sounds like a good idea to me. I will update after I install the switch. For now, I have the meter measuring discharge. Wish I would have bought this years ago. Update 14 Feb 2017: I installed a double pole double throw (DPDT) on-off-on switch. This allows one meter to measure discharge or charge rates (or measure voltage only in the off position). Works perfectly. Just wire the switch to swap the two conductors hooked to the shunt. In my case this was the green and white wires. For info only....your situation may be different. Update 6 Apr 2017: For what it's worth, my generator draws a max of 79 amps (momentarily) when cranking the starter. So the 100 amp shunt is adequate for my rv. The generator starter is my highest 12 volt house battery draw. Using this monitor, I've learned having my rv plugged in to shore power, while the use/store switch is in the "store" position will cause about a 13 watt constant power drain. If I disconnect the shore power, the draw goes to zero. I dont know why this is. But, its nice to know and explains why I had low batteries a few times in the past.
Donna Renee Rensel
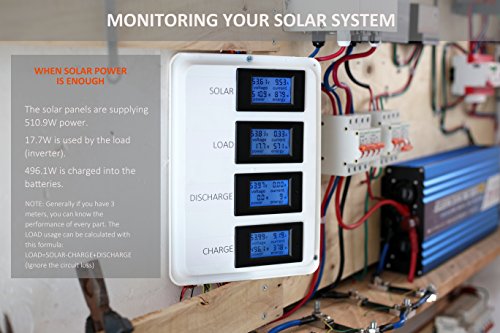
Great for remotely monitoring your off-grid solar power system.
We use a pair of these for remotely monitoring our small scale solar power system at an off-grid cabin. By "remote", I mean not in the high current paths of charging and discharging the battery bank. Prior to these meters we used in-line meters ("Watts Up" type) with internal shunts, which meant visiting the crawl space where the system is installed to check on status. Having the shunts external to the meters means you can locate these guys just about anywhere in your house and run light gauge (18 gauge is what we use) wire to them; these are inexpensive relative to what you'd pay for a packaged solution to do the same thing. We use one for solar input and one for load output and the ability to reset the energy accumulators is great, along with the fact that the solar meter will maintain the energy accumulator after the sun goes down and the meter goes dark. My only complaint is that the energy meters roll over at 9999 watt-hours rather than convert to kWh and keep going. The meters are well documented and the wiring diagrams are easy to follow as long as you are careful and work methodically.