


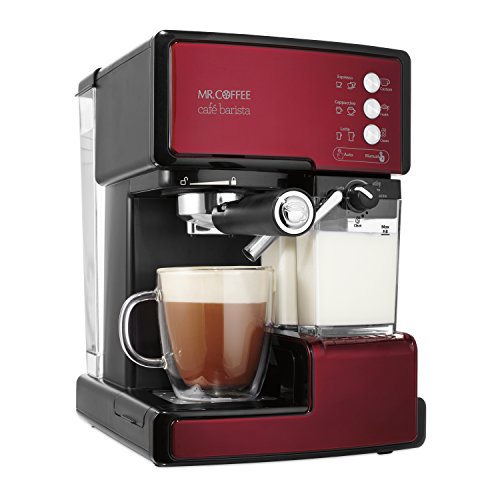
- Semi-automatic 3-in-1 espresso, cappuccino and latte maker
- 15-bar pump system brews rich-tasting espresso coffee
- Trouble-free automatic milk frother removes the guesswork
- One-touch control panel for drink selections; Creates single and double servings
- Easy-fill, removable water and milk reservoirs; Programmed cleaning cycle
- Cord length: 26 Inches & Watts: 1040
-
Information
-
Twitter
-
Pinterest
-
Youtube
-
Facebook
April Richards
Scientific Review of Cafe Barista's Liquid Volume Output
I just purchased the Café Barista and it makes great Espresso and Cappuccino. I can't comment on the quality of the latte because I don't drink latte and so I cannot judge. I developed a taste for expresso and cappuccino on my visits to Italy and more often than not I am disappointed when ordering these drinks at major coffee chains here in the states, hence why I brew my own. For years I have used manual machines and been happy with the results, however, as I get older I am getting lazier so wanted more automation - hence purchasing the Cafa Barista. Before purchasing this product I did my research (I am retired, but once was a research director at a not-for-profit research institute). The only concern I had was that some reviewers said the volume of the liquid delivered could be low compared to what was listed in the users manual. Upon first using the machine I thought so too. So being the geek I am I decided to conduct some experiments. I ran 10 trials under different conditions and used accurate measuring devices to measure the liquid delivered. Bottom line if you don't want to read the details is this a great little machine but not perfect - but for the price it is an amazing feat of engineering. What I found is that the unit consistently delivers 1.75 ozs for a single shot expresso, and 3.5 ozs for a double shot expresso. More than the advertised 1.25 and 2.5 ozs -- so no complaint there. Next I measured cappuccino output. The output delivered will vary based on the temperature and fill level of the milk reservoir. A full reservoir at room temperature will consistently deliver a 5.5 oz single cappuccino, and a 9 oz double cappuccino. A little less than advertised. If you let the reservoir get low you will see a reduction in liquid by about 1/4 oz. If you heat the milk before putting it in the reservoir you will lose another 1/4 oz of output. Hot milk is losing volume in the steaming frothing process so this makes complete sense. Single Latte output ranges from 7-9 ozs depending on fill level of the reservoir and temperature of the milk. For double lattes output ranges from 11-12 ozs. This is significantly below what is advertised. In my opinion, for the price you pay for this device this performance is excellent. And the bottom line is the taste and for my palate the espresso and cappuccino out of this machine is better than what I can do with my manual machine, and is better than 99% percent of the product sold in cafes here in the states. There is one little family run café here in the states that I visit occasionally, run be a couple of Italian ex-pats, that the Café Barista can't best - but that is the only one.
Justin Corning
A great intro to the world of espresso-based drinks
I'm new to the world of coffee, but already found I prefer espresso-based drinks over those brewed in a drip-style or pod-type machine. What to do, then, if you want to take baby steps towards brewing at home? For me, this machine was a no brainer. At the time, it was only about $150 (although that price has apparently fluctuated since), making it a relatively inexpensive way to try different drinks at home. Simply put, I adore this machine. My wife, a more established coffee drinker, also loves what this machine is capable of. With fresh milk and high-quality/ fresh coffee grounds, it's hard to taste much difference between what we're able to brew at home and what we can order from a quality coffee shop. My only couple complaints I have with this machine are: 1. There are settings to auto-brew cappuccinos and lattes based off a double shot of espresso, but they also increase the total volume of the drink considerably - to the point where only a few of our coffee mugs can handle the volume. I instead auto-brew a double shot of espresso, then manually produce the steamed/ foamed milk into a pitcher (you can do so by manually holding the cappuccino button for 3+ seconds), and then pour into the drink. 2. I find the warm-up time to be slightly on the long side. I've countered this by plugging the machine into a Wi-Fi connected outlet, which I can activate by Google Assistant in one side of the house, giving it a couple of minutes to come to temperature before I enter the kitchen. There are a few things you should seriously consider adding to your purchase list if you're considering this machine: 1. A high-quality 49-mm tamper. Yes, the plastic scoop that comes with this machine can technically double as a tamper, but after picking up a proper weighted tamper -- even the $10 budget one on Amazon - it's SO much easier to pack the portafilter with coffee in order to get a proper brew. 2. One or two stainless steel frothing pitchers. Especially important if you plan on brewing a drink to fill a tall to-go style tumbler, as it will not likely fit beneath the machine. 3. A proper knock box for coffee grounds that you can keep on your countertop by the machine. While yes, a much more expensive, more professional-grade machine may be more
Noelle Holloman
Great machine for the price.
Great machine for the price. I spent a good amount of time researching for an espresso and latte machine. I looked over different brands and costs and while I agree this is not a expensive or professional machine, it does make great espressos and lattes. Very easy to use and clean and definitely love the taste. My daughter loves the hot chocolate with frothed milk and even my wife likes her cappuccinos. I read a few reviews regarding water leaks and I can't see this to be a problem, it's more on if the water tank is inserted properly. I also have a Kerrigan machine and they both are almost the same size. One more thing, the machine starts and warms water faster (no more than a 5-7 minutes). Definitely a great buy so far. If you are looking for a decent price and great coffee maker this is the one for you.
Thet Myat
A tip for those who like a frothy cup of cappuccino or latte
This espresso machine is amazing for the price. It's compact, pretty sturdy for its size and it looks good in the kitchen. I've experimented with this machine in the last few weeks and I've liked it more and more with each passing day. Here's a tip for those of you who like a frothy cup of cappuccino. Make sure your milk is at room temperature and is not straight from the fridge cold. This machine does not come with a frothing wand so you can't warm the milk up that way and get it to froth. The little milk chute froths the milk and pumps it directly into your cup of coffee. If your milk is cold, the milk chute does not have enough power or heat to froth the milk. What I do is take my milk out from the fridge and heat a little up in a small pan over the stove to get it a little warm and then I pour it into the coffee machine's milk dispenser. This helps it froth up better and the machine sends a perfect stream of hot frothy milk into the waiting cup. Sure it takes a little more time but why rush when you're making yourself a great cup of coffee to start the day :)
Ronald Miranda
The Results are Worth a Little Effort
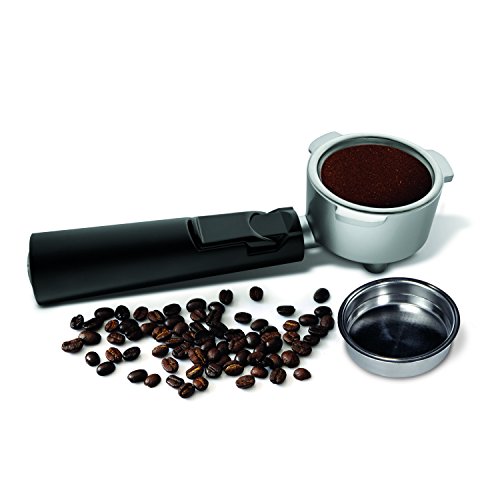
By the time I bought this espresso maker, I had already gone through many different coffee and espresso machines. A friend raved about the Nespresso systems but I had used a Keurig for a few years and was done with the whole pod system, which seems wasteful and expensive, plus it was hard to keep it clean from icky sludge that formed in the water dispenser. Another friend raved about the Breville but the cost of that was way over my budget. This Mr. Coffee machine had great reviews and the price was good, so I decided to give it a try. I've waited to write this review until I had some time to really get to know this machine and I can tell you I absolutely love it. The Espresso, Cappucino, and Latte Drinks I've made have all been delicious. The espresso comes out dark and rich and even has that crema top to it when the shots are finished pouring. There are two options: a single or a double filter and I always use the double. For milk, I use almond or rice milk and the froth on the cappuccino is great! The bubbles aren't as fine and "creamy" as you would get from a professional machine at an espresso bar, but the results are still delicious and impressive. The machine dispenses the milk first, then adds the shots of espresso, so I sometimes stir it after it's done to totally mix the espresso (especially if you add sweetener). There is definitely an advantage to using the right grind for the coffee beans. Be sure your beans are ground for espresso. I had used beans ground for pour over coffee and the espresso was watery. The Machine If you are looking for a brew-and-run system, this isn't your machine. But the time and effort you spend is honestly not that big of a deal and the results are worth it. Take a cappuccino, for instance. Here's the process. First, fill the water container with water and place on the back of the machine. Turn the machine on (it takes a few minutes to warm up). Next, fill the milk container with your type of milk, place the top on, be sure the setting is set to "cappuccino"* and insert the unit into the machine. Next, take the "porta-filter" and place a scoop of coffee into it, tamping down firmly with the tamper on the other end of the scoop. Insert the filter into the machine. Place a large cup under the filter (there's a pull out stand for a small cup but I rarely use that), make sure the silver tube (dispensing the milk) is pointed into the cup (yes, I've forgotten that and dispensed milk all over the counter by accident), and then press the cappuccino button twice (for a double). The machine goes to work, first dispensing the milk, then the espresso. You'll know it's working because it is loud. After you've enjoyed your cappuccino, there are a few things you need to do to "clean up" and be sure the machine is ready for the next time. First, remove the porta-filter and dump the used grounds (they go into my counter-top food scraps bin). Rinse out the filter, and then place back on the machine and press the button for a single shot of espresso. This rinses out the espresso parts of the machine. I then remove the filter, take it apart under cool running water, and let it dry. For the milk container, turn the setting to "clean," place a cup under the metal tube, and press the "clean" button (it's the latte button, pressed and held for a few seconds until the "clean" function turns on). Now, the tube is clean and you can either place the container in the fridge (if there's milk left over) or rinse/wash and let it dry. Does this sound like a lot? It doesn't take long and it just becomes part of the process. Again, the results are worth it. *As you can see from above, after you've cleaned the milk container, you have to turn the knob back to cappuccino or latte. If you forget, you'll quickly realize that you are dispensing steamed water instead of steamed milk into your cup (plus, the cleaning sound is different than the frothy milk sound). Cleaning the inside of the machine is an easy process (using vinegar) and the machine seems to stay much cleaner than the Keurig machine I used to own. Bottom line: So far, this machine has produced excellent results. Takes a bit of effort but the results are worth it.
Shirley Branch
"Broke" after ~660 days... but then I delimed it.
Wife makes a cup a day for the last six months. No issues so far. She runs the cleaning cycle every time she uses the frother. We have not run any cleaning solutions through the water, and we have not noticed any decrease in performance. The frother bugs me a bit when I make hot chocolate, but if I stir the milk in my cup as it's being poured, it seems to cut down on the frothiness of it. *UPDATE* Running strong for over a year now! I should probably clean it sometime... Haven't noticed any decrease in performance yet due to not cleaning. *ANOTHER UPDATE* We ordered this on December 5, 2015. Today is September 27, 2017. Why the update? The frother stopped working on latte mode! I first cracked open the milk dispenser top to see if there was a clog. Turns out, it's super simple in there, and not much to clean. I paged through the manual, and there's a section in there about cleaning. Hey, wouldn't you know, Mr. Coffee says to run vinegar through the thing once every forty-eighty cups to delime it! My wife has been pretty regular in her coffee habit, minus missing a few days, plus making a few cups for guests, so I would estimate we're about 660 cups in so far! Just a little bit over the eighty cups they recommend a cleaning at for those of us with hard water. Anyway, I (sorta) followed the deliming instructions, ran a half gallon of vinegar through it using both the espresso and cleaning cycles, and the latte setting on the frother works again. And for those of you who are wary... this thing works great! My wife isn't a coffee snob, but this machine is helping her to become one. She's (mostly) sworn off that overpriced star place's coffee, as she's come to find it's very bitter, unless there's a pound of sugar in it, then it's too sweet. While the Mr. Coffee Cafe Barista doesn't have all sorts of fancy features as you may see in more expensive models, this bad boy reliably delivers what it promises, and can save you tons of money! Just think... We've spent maybe $100 on espresso pre-ground coffee, $300 on cocoa (it's good cocoa) & syrups. Compare that with the, at very least, $4/cup, and we're looking at $540 for 660 cups with the Mr. Coffee, compared to $2,640+ for coffee from that star place. Pretty good deal!
Christine Jay Taaca Damasco
I was hesitant about purchasing this particular machine, but my family and I are so glad we purchased it!
I did my research on Cafe Barista's and I decided to give Mr. Coffee a try. These little coffee makers can cost in the hundreds and even thousands of dollars, but because of all the decent reviews on amazon concerning this model I purchased it. At first I was going to return this back to Amazon because I was concerned that much of the maker is made of plastic. I called Mr. Coffee and spoke to one of their customer care reps and she guaranteed that all Mr. Coffee products are BPA free. I decided to keep this and my family and I are amazed how this lil machine can make a latte just as good or better than the big corporate coffee houses out there. I'm totally serious and the Mr. Coffee Barista makes an incredible, most delicious latte, indeed. Now I will tell you how I make my latte. 8 ounces of Silk Almond/Coconut milk 1 full scoop of Kona Hawaiian ground coffee from Kroger 1 teaspoon of organic coconut sugar I pack 1 full scoop of Kona coffee into the filter for Single Shot of Espresso. Make sure you place the Porta-Filter on your counter and put some muscle into packing down your coffee grounds using the Measuring Scoop/Tamper which comes with this Coffeemaker. By packing my coffee down I believe much of the delicious coffee flavor is extracted from the grounds. There is a line on the Froth Control Knob and I line it up with coffee icon on the machine. I believe the machine gives me the most milk froth where I set the Froth Control Knob. Make sure you aim your Froth Tube into the center of your coffee cup. I push the Latte button on the Control Panel twice for a large Latte and out comes my foamy, most delicious, most heavenly milk froth and than my Kona coffee. It's that easy folks and you will not be disappointed with the purchase of Mr. Coffee Barista. Why spend hundreds of dollars on the fancier machines when you can make delicious coffee drinks with this machine. Just buy it, you will not be disappointed.
Paula N Moore
People call me a foodie and I love process while cooking
To be honest I had low expectations, I over research everything. People call me a foodie and I love process while cooking, doing it right. I almost hate to admit how much I love this machine though. I also bought a Delonghi espresso maker (the highest rated one) and i use the Mr. Coffee one most days. The milk container is so easy to use and makes very good steamed milk and foam. I love how easy it is and in the early morning, I want simple. And if I want if different i use the manual option on the buttons. It makes a great cup of espresso, latte, or cappuccino. I did get a good grinder though, not the Mr. Coffee grinder, a Baratza. Bottom, line is if your trying to impress someone get something else. If you like variety in your coffee drinks, want simple, easy clean up, and don't want to spend a fortune, well, I don't know of any other machine that does it all.
Aakanksha Roychowdhury
TIPS THAT WORK! From an average person, not a barista.
I'll give tips after a little background info, what wasn't right and what customer service said to do, that WORKED! First off my background. I am not, nor have I every been a barista. I am an average person who likes mochas from the coffee shop, but I live 80 miles from town, so I don't get them very often and wanted to try making them at home. This is my first espresso machine. I read a lot of blogs and watched online videos from real baristas giving tips how to make good espresso drinks at home before purchasing this. I got this thing and things didn't taste right to me, bitter. So I did more research and figured out the problem, it wasn't heating up well. I checked temperature and it was only getting to 157*F on average (too cold) and took 14-15 seconds to make one shot (too fast). NOT what the online advice says you need. Online advice says 170-180*F and 27-30 seconds is about right. So I called Mr Coffee for help before I sent it back to Amazon. GLAD I did. The call: In short, customer service told me to run a cleaning cycle per directions from page 16 in the user manual. Which is 1/2 tank of white vinegar, hit the button for double shot. Repeat as many times as you need. Also run a cleaning cycle through the milk dispenser. My thought was, "what the heck, its a new machine! I did the priming as directed before use, how can it be dirty?" But I had to give it a try or send it back. Well I'll be go to heck, it WORKED! While directions said you only need to run it few times. I had the time, so I ran the whole 1/2 tank white vinegar through (double shot at at a time) since I has to toss the vinegar anyway, so why not really clean it eh? Anyway, after a couple times running the double shot espresso button the temperature went from consistent 157*F to 175-182*F. Wahoo! It seemed to matter how long I let it warm up between shots. Running two times consecutively got the 175-177*, which is just what you want. Letting it sit and warm up a few minutes before runs got it 180-184*, which is getting a little too hot. BTW, I was using a good quality quick, calibrated thermometer that I use for caramel making, which is a very exacting process to do right. So I figured it could accurately measure the espresso before it cooled from air temperature, which by the way is mere seconds I found out. NOTE: The higher temperature is NOT for drinking comfort (how hot you like it) it is what the espresso NEEDS to properly extract and not be bitter. You can let it sit a few minutes if you don't like it that hot, personally I don't want a burned tongue, so I wait a little. Coming out of the machine perfect drinking temperature is NOT a good thing. SECOND NOTE: Running the vinegar through is NOT descaling, it is cleaning. Descaling is something else you do, read the manual on how. The vinegar clean is NOT priming, it is cleaning. Don't know why you need to clean the new machine in addition to priming, but DO it anyway. Make sure to rinse the reservoir out, then run some PLAIN water through to remove the vinegar afterwards, do it as many times as it takes to get the smell out, mine took a full reservoir. Honestly though it's faster shipping it back and waiting for a replacement machine because it doesn't get hot enough, this WORKS. When I first got it, as I said it was taking 14-15 seconds to run the shots through. During the cleaning process they got longer and longer. Now that it's clean, it's about 28-30 seconds. Again, just what you want. I use my cell phone stop watch feature to be accurate. In summary, based on what I've read and how I got it to work well, at least for "normal" person standards. This a good machine. Here's my TIPS TO GET IT WORKING RIGHT: 1. Learn to grind grounds well. Do NOT buy pre-ground, buy beans and grind them yourself. It has to do with when the oil is release one how well it works. If you are going to the trouble to use a machine like this (rather than just normal a coffee machine) you can go to the effort to grind as well, it's just part of the process. You can use the hand held cone burr grinders for the most accurate fine ground. Or you can spend a bundle on an electric burr grinder. From what I read, you REALLY do need to get a good one if you go electric. In fact that is almost more important than the machine they say. Inconsistent size of grounds will yield inconsistent shots. Too fine (Turkish grind, which is like flour) and it clogs the filter making the machine unable to push all the water through. Too course (regular coffee machine grind) and the water goes through too fast making it bitter. Espresso grind has to be the consistency of table salt. I'm cheap, so using the hand grinder does work and I advise it for other cheap people. However, in the morning I am cranky and impatient, I'm also lazy, so I've ordered a couple different electric burr grinders to see if that works as well. I plan to return which ever (or both) that don't grind as the espresso NEEDS (good ol Amazon prime and their return policies). No, I did not take the online baristas advice and buy a $200 burr grinder (I am cheap after all), but I did spend about $50 on a burr grinder and $20 on a blade style. Will update when I have decided what works or not, which I kept or if I end up just doing the hand grind. 2. Learn how full to fill the cup. At least to the top of the rim, or a little higher. You want the end result about 1/8-1/4" from the top. The amount in the cup DOES matter. 3. Learn how to pack your grounds to 30lbs of pressure. How to do that, put your bathroom scale on the counter. Use your tamper to push until you get the feel of 30lbs pressure. Repeat several times until you can push it pretty accurately. This is very important. Also, but a metal tamper, the plastic one isn't sturdy enough for 30 lbs pressure, it bents and packs unevenly. You can get metal tampers cheap, it's worth it. 4. Before you make your cup each morning, warm the machine as directions indicate, but ALSO run a shot of plain water through first. The second time through will be hotter, and it only takes 30 seconds. 5. Even though it's a new machine, and you did the priming as the manual says, run 1/2 tank of white vinegar through it (directions on page 16 of manual) and it will make a tremendous difference. Don't argue, just do it. 6. You can open the lid and fill the reservoir with it ON the machine with a pitcher if taking it on and off is too hard. NOTE: I did NOT receive this at a discount in exchange for an honest review. This is a good machine for the average espresso based specialty coffee drinker. I gave it a full 5 stars because it's pretty idiot proof (I'm not the most mechanical person) and it makes mochas that are pretty darn good in my average persons opinion. I have no idea what a real coffee expert would say, and really, shouldn't they have a professional machine anyway? [...]
Chris Anglin
Love it
Other than 1. some priming issues prior to first use and 2. my impatience waiting for it to heat up for a couple minutes prior to use and 3. it not fitting my favorite (very tall) cups I love this machine! -It's attractive and takes up less space than a traditional coffee maker -easy to use -froths plant-based milks: soy, almond, coconut, flax, hemp, etc. VERY well! - makes coffee shop quality drinks very cheaply -better than keurig bc no k-cups and fancier drink options Tips - I keep a compost pail next to it to smack the grinds into after making a cup. Don't let the grinds sit or they will harden into a brick. Coffee grinds are great for composting or can be added directly to garden/planter soil for a nutrient boost -Turn it on before you start preparing the coffee and milk to minimize your wait time - store milk compartment in refrigerator between uses -use straw width pipe cleaner to hand clean milk compartment tubes as needed - use well filtered water to prevent mineral build-up