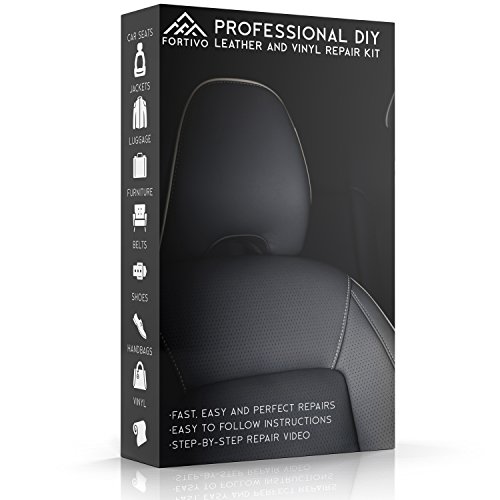
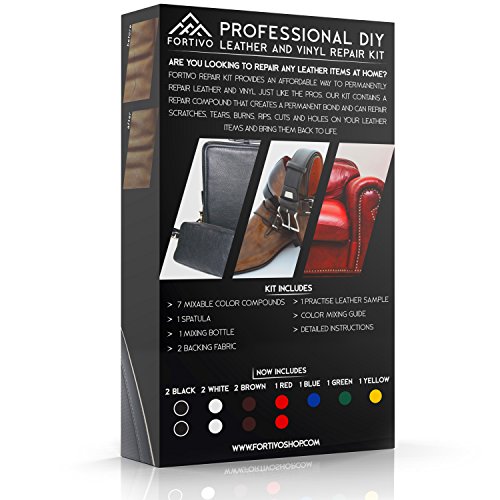
- LEATHER RESTORATION WITH CLEAR INSTRUCTIONS : One of the best ORIGINAL DIY leather repair kit & vinyl repair kit in the market that will help you touch up, fix, repair your leather & vinyl goods. Cover marks & make your leather like new condition again!
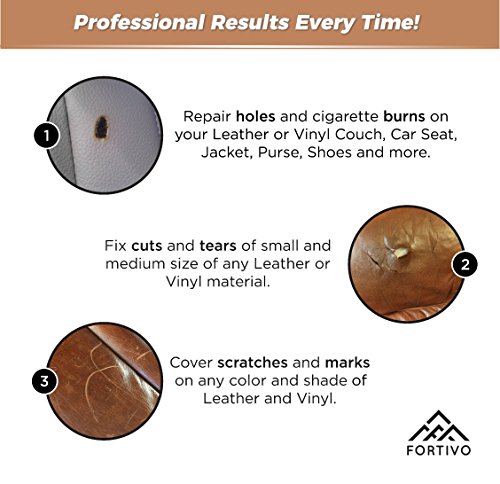
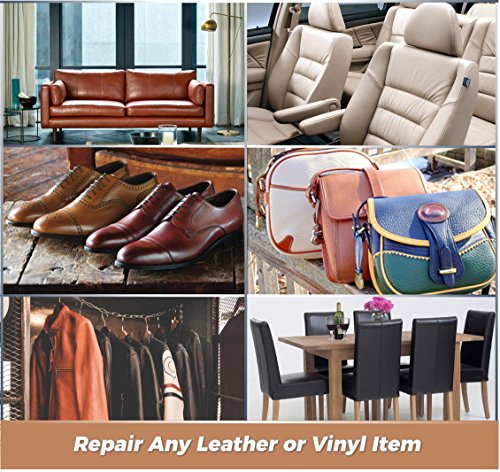
- EXCELLENT FOR FIXING SCRATCHES, TEARS, HOLES, RIPS, BURNS OR CRACKS: Our leather filler works on damaged leather and vinyl couch, sofa, chair, car seat, bags, purse , shoe, jacket, belts , luggage, boots, boat seat, auto seats, rv seats, shade, gloves, motorcycle seats, recliner, handbag, loveseat, truck seat, ottoman, lazyboy & furniture. Restore any Material Artificial, Synthetic, Bycast, Faux
- QUALITY PROFESSIONAL RESULTS - Our leather repair kit is made of high quality, super-fast drying repair adhesive compound that will help repair scratch, cut, hole, tear, rip, crack, mark, pet cat or dog damage on your damaged, cracked, scratched, peeling leather. Best repair results with easy to follow 5 STEP process.
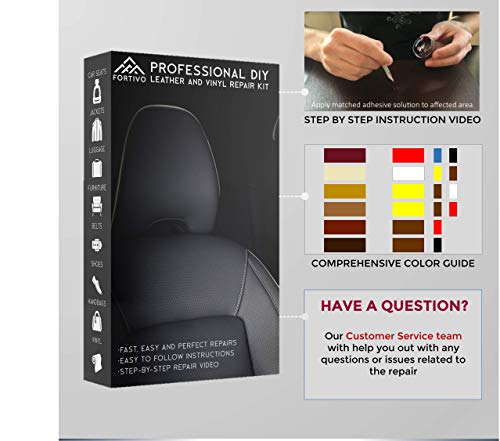
- FREE HELPFUL RESOURCES - Get FREE email instruction guide, online color mixing tool plus a step-by-step video to assist you in your repair. We are here to help you through the process and will answer any questions or issues you might have during your repair within 24 hrs. 100% response rate!
- 100% SATISFACTION & MANUFACTURER GUARANTEE; 30 day money back and 1 year free replacement warranty. Kit Includes : Set of 7 intermixable colors with repair compound (2 brown, 2 white, 2 black, 1 red, 1 blue, 1 green, 1 yellow), 1 spatula, 1 mixing bottle , 2x backing fabric, practice leather patch, color mixing guide and instructions
-
Information
-
Twitter
-
Pinterest
-
Youtube
-
Facebook
Jazmine Solis
Like new now!
I just gave my brother our old couch from the storage for his basement. There were few tears and kit worked wonders. You can see in the pictures the repair is almost invisible. Five stars!!
Hannah Cherié Harp
Great value! Color mixing not too hard.
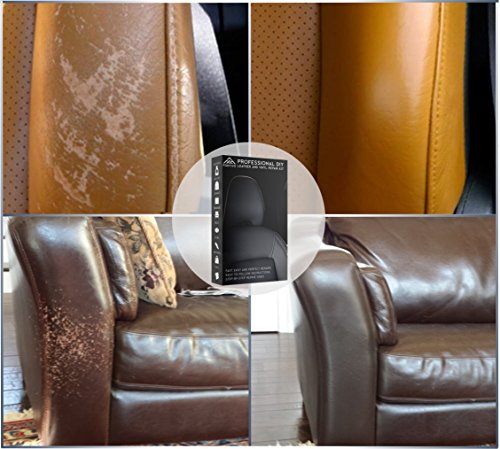
I was pleasantly surprised! I had two large cracks in the leather driver’s seat of my minivan. The cracks were about six inches in length. I was worried it would be impossibly hard to match the color of the leather, but I figured it couldn’t look much worse than the tears did. It turned out great! I used both bottles of white compound (tinted with black, brown, yellow, and green) to get the repair to the point pictured above. I emailed the seller and asked for additional white compound to make the repair smoother (fewer visible signs of cracks). They were very responsive. Great value! You do have to mix the color to match, but with some persistence and patience, that wasn’t too hard to do. (Tip: I got this from an artist when I couldn’t figure out which color to add next - If you are close, but the color skews a little to one primary shade, add the complementary color. For example, I got a grayish tan that was close, but was a bit too pink. Adding green, drop by drop, toned down the pink and got the color right where I wanted it to be.).
Patrick J Dougherty
5★ - pros & cons
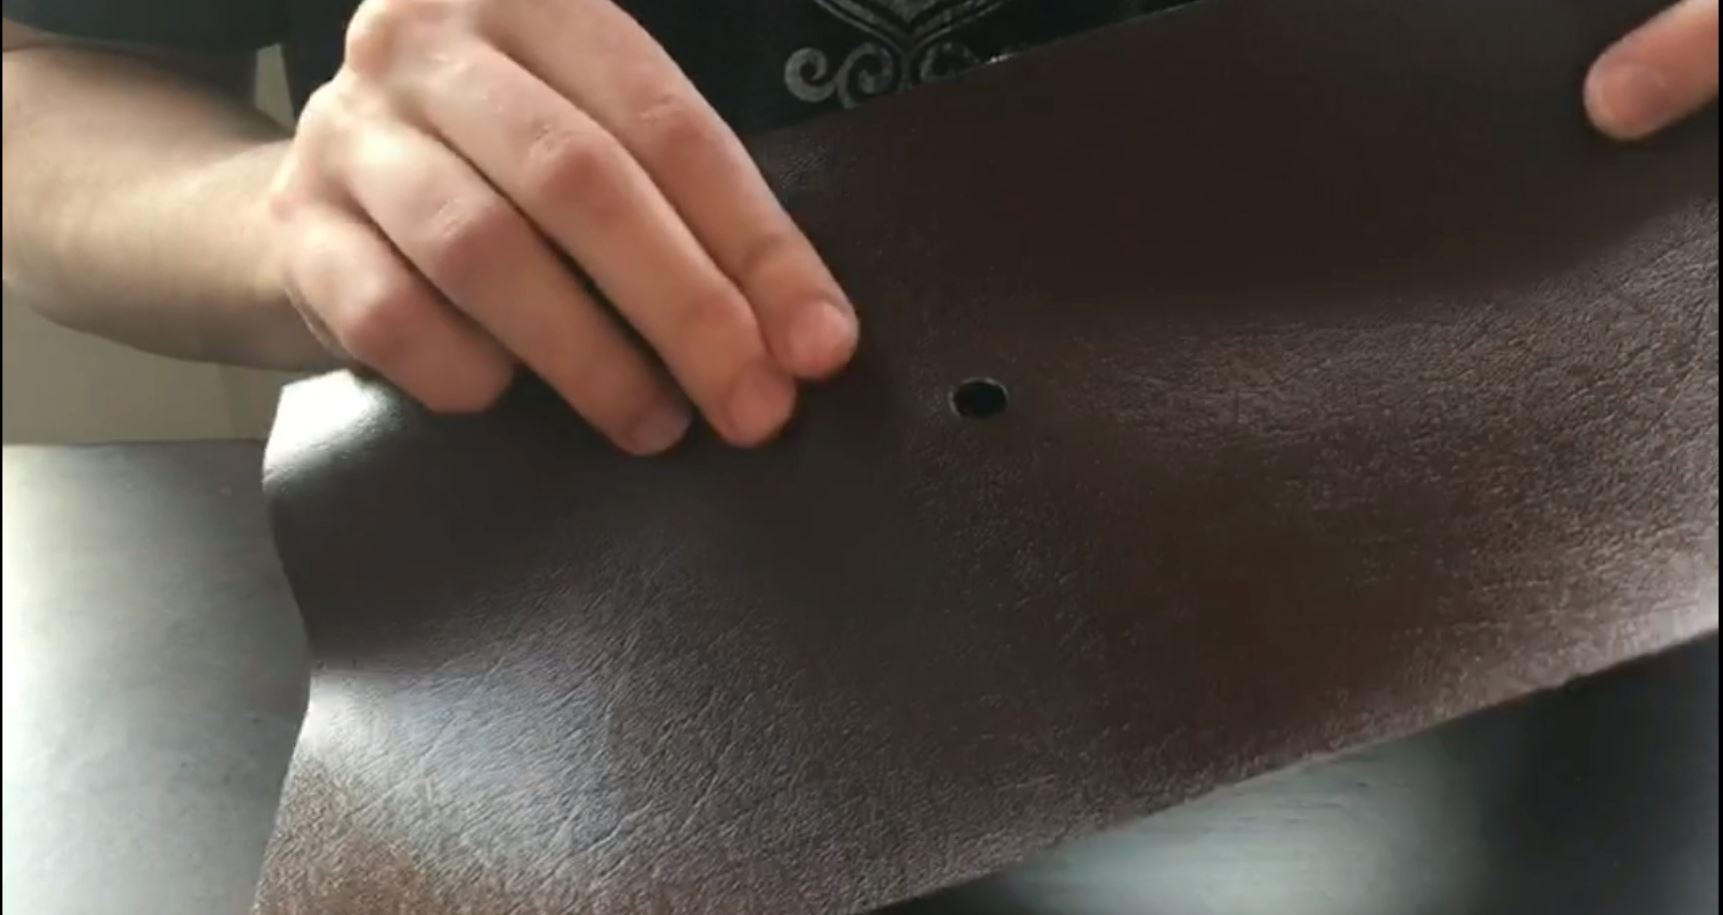
Overall I would use a leather kit again for a future repair if needed. This kit is fine (or I might try a different kit with more components). Pros: - worked well to repair a hole in bonded leather - easy to get a pretty good color match - easy to get a pretty good repair for a small hole - includes a piece of backing material - inexpensive - durable / tough repair - the glue material includes the color - some kits have the glue & color as separate materials Cons: - not enough repair glue material...& definitely not enough to practice or make many color adjustments - the directions say you can remove the material at any time with water or alcohol - that didn't work for me - the glue material starts clumping/drying as you use it, so by the 3rd coat it was difficult to spread smoothly - doesn't include grain paper - doesn't include poly leather sealant top coat - time consuming to get a very good color match - time consuming to get a very good looking repair - typo in the website mentioned in the instructions - it's leatherplusshop.com (double s) and the website wasn't that helpful anyway. But the paper instructions were fine. - plan on several coats - like 1 heavy coat and 2-5 skim coats with drying time in between coats - the mixing spatula worked fine for the first coat but after that I started using old credit cards because after the glue dried on the spatula it didn't work well for me I repaired a 2"x1/4" hole in a bonded leather 'distressed espresso' sofa cushion with a light grain. The quote for a professional to do it was $175. In medium light from a few feet an average person wouldn't notice it. I know where the spot was - it's a little shiny & a tad dark - so I can see it but it's not bothersome. See the pictures. Suggestions: If I did it again I would try grain paper (although reviews indicate that that is tricky). It would have helped if I could have removed the leather cover from the cushion (mine was permanently glued together). For the first coat, I used some of the colors I wasn't going to need for the final coat, which gave me more glue to work with. good luck!
George R. Landau
Even a sloppy effort generated better than expected results
Due to the severity of the damage I was dealing with, I didn't expect very good results, so my effort was less than 100%. But I did pretty much follow the instructions, my biggest mistake was rushing the mixing/matching of the color when I ran out of the first batch I mixed. The pics I've attached show the before, the method I used to stuff the "backer" in the largest hole (I filled it first with cotton batting from a local sewing department), the results before "buffing out" with rubbing alcohol, and then the "final" result. I may go back and add another layer to better level the surface. Thing is, because it was such a large hole in addition to numerous smaller holes and cracks, I ran out of the yellow. The seller Okapi, Inc. sent me additional yellow free of charge, and went way above and beyond in the customer service department. Just make sure you take your time mixing your colors, start with the light and SLOWLY add SMALL AMOUNTS of dark. The included color chart is a great guide, but I rushed and added too much dark right off the bat. Follow the instructions, including the part about testing your color match in an inconspicuous area, and allowing it to dry before comparing the match. I would definitely recommend both this product and the seller.
Mary Cox Morris
Saved my marriage! Don't waste your time with cheaper brands!
Got a tear in the leather seat in hubby's new vehicle! When that happened to our sofa it cost 3 figures to have a repairman fix it. Needless to say he wasn't happy. Did my homework and found this product had the best reviews. What did I have to lose trying to fix it myself? 1) The video is wonderful! I am all thumbs and would have made a mess without the step by step instructions. 2) The service is bar none. Had a question and the seller got right back to me! Does this ever happen with other online orders?!? Not that I've ever had occur and I shop online all the time 3) The product is amazing. Took several applications as the cut was deep in thick leather. I just kept applying a little more like you would with nail polish until it filled in the groove. 4) The color match was beautiful. Just a tip - my leather is grey. Instruction was to take white. Add black THEN add 3rd color to adjust shade. The chart to mix colors is very helpful. I took a toothpick to add a tiny bit of the 3rd color as you don't need much. Also use a drop cloth! When I closed the plastic pots of color they got an air bubble in them. Close them slowly to get out the air or droplets will go flying. If I hadn't used a drop cloth I'd have color on my carpet. Hubby is happy, The seat looks great! THANK YOU LEATHER PLUS. The PLUS part in your name is that we should be able to give you 5 stars ++++++!!!
Beth Davis
Highly recommend
Extremely happy with the results of this kit! I purchased a used genuine Italian leather sofa that came with a ton of cat scratches. It was so beautiful that I couldn't resist, but I definitely wanted to try and repair the scratches and wear. I spent a lot of time researching and comparing leather repair kits on Amazon and finally decided on this one. I had never used any type of leather repair kit previously, so I was really nervous about how it would turn out but I'm so so glad I went with this kit! The results were honestly way better than I was expecting and the price is definitely reasonable. The instructions were super simple and easy and the sofa looks 100x better. Just make sure to clean the application spatula thoroughly when applying layers so the spatula doesn't get any buildup on it...that'll make it easier to spread the additional layers evenly. The picture shows the section before I used the kit (with a close up) and after. I didn't receive any sort of discount to influence my review; I just took a chance on purchasing this kit and I'm happy that I did :) Also when I contacted the company about ordering another kit and customizing it, they were so nice and helpful. Great company.
Leathaj Cooper Degraw
Stellar customer service, good product - be careful if using for fixing cracks!
The product? Great. The service? Incredible. My project was too big for the amount of adhesive included in the package. However, the email you get from them (not Amazon) after you buy it, you're encouraged to talk to them for free bonus tubs to handle your job. They're prompt in responding; invested in the success of your project; and they provided extra tubs cheerfully. The package contains: - ten (10) small tubs of the colored adhesive - black (2); white (2); brown (2); red (1); blue (1); green (1); and yellow (1) - color blending guide - one (1) mixing tub - one (1) spreading tool - two (2) pieces of backing fabric One thing of note! This product is made primarily for patching holes and slashes in your leather/vinyl goods, NOT for sealing cracks. I bought it for the latter purpose. So while it works just fine for sealing, the end of the instructional video is a bit misleading if that's what you're doing. It shows the user using rubbing alcohol and a Q tip to clean up the edges of the patch job. If you do that after sealing to buff the area, you'll actually dissolve the adhesive, undoing all your hard work. Even if you give the adhesive extra time to dry and set. So if you're patching, don't do that buffing thing. The area will be a bit tacky for a while, but your couch will stop shedding little vinyl scales everywhere. I call that a win. So in short, awesome product, awesome customer service, but it's more suited for patching holes. Highly recommend.
Marsha Robinson
Good value, large repairs will not look like brand new leather.
Used on my black vinyl Ashley Furniture sofa that began cracking with light/moderate wear, leaving gashes of white material exposed. If you're not familiar with the brand, it isn't bottom of the line, but isn't anywhere near the top, so I was on the fence about whether to even attempt a repair on the thin, prematurely brittle material. My choices were to either put an adhesive patch over the whole area (super classy) or try this product. I ***followed the instructions*** and applied several thin coats, which dried much faster than the 4-6 hours the directions advised. I also applied the repair material over the surrounding area where the cracks were likely to spread. My sofa now has a visible repair that looks much better than before and has stopped cracking. To get better results, I would need to 1. start out with a better sofa and 2. apply this product when the cracks were much smaller. Seller support is very good and you will receive emails explaining how to properly use the product. If you don't use it properly, don't be surprised if you wind up with a sticky mess.
Tammy Hubert
Good camoflauge repair
Cats and leather (or pleather) are not a good mix. My friends favorite lounger had some picks, a scratch or two, and a "crease" spot that I said should be repaired before they got worse. I got this kit for him, and being his lounger is black, it was easy to "match" as their was no color mixing involved. Leather Plus did a great job of conceiling the spots and even under close inspection is very difficult to see the repairs. He thought it was easy to use. I'll probably experiment with some of the other colors as I have a couple of beautiful and expensive handbags I would like to touch up. :)
Nathaly Desilets
Very happy
My dog ripped a gash in the leather console in my car. I watched the video and performed the repair. Although the repair is not "Perfect" and you can see that there has been a repair (after all if you want it perfect, don't rip your leather or spend $$$ to have it fixed) if you look hard, it does give some stability to the damage (mine was ripping more and curling). My advice would be to know what you are getting (several little bottles of different colored repair compound and some fabric backing to fill in the holes, and if you watch a video and follow the instructions, it works pretty darn well. I would advise (as does the instructions) to practice first before doing it on a very exposed area. Although it is not hard, there was for me an "a ha!" moment that I got after I was finished with my product. I think if I had had that moment prior to attempting the repair I could have done it even better. In no way would I suggest that if someone got into my car in good light and look very closely, that they could not find the previous damage, but I am very very satisfied with the result and confident that this was a good purchase. It is acutally pretty remarkable in how it works and anyone who reports otherwise either has unrealistic expectations or did not follow the directions. Also, if you do not like how it turns out you can actually (with some effort) come pretty close to removing it and starting over (in the case of my simple rip, might be harder with a flap repair or a hole repair. I hope I never need it again but now knowing how it works, I would for sure buy it again for another repair. Key tips--get the color right, give it overnight to totally dry, then follow the instructions for how to remove the excess and "feather out" the color--all with the expectations that you DID rip your seat. Nothing is going to make that magically grow back. And that this is a very very good $20 fix to a thousand dollar problem! Append--there is just a small amount of each color but a little bit goes a LONG way. If you find that you need more than is in there, they will send you more. But frankly, if you need more than is in there you likely do not need to be fixing it yourself with a $20 kit