

- ❤️️ High Leve Privacy Protection.
- ❤️️ No glue, reusable, easy to install and remove.
- ❤️️ Please refer to the product video on the right seventh picture for installation steps.
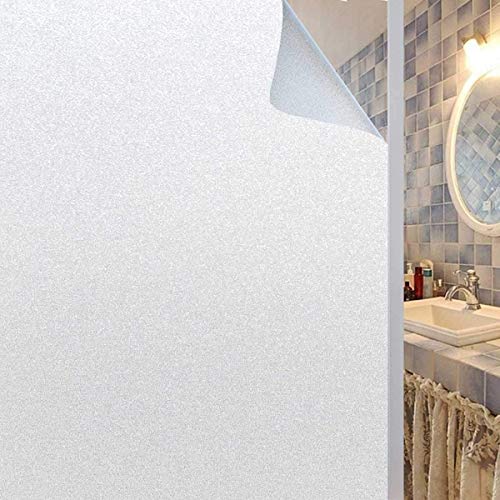
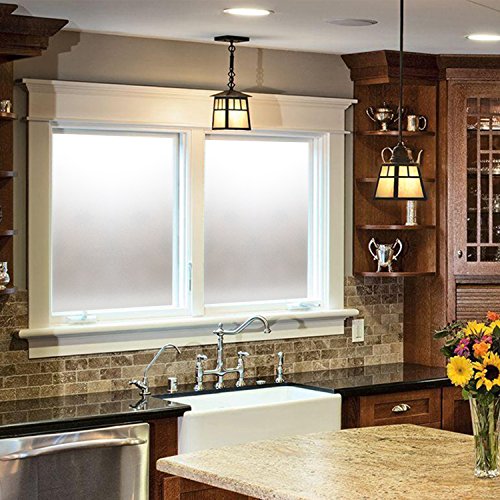
- Privacy Window Film - GOOD PRIVACY PROTECTION - Highly quality frosted design, 0.5 meters away, the effect of privacy protection can be more than 98%.
- Privacy Window Film - ENVIRONMENTAL MATERIAL - No glue, static cling, easy to install and remove. When you remove it away, there is no trace left. No harmful to your glass.
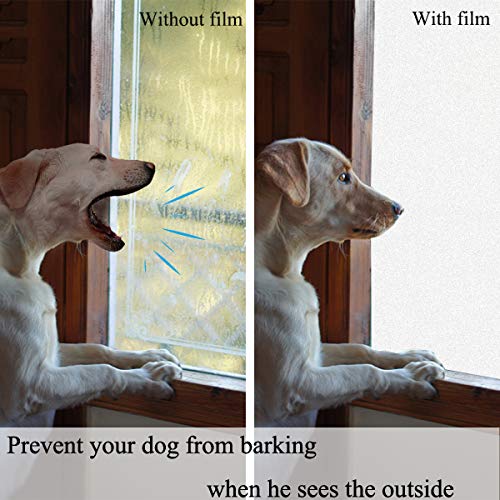
- Privacy Window Film - SOLVE PROBLES - Prevent dogs from barking when they see the outside world, prevent birds from striking, effectively help solve problems in your life.
- Privacy Window Film - ULTRAVIOLET-PROOF - 90% anti-UV, provide good privacy but still let soft light in, prevent your furniture from fading. Heat insulation in the summer and heat preservation in the winter.
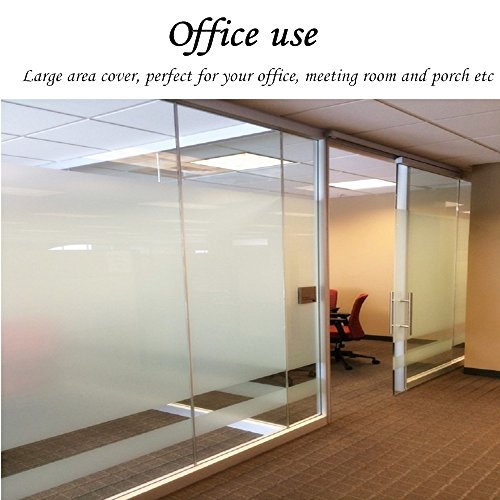
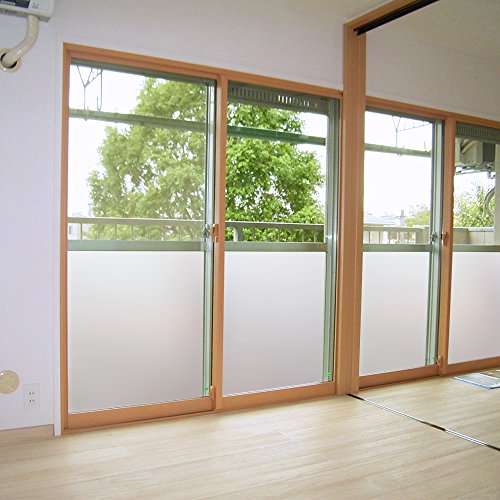
- Privacy Window Film - EXTENSIVE USE - This product mainly used on smooth glass surfaces (such as window, sliding doors, glass table, glass cabinet and so on. Good for home/office/store use.)
-
Information
-
Twitter
-
Pinterest
-
Youtube
-
Facebook
Art Crum
So far so good!
We have an unconventional setup where our bedroom doors are French doors so any guest walking by at the wrong moment can catch an eyeful ... needless to say we needed something to create some privacy. This was great, easy to cut, even easier to put on. A little hard to peel the backing off but everything else was great. We used a cutting mat that we happened to have, and an exacto knife... we also decided to cut a bit smaller so ther was a border of glass still showing around the frost - all in all it's an affordable way to make a nice upgrade. I will buy again in the future!
Vickie Sauvageau Cauthen
Affordable solution for glass cabinets
I'm very happy with this product and customer service. I researched a lot of the options on Amazon and this was the best price for the privacy frost. Granted it's not 100% opaque but it gets the job done. I couldn't stand that my apartment's kitchen cabinets were glass and this was a great solution that will leave no permanent damage when time for removal. FYI: the more water the better when applying! I also suggest using a credit card to get any bubbles after using the squeegee for general smoothing. It really helped!
Géraldine Poulin
Easy to apply, easy to love.
We really needed the privacy bc all we ever looked at through our dining room window was our neighbors car. I was pulling the drapes closed every night for privacy and then dreading opening them every morning. It took about 1/2 hour to install on two windows. I used my own regular squeegee and xacto knife and metal ruler. Just be patient when you're cutting on the edge of the window. I also really appreciated the larger size of this roll bc I only had to buy one. The other popular but smaller size would've forced me to buy two rolls. I applied it a few weeks ago already, in the dead of the winter, so the window was very cold and it is still staying on strong with no bubbles. I had my daughter stand inside right in front of it while I was outside and I could only make out vague shapes of the colors she was wearing. But best of all, we still get plenty of sunlight and the car is now only a memory.
Helen Hutchinson
Very easy to install
Very easy to install, 1 person could do it, just takes a little patience getting it on straight. A squeegee is good to have but I used a plastic paint scraper to get out the air bubbles and that worked great. Once it was up and de-bubbled, I dried it and within an hour, the residue water dried and it looked great, instant privacy. I would recommend this window film if you want privacy glass. Only drawback is I can't see out either.
Nathaly Desilets
Can't see a thing in/out - but plenty of light
The film is easy to work with and good, thick quality. I am disgusted with myself b/c I put it on the wrong window. Now I will have to buy more. Regardless, it's a good price. So, I don't mind too much. The tricks to putting this sort of window film on is following: 1) Clean windows THOROUGHLY with soap and water. Let dry. 2) Use warm water in a spray bottle w/a touch of dishsoap in it and SOAK the windows. 3) Do not pull the backing off the window film until you are absolutely ready to use the film. Dust causes the film not to stick. 4) Only apply the film during the day time on a hot day. The sun helps the film to dry and stick. 5) Use an exacto knife to cut the film when trimming it against the window. It makes a more precise cut. 6) Do not cut the film overage so close to the edges of the window pane. Leave a tiny space so you can effectively squeegee the bubbles all the way out. 7) Don't be shy about pulling the film down and spraying more water if can't get the bubbles out of a few spots.
Tim Slade
Works great if you follow the directions
Once I actually read the directions and PEELED THE BACKING off, it worked great!!!! Lol! All the people w reviews saying it doesn’t stick, definitely did what I did the first time! You have to remove the plastic backing and then it sucks on like glue! I’ve had mine up for months and it’s not coming off at all! It’s perfect for bathroom window privacy...I got to get rid of my ugly blinds- and now get a ton of natural light without my neighbors being able to see me. Thumbs up!
Balint László Eduárd
Great Solution for privacy WITH light!
Very easy to install and really looks great. Exactly what we needed for our bathroom window. Some pointers: ~ Clean, and then clean again the window ~ Have a very sharp utility knife. Mine was dull and tore the film. You want a sharp edge. ~ Yes, LOTS of water, it helps it to cling. ~ The back is NOT sticky. Not before you are ready, but when you are ready, peel the WHOLE backing off before placing the film. If you try to peel say just the top and then peel as you go, it will crease the film and you can't fix that, or get it out. ~ Because the back is NOT sticky, you can readjust as you go. Take your time, be careful, and I'm sure that readjustment option is limited, eventually it won't stick I would imagine, but you have some flexibility. ~ Avoid Creases! Bubbles, water, air you can get out, creases you can not. As you peel the backing off, do so smoothly and slowly as to not cause any creases. I'm very happy and would get this product again. I just put it up today. If it for some reason doesn't last or starts to droop or peel, I will update my review. Enjoy the privacy & light!
Steve Alcorn
A Great Solution
I can recommend this widow film for anyone who wants to keep the light but lose view. Seller was great, arrived quickly and in good shape. Now that I have that out of the way, some details... This stuff can be simple enough to install, but that doesn't mean it will be easy. Take your time. Clean your windows, and then clean them one more time. Let's say you have, as an example, a large, lazy cat, who knows he is supposed to stay off the counter, but is a cat, so couldn't care less. You will want to first vacuum, dust, and wipe the whole area, THEN clean the window, THEN install the film. Otherwise it will go on looking great, and the next day you will be very aware of exactly how many cat hairs made it between the film and the glass. Nothing wrong with the product, but be very sure things are clean. (And maybe be a little more strict about the cats on the counter rule) Use plenty of water. I did not, and later discovered that every time someone tries to put this film up without using a good amount of water, another boy band is formed. I'm sorry. Also your film may not stick as well as it should. Be methodical and carefully get all the air bubbles and water squeezed out. I found that working from center towards the edges worked well. Make sure you use a new razor blade. Safely. (It's a razor blade) Lastly, I have used this on three windows so far, and have a couple more to do. I will probably have to do the kitchen window over (after the cat and I work a few things out, and I end up admitting that I am wrong, and just putting a little more effort into cleaning the hair off the counter next time) The other problem I have in the kitchen is from the previous owners, who perhaps splashed some food or maybe even some paint on the window, and then used a scotch-brite pad to clean it. I believe that the badly scratched glass created a problem with the film's ability to cling. I may try adding a couple drops of dish soap to the water on that window, but will ask the manufacturer first. I had plenty of trouble, but I can't fault the product for any of it. The garage window, while more difficult because of its size, went on great because of the lessons I learned from the kitchen window. Now I feel like an expert! While I did not enjoy the process of putting the stuff up, it really is a great solution that when done correctly looks really nice. One last tip: Once the film has been put on the window and is looking great - is NOT the best time to remember to take some "before" pictures.
Malcolm Glover
Spouse has a terrible habit of running around without a robe on
I live in a very dense residential complex with floor to ceiling windows and needed to throw some privacy on some neighborly-facing windows. Spouse has a terrible habit of running around without a robe on. My windows are actually 89 inches tall, so I left an 11 inch gap at the bottom for my cats to see out and my foot-fetish neighbor to see in. I am extremely pleased with this product. It provides the perfect level of obscurity to our windows. I chose to pre-cut the film to the width of my windows ahead of time instead of cutting them after installation as the instructions indicate. I think installation might have been smoother if I followed the instructions. But overall, I am very happy and results came out great. All of the pictures provided by other users are accurate with the level of diffusion and light it provides. Installation took 30 minutes and all you need is window cleaner, a squirt bottle, water, a squeegee, and a utility knife. Word to the wise, use plenty of water on the windows as directed and don't peel away the film backing unnecessarily too soon. The film is very static-electric clingy like fresh clothing out of the dryer, so try to minimize dust, lint, and pet hair around you.
Jade Jones
This film does a great job of preventing anything from being seen from the ...
We needed this film to improve privacy at night (due to gaps in the window shades); and to allow for natural light in the daytime without worrying about anyone looking in. This film does a great job of preventing anything from being seen from the outside or inside. We tried to peer in the window from the outside in the dark (with the interior lights on) and during day time. You can't see anything. that being said, I left the top 1/4th of the window free of the film, so if something is going on outside the blinds can be raised and we can look out. If you have a little gap between the window and the blinds the top 1/4 edges can be filmed with a little strip on either side to prevent anyone on the outside from climbing up on a chair or something and peeking in. Otherwise if you film the whole window you will need to open it to look out, because you can't see anything with this stuff. It was very easy to apply. I just cleaned the windows very well and used a T-Square and a cutting mat to get things neat. I used an empty spray bottle to mist the windows with plain water. I trimmed excess with a straight edge and a razor blade. I used a rubber spatula head (taken off the wooden handle) to smooth air bubbles out. I could have been neater with that, but it's fine for me. I love that when we are done with this it can be easily removed. So far it's been on for about 2 weeks with no issues.