
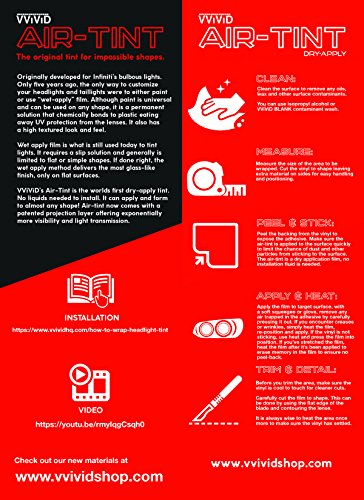
- VVIVID Air-Tints are an industry first: a headlight/taillight tint with all of the technologies developed in VVIVID+ premium materials. They include an air-release membrane which allows you to install the tint dry ( without installation liquid ) Ready to use out of the box!
- This is the only film on the market that can wrap ANY SHAPE. It is super conformable with heat. It was originally manufactured for hard-to-wrap surfaces, but the ease of install has professionals saving time on any headlight shape.
- This film is also self healing and scratches will go away with heat! Simply cut the vinyl to shape, and apply it to the surface. To make the vinyl conform to curves, simply heat with a heat gun or hair dryer, stretch and apply. Lastly, using a sharp blade, trim away excess from the headlight and you're done! its literally that simple!
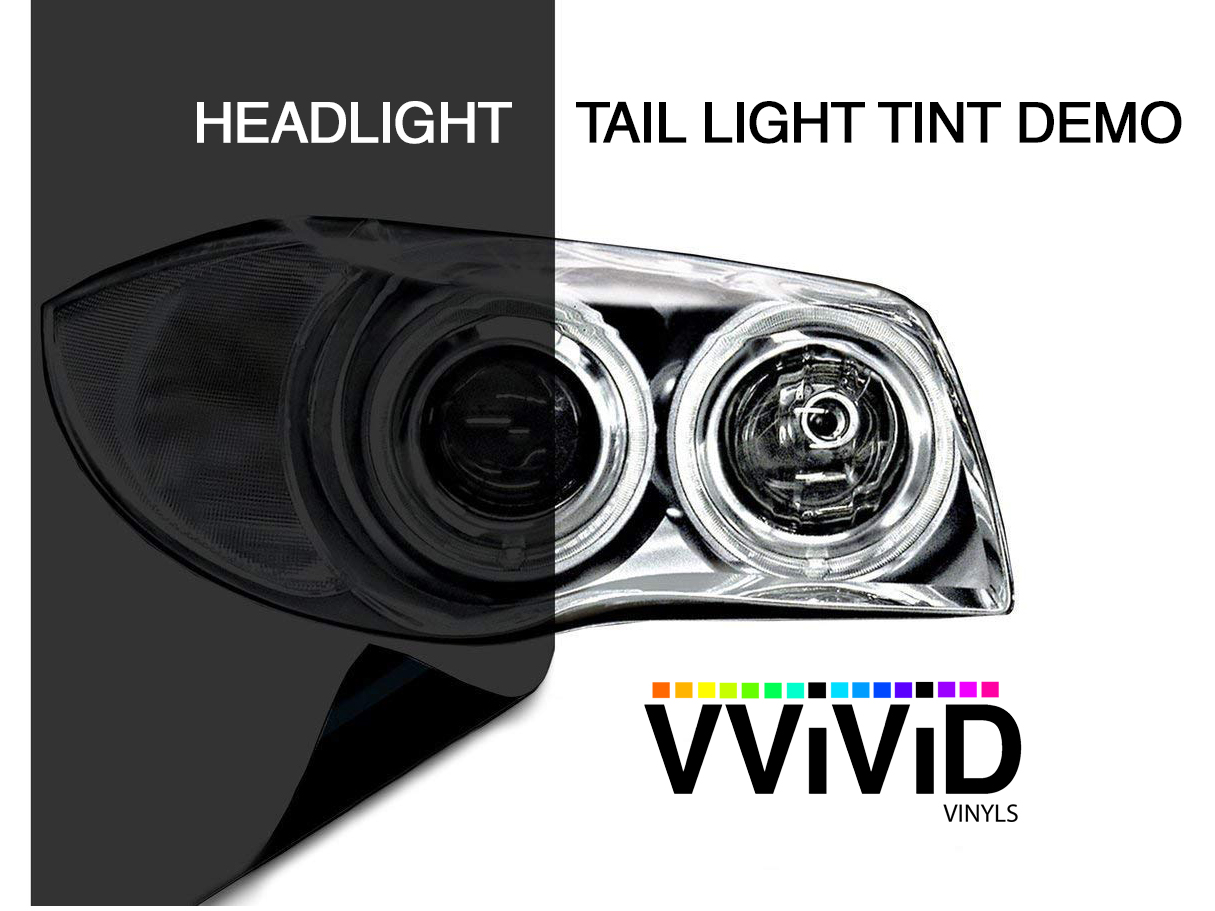
- Made with automotive grade cast vinyl, these tints are 80% tinted smoke or 20% VLT. The adhesive is acrylic based which will not eat through plastic like other tints on the market. It is 100% chemical safe, and will not eat through headlight coatings or damage your lights.
- NOTE: MAKE SURE TO MEASURE YOUR HEADLIGHT TINTS - THIS PRE-CUT SHEET IS 1.49ft x 60"
-
Information
-
Twitter
-
Pinterest
-
Youtube
-
Facebook
Imane Ait El
Perfect!
Wow, i'm very impressed with this vinyl. The product itself is really nice. It feels of good quality and it is good quality! Shopping was good. But I have no idea why they didn't just put it in a cardboard tube instead of a big box by itself. (It was raining when I took the photos. So that's just water not air bubbles) I installed this a few days ago. This was a DIY for me and my first time ever tinting tail lights. I'd say I did a very good job. There is definitely some air bubbles in there. But you can barely see them. If you are doing this yourself. YOU NEED A HEAT GUN. It will save your life and make it so much easier. Can't speak on longevity yet. The hardest part is if you're tall lights have sharp curves, deep indentations, creases ect. That little crease line in my tail lights was pain, so if yours is worst, I'll pray for you 😂. In florida, they are legal ONLY if you can still see your tail lights/brake lights illuminate from 300ft away in broad daylight. Put in LEDs to ensure that are bright enough to be seen from a distance.
Azura Ena Rhosyn
So easy to apply I wish I had more taillights
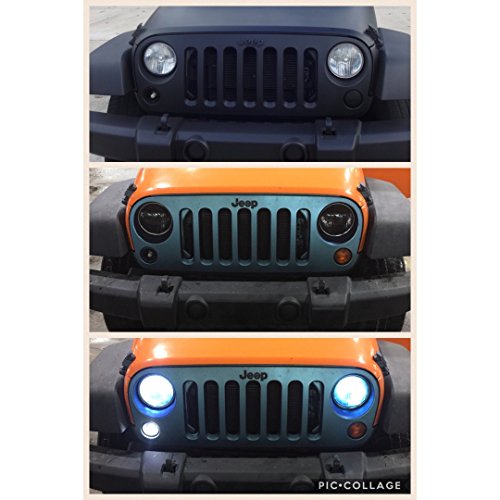
Amazed how easy it was to apply! I was expecting to struggle bc I am not a pro at this stuff, but here I have to give kudos to the team who developed this product. Even hard angles and turns are a breeze with a simple hairdryer. Install looks great after 2 days, and will update review if it peels back or deteriorates ungracefully. Update: 2wks in and still holding great. I put some on my headlights which have a really tricky bend, and apart form a couple of creases that I was too lazy to work on, it conforms as stated in my earlier review.
Gaurav Aghi
Great product! Never wrapped anything before
Great product! Never wrapped anything before, and this was pretty simple. I used a hair dryer, a blade, and a felt covered squeegee...mostly my hands to smooth it out. Lights show through just fine and the look is very drastic...exactly what I was looking for. It's been a few weeks and it's holding up great. Even been through the car wash (after waiting 48 hrs to cure). 2017 BMW X1.
Lorraine Moser Baron
very easy to apply even if you are doing it first time
I really liked this vinyl VViViD Dark Black Headlight Taillight Tint Air-Release Vinyl Wrap Film 17.75" x 60" Rollfor taillights. It was my first experience with tinting the lights so I was checking what way is easier to wrap this vinyl wrap. I did one side with applying water on the vinyl and headlights and another side just dry. My suggestion would be make it dry ,eventhough with using water I got good result there were a few water bubbles that were hard to move out. And by the way it was enough just for two back lights nothing left so keep in mind if you want to wrap more then two you need more . Very easy to apply , gives an amazingly dark shade to headlights, good price , I really loved it but I couldn't enjoy it I had to pill it off because I found out that it is illegal in Virginia . I'm glad that I had to try it and let others know about this product . Seems like some people are not happy about pilling it off, But firstly it wasn't too bad took a few mins to get it done and secondly please before you order some stuff please read the PRODUCT DESCRIPTION which says (These films are made for headlights and tailights that would normally be impossible to wrap) and sure because of this it's very sticky . As soon as I got some extra money I'm planing to try the Red Carbon wrap from vvivid , let you all know
Kirsten Figueroa
Exact shade i was looking for!
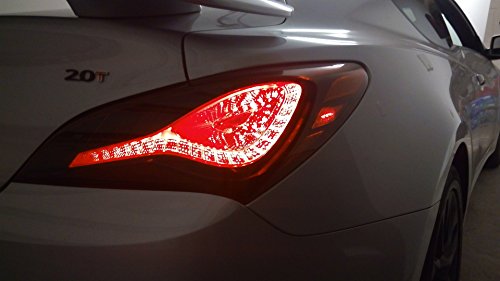
Great quality, especially when you have some experience installing vinyl. It is the exact shade tint that i was looking for. Gave me more reason to trust the VViVid brand. Literally just bought more before writing this review. - Pictures show the difference between the tail light with and without tint. Note that the tint still lets plenty of light shine through.
Emie Diolata
Frustration Provides Results
Great product! I figured out an easier way to install the film. After starting on one taillight, I got so frustrated, I went back inside the house. The next morning I had an idea. The darn stuff kept getting creases during the installation so I took a 1/2"x 24" wooden dowel and wrapped 2" around it. It created even tension and I used a hairdryer about every 2" of installed film to relax the vinyl. By God, I finished the second half of the first taillight and the entire second light in less time than the first frustrating attempt. Looks professionally installed and this is my first time! Sorry that a couple of photos of the install are hard to see but look close and you'll get it.
Ñööri Mãlik
Great cheap upgrade
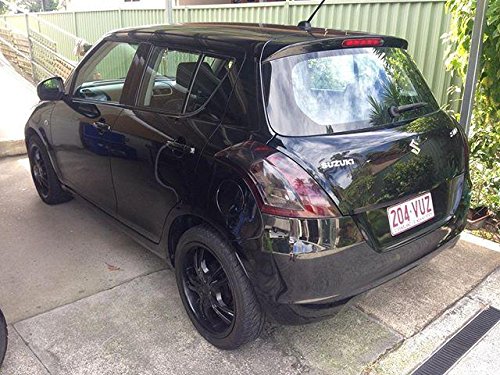
Color is dark and sleek. had no problems besides actually trying to put it on. I'm a noob and I've boughten two rolls already to redo my backlights. extreme curves are tricky, but if you have a straight light then i would recommend it. patience and a partner to help you would is needed if you're a beginner to wrapping. i wouldn't do this on my headlights. i feel like the color is way too dark for the headlights. but they do make a difference, and doesn't make a major difference in light change at night. you'll still be seen from 300 feet that your pushing your brakes. One roll did both my tail lights. and i got the extra remaining and did my bottom reverse lights and third light afterwards.
Lonnie Heath
Great product. Great Price. Highly recommend.
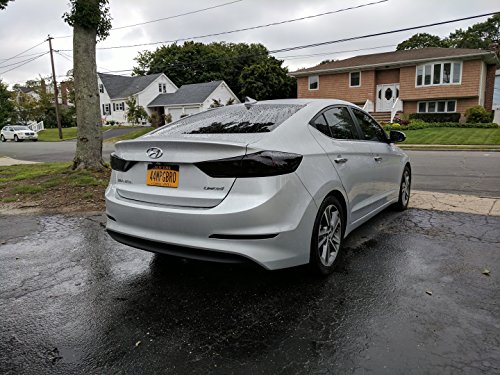
Quality product. Fast delivery. As a beginner I was able to successfully wrap my 2014 IS F-Sport that has some pretty contoured headlights. Only needed a small plastic squeegie, hair dryer, and patience (and I barely have any). Just put in a second order so I can wrap my tail lights.
Aaron Dunning
Easy to apply, looks great.
I didn't use tint over my entire headlight because I just wanted to do a custom curved outline across the top/inside of the headlight. I know literally nothing about tint (or cars in general), but this stuff was so easy to use. I cleaned the lights with alcohol, and made sure they were completely dry before applying the tint. (I read reviews from people who applied the tint to a dry surface vs. wet, and it seemed like folks had more luck with dry.) I cut a rough outline of the shape I wanted, applied the tint, then used a razor to trim the excess tint. I used a credit card to work out any small bubbles. I've attached before & after photos. I've had the tint on for about a month now and have had no nicks, tears, or any other problems with it. Awesome product!
Oshi Amarasinghe
Appears to be great quality and easy to work with
These are dark but not a complete black out when in sunlight, which is nice when driving around cops. I installed this on my Genesis Coupe tail lights. If you have LED tail lights, the brake lights shine through with no issues, day or night. Can't speak for regular bulbs, but I suspect there will be no issues with the light output. Very easy to install, even with extreme curves. Just apply some heat to the vinyl where it will make contact to the curve and stretch it enough to hug it. Try to "glass it out" when stretching, but don't over stretch. Remember to always apply to the flattest part first and squeegee from the center out. Don't forget to let the vinyl rest once you come to the edge of your light. This will prevent the vinyl from stretch back and peeling. If you have little to no experience with vinyl, take your time with it and look up tutorial videos before attempting. This particular vinyl has a textured pattern on the sticky side from the nonstick paper it sits on. After you install, this pattern should smooth out and disappear after a few weeks of baking in the sun. If you get any bubbles, take a pin and pop a hole in it. All in all, the quality seems great and easy to work with.