


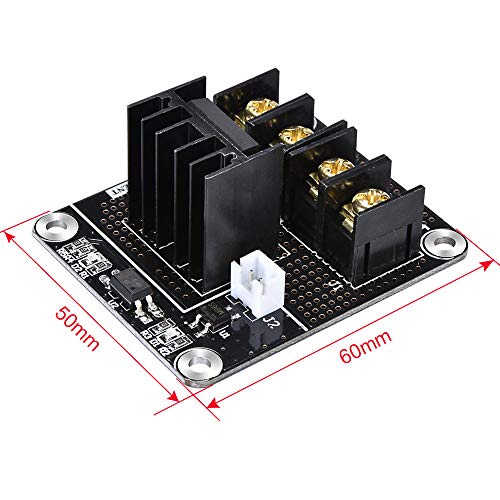
- A general add-on heated bed power expansion module for 3D printer
- Completely solve the hot bed power is too large and the load current issue. It can work with the Anet A8
- With this addon module to your 3D printer motherboard you can lead the maximum current up to 15A
- Under the premise of normal heat dissipation, this module can work steadily under the condition of I(Max)=15A. Don't exceed 15A during the process.)
- If you intend to use heated bed with your 3D printer that uses a 12V power supply, then this module is recommended, else it may cause excessive current during times which may burn the connectors on the controller board, According to the thermal power of the bed, please choose the appropriate power supply, with sufficient margin. If it is large power heated, we suggest 24V power supply, under the same power requirements, current is less than 12 v
-
Information
-
Twitter
-
Pinterest
-
Youtube
-
Facebook
Nisim Salinas
A quick installation for a peace of mind.
It was a breeze to install this cute little MOSFET, for me it's just for the peace of mind because I installed this on my Anet A8 which is brand new. I can't tell if my Anet A8's mother board would fry without it. For the cabling, I reuse some leftover 16AWG wire taken from the ceiling fan / light to connect from the MOSFET's DC power to the printer's A/D power supply DC output. I did not connect from the MOSFET's DC ports to the motherboard's DC ports although it's like right next to it since I don't want the MOSFET to tap power from the motherboard, it's not recommended anyway. My 16AWG wires go underneath the printer to the other side where the A/D power supply sits (black wire to DC+, white to Ground or COM, it's kind of a detour to get DC power but it's a good detour. When the printer is turned On, the Red diode D1 (next to the HOTBED port) is turned On to indicate it's up and running. When the printer is heating up the Hotbed, the blue diode D2 next to the Control In port is turned On, the attached picture was taken when I manually selected the Quick Settings -> Preheat PLA. When the Hotbed is activated by the computer then D2 is turned on and off when the software needs it. That's about all I can tell if the MOSFET unit is working or not, the Hotbed went up to 190deg before and after the installation anyway. Would I recommend it? Yes, if anything it's like buying a cheap insurance for this printer. I attach a few pictures showing how I attached it using the bottom left screw from the motherboard. Have fun with this little project. p.s. This MOSFET is scheduled on Today's Deals, hope you catch this deal.
Phil Will
Excellent mosfet for 3d printer heat beds!
Purchased this mosfet for use on my Anet A8 after reading about numerous heat bed connection issues due to the original printer setup using low amperage connectors. Wired everything up with the heat bed drawing from it's own power supply. Easy to wire up. Signal wire with connector was included. Works perfectly. Highly recommended upgrade for heated beds!
Mirza Carlson
I should've read the reviews better
Apparently, I'm not the first, and likely won't be the last, to have this fail rather quickly. Pretty disappointing. It worked fine until last night. Less than a week of use, and my bed was heating to over 100c! I'm glad it decided to die while I was sitting here because it got easily burn-your-house-down hot! At least it failed while still inside the return window...
Ashley Taggart
Works as advertised.
Installed into a monoprice maker select 2.0. No soldering required. I had to do a little digging to find some suitable installation pics. I was scratching my head about the +/- designation on the white signal wire. The wire harness included with this fet board was a little different. I concluded that it wasn’t necessary to install this harness with polarity so I just connected them with my best guess. Worked fine. The package included some crimp on spade connectors. I don’t own a crimping tool and had a hard time getting a good crimp. I ended pitching the spade connectors and connected the main Vin wires directly to the power supply terminal screws. Worked fine. I was happy that the installation worked the first time around. I used a printable mount I found on thingiverse to mount this board into the control box. I have about 50+ hours of printing time since the install and have seen no problems yet. For the price, and if everyone suggests this mod, I recommend you do it too. It took me about an hour or less to install and reassemble everything, and 2 hours of google image search to find enough install pics that I was comfortable enough with to do it without fear of frying something. My electrical skills are hobby level at best. I can solder, but would rather not. Pleased I didn’t have to. It would be nice to include a link to a more detailed installation guide. There are several out there but nothing “great”. I suppose since every printer is a little different, this might be a challenge, but I’m sure someone could whip something up that was decent with some close up pics for those people who don’t know jack about electronics.
Waren Doll
Works as advertised.
Mails in static-proof bag with bubble-wrap. No Instructions included, so here is a summary: 1. Remove basically all ouside screws for your Wanhaoi3 / MonoPrice Maker Select VIII control box. 2. Take pictures of existing board wiring. 3. Unscrew two large 12/14GA wires on the board labeled "hot bed". 4. Screw these two wires into the new mosfet board labled "hot bed". 5. Connect the small jumper wires (white) to the control board where you just removed the two wires and screw them down. Note the polarity on each board. Match (+) to (+) and (-) to (-). 6. FInd 2x 6-8" pieces of 12 or 14 AWG wire. Most cheap extension cords are 16AWG (too thin). Your local home depot / menards / ace will have this as cut-to-length. 7. Run one of the 6" wires to the power supply (+), screw in; and the other side to the (+) DC IN on the new mosfet board. Repeat for the negative wire (-) to (-). 8. Many people use velcro to secure the new board to the top of the control box. Others print off a holder from thingiverse. 9. Put everything back together. 10. When complete, you'll see a blue light activate for signal from inside the box when the bed heater is activated by the control board.
Livia Holguin Crooks
It is easily wired in and takes a load off the main ...
This product seems very well made. I installed it on my Anet a8 to take my heated bed amps from the main board. If you don't have one of these on your 3D printer, you need one. It is easily wired in and takes a load off the main board which will save the main board from burning out or potentially starting a fire. I have only installed one on the heated bed per recommendation of a friend, but plan to add one for the extruder as well.
Ali Moss
Worth it's weight in gold.
This is worth it's weight in gold, it runs my 150watt silicone bed heater so well. The highest temp I seen on it was 29c. No issues with this item, hookup is simple make sure you put the positive and negative the right way. Two white wires hook up to where your bed heater went on your board, the 4 gold connectors; possibly and negative to power supply and other 2 is where you hook bed heater and that is it, run your PID auto tune as they will have new settings. Just make sure you check the polarity on the 2 white wires there is a positive and negative it is marked on the board where the positive is.
Lauren Gilliam
Used in Anet A8
So far so good, no issue with wiring and setup. Rewired hotbed and mainboard power through this unit for my Anet A8. Everything appears to have been working properly. Just received on 11/19/2018 and install that night, so it has not been tested while fully using the set up. solder points are good and solid, but ends of components could have been snipped closer to the back of the board. All in All in powers up, and transfers power to my heatbed and mainboard. will be adding a second to the hotend of my printer later on.
Claudia Soares
Heat Bed Heats, RAMPs board stays cool
I had been struggling with my Folgertech 2020 i3 for two months and had burned out three RAMPs 1.4 boards. With this, the overheating went away and the heat bed got up to temperature quickly. Highly recommended that anyone having overheating issues on their RAMPs board due to heat bed issues try this out.