
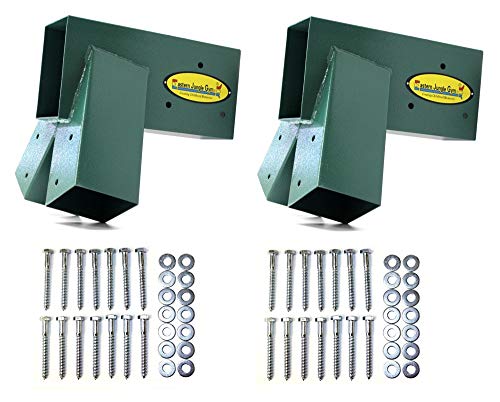
- Includes 2 (TWO) A-Frame Swing Set Brackets and 2 (TWO) sets of A-Frame Bracket Hardware – EVERYTHING you need to construct a Free-Standing A-Frame Swing Set
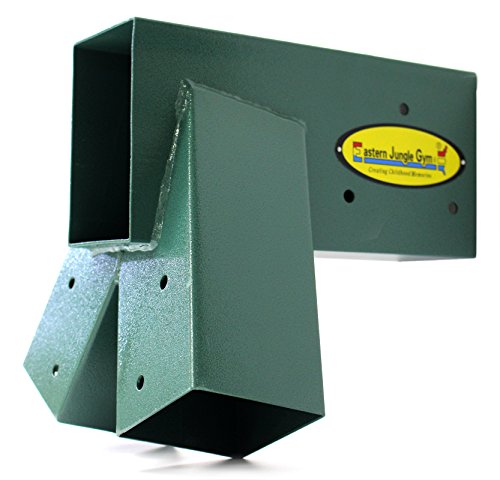
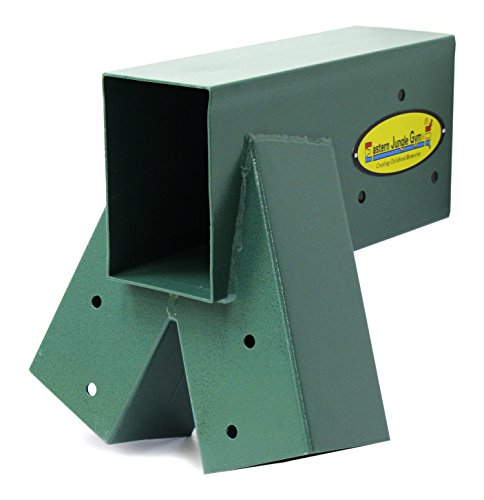
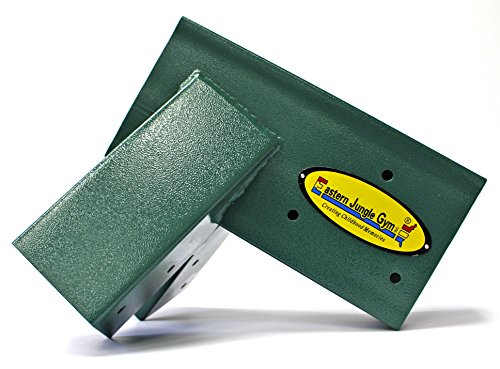
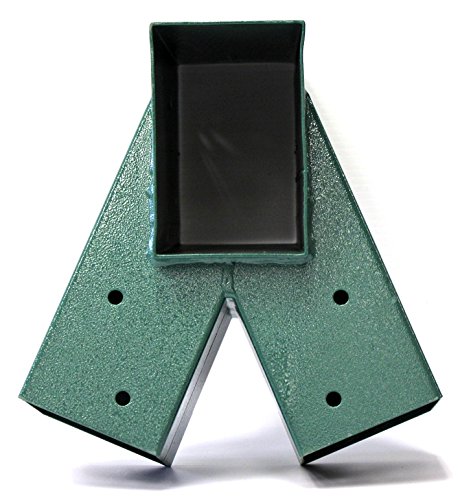
- Our brackets are a solid, one-piece design, open-ended and constructed with heavy-duty steel and welded seems for the strongest and safest construction; each bracket weighs 10 pounds!
- Brackets are finished in a power-coated green color and Eastern Jungle Gym's signature yellow tag to ensure 100% authenticity and our warranty. PLEASE NOTE: Eastern Jungle Gym and Amazon.com are the only authorized sellers of this product. Purchasing from a third party seller voids the EJG warranty and is not guaranteed authentic.
- Includes all hardware needed to build a DIY A-Frame Swing Set. We provide all the hardware needed to install both swing set brackets (28 – 5/16" x 3" zinc-coated steel lag bolts and 28 – washers)
- Lumber is not included in this kit. We recommend using one 4x6 96" top beam and four 4x4 96" side support legs to construct a basic A-Frame with the finished dimensions of 12'Lx8'Dx7'8"H
-
Information
-
Twitter
-
Pinterest
-
Youtube
-
Facebook
Amanda Spouse
A 34 y/o woman, mom, biochemist just built a swing set BY HERSELF in 3 hours thanks to these! DIY heaven!
Before I start my review, you should know a few things. First and foremost I did NOT receive this item for free or at a discount. Second, I am a 34 year old woman who has no experience building anything like a swing set before. I hadn't even used a ratchet before now. I am a biochemist eye disease researcher and mother of a 4 year old boy with autism. My son, like many kids with autism loves to swing. And when I say "loves" that is a major understatement. His birthday is coming up and I wanted to get him a swing set. We just moved into a new house. Our old house had great trees for swings and this house doesn't. However, nice swing sets are SO EXPENSIVE to buy, so I started looking into the possibility of building one. While I don't have much experience doing anything like this, I'm all about trying! That's when I stumbled upon these brackets and decided I could do it. I'm glad I saw the "kit" version instead of just buying two of the brackets themselves. It saved me a lot of time and trouble buying the right hardware as well. This kit comes with everything you need to assemble the A frame except the wood and tools. I ended up making a basic A frame with a 10' top beam and 10' legs (they recommend 8' legs but I wanted to have a larger swing arc). Here's what I needed to complete the project: - This kit (which comes with two brackets and 28 appropriately sized lag bolts and washers) - One 10 foot 4x6 beam (Home Depot) for the top (be sure to get pressure treated lumber so it will last and won't degrade in contact with the ground) - Four 10 foot 4x4 beams (Home Depot) for the legs (can be anywhere from 8 to 12 feet but I recommend going longer, especially if you plan to anchor the legs in concrete or bury them in the ground. I opted not to bury them but just get some screw in ground anchors. - A drill and drill bit smaller than the lag bolts to pre-drill the holes (already had). I don't know what size exactly I used but it was one that came standard with my drill. - 2 swings. I already had this Deluxe Platform Swing by HearthSong that I bought on Amazon last year and my son loves it. I hung it in our tree using the yellow swing ties that you see pictured - also bought on Amazon. I decided to use them since I already had them. I bought the half bucket swing on Amazon for this project from Swing Set Stuff. - Safe-Kidz heavy duty swing anchor kit (again, Amazon) which came with two anchors, two clips, a drill bit and 4 lag bolts and screws. - Two 80" lengths of zinc chain (Home Depot). I guessed at this amount before building the swing set but only ended up needing about 70" for the half bucket. It all depends on what type of swing you're hanging and the age of the children. - Two Quick Links (Home Depot) to connect the chain ends to the swing - Ratchet and appropriate size bit (again, one that came standard with my ratchet that I already had) With all of this stuff I was able to complete this swing ENTIRELY BY MYSELF in just a couple hours time and that includes the shopping and loading/unloading!! The brackets take all the guess work and careful measuring out of the equation for you. Just slide the wood into the bracket, pre-drill the holes for the lag bolts and ratchet them down and your A frame is finished! A note about inserting the beams into the brackets. Other reviewers mentioned tight squeezes and having to sand or lubricate the beams and then beat them in with a rubber mallet to get them to fit. I was prepared with my orbital sander, dish soap and rubber mallet to do whatever it took but none of that was needed! The beams I bought slid right in with no effort whatsoever. It literally could not have been easier. I guess it depends on where you get your wood, but if it's TRULY 4x4 and 4x6 they should slide in to these brackets NO PROBLEM without sanding or lubricating. Before I stood it up (I actually did need help with that part) I measured and installed the mounting hardware for the half bucket swing in the top beam. The manufacturers of the hardware suggest measuring at least 15" away from the nearest structural element of the swing set. I went a little further than that. They also recommend spacing the hardware wider than whatever swing they will be holding. For standard swings 16" should be fine. That's what I did. Once I stood it up I hung and adjusted the platform swing using my ladder and tested it out myself to be sure it was sturdy. Holy cow this thing isn't going ANYWHERE! Even without being anchored to the ground (which I will do anyway) I was able to swing pretty high laying on the platform without the A frame even wiggling a tiny bit under my 130lb weight! When my husband and son got home from their daddy day that afternoon they were both blown away that I had done it myself and my boy was ECSTATIC!! He LOVES his new swing set and I love how easy it was and that it saved me money! So here's the final price tag on the one I built if it helps: Wood - $100 Bracket/hardware kit - $79 Half bucket swing - $40 Chain - $30 Swing mounting hardware - $28 I already had the platform swing and swing ties but they were $130 and $25 respectively That was only $277 out of pocket and a few hours on a Saturday morning for me which is basically amazing. Total cost including the stuff I already had would put it at $432. For a swing set of this height and sturdiness you would be hard pressed to find something cheaper. Also, this would be very easy to add on to! I intend to add wood planks to the side of the A frame and build a climbing wall on one side and add a slide to the other! Plus I'm so proud of myself that I did this. I love sticking it to gender roles! I'm telling you, if I could do this, anyone could do this! I have nothing but the highest praise for these brackets and highly recommend them to anyone who thinks swing sets are too expensive or is contemplating building their own! One more free tip for you newbies like me: When working with pressure treated lumber, WEAR GLOVES!!!! Splinters from pressure treated wood are NASTY and will get infected really quickly so save yourself the pain and trouble and just wear gloves from the start. I really hope this helps someone else! Good luck and have fun building!
Andy Kovesdy
Makes a Fantastic Swing Set
I used a 12 ft 4x6 beam and 10 ft 4x4 legs. It works great and has 2 2ft wide adult size seats and 1 sling seat. The frames take a foot on each end so you're really working with 10 ft of beam to attach swings. I constructed my legs as an a-frame to add support. We did attach the beam on the ground and then flipped it up. The swing set looks great! The angles are: leg-to-leg 45 degrees. Leg to cross beam approximately 101 degrees. I cut the bottom of each leg with a compound miter set at 22.5 and 11 degrees and they sit perfectly flat on the ground.
Tasha Trix Keyzel
Worth the extra money.
They do seem expensive but once you buy the cheaper individual brackets that combine and do the same thing, these are in the same ballpark. They are well built and make assembling a sturdy swing set easier and faster. Because these are rather bulletproof, I would suggest checking Warehouse deals, this is where I got mine and they were in perfect shape. Our old swing set was rotten and my kids grew out of it, but my daughter still enjoys swinging. Using 1 4x6x8 and 4 4x4x10's and recycling the swing hardware from the old set made a nice smaller swing set that we can transition into a yard swing once the kids grow out of it. I sunk the legs about 18 inches into the ground and filled with gravel and dirt (no concrete) and the thing does not move, it is very sturdy. I used the 3 inch Spax lag screws from HomeD and they worked perfectly. Also the tip from reviewer "Brant G. Henne" about using a hand plane made assembly very easy. I highly suggest doing this.
Francis Parisien
Sturdy and comes with hardware. Not a bad price compared to what's out there!
These worked wonderfully. I had to sand down my 4x6 to get it to fit, but it is very sturdy. Also this set comes with hardware. If you buy the individual one, no hardware! Your legs will angle out a bit, which adds to stability, just make sure you take that into account when designing your swing. We added on to ours, had to adjust for angled legs. There is no doubt in my mind that this has serious structural integrity. It's not going anywhere!
Aalia Bhat
Powder Coated and Welded Product is THE Premiere Choice For Assembling a Swing Set
This was clearly the best A bracket I found on any site. It was welded and heavy duty. The 4x6 and 4x4's slid easily into place with only one being a really snug fit (treated wood was still wet from the treatment and was swelled). I used 14 galvanized wood threaded bolts and washers on each bracket. Pre-drilling the holes with a drill bit smaller than the galvanized threads allows for easier assembly and minimizes wood cracking. My daughter's now have a three swing swing set that is as big, if not bigger than the metal framed swings you find at most parks. They will never outgrow this mammoth of a swing set!
Gęmmå Śmîth
Easy to assemble, hardware appears galvanized
Most reviews have it covered that these brackets make assembling pressure treated (doug fir) 4x4x8' legs (4ea) and a 4x6x10' beam (1ea) a breeze (update: I wish I went with a 4x6x12 for 2 normal swings and one round swing as the round one takes up a lot of space). The seller lists this as having zinc coated hardware and it does appear galvanized with zinc (see picture for comparison to "yellow zinc" indoor, non-galvanized comparison). What I hear is to hold up in pressure treated wood now it needs to be hot dip galvanized. I'm not sure this is hot dipped but it certainly appears galvanized, however for that many fasteners to fail, it would require complete failure as they are just preventing the beam from sliding and walking out. Thus even though I had purchased other fasteners (~$1/per) I went ahead and used theirs. If the seller could update that these are galvanized and if hot dipped, it would make this the go to set. Now, for how I assembled, simply slide brackets on to the beam (one end did take a 2x4 over the end of the bracket and tapping that with a hammer so as to not damage the coating on the bracket, but no planing required), drill holes and fasten bracket in place. Repeat for one side of legs, assembling at the end upside down (helps to have a helper, and assemble in a position so you roll into final place). Once you've rolled it up, have one person hold the beam up or slide an A frame ladder under the beam. Slide the other 2 legs into the brackets, drill, and assemble. Easy. I did add cross bracing on the legs but only because they are not buried and I thought it would make it more secure.
Leno Fountain
Easy to use and Customize
Product is extremely easy to use. I ordered two ends and a middle bracket. I used 2- 12 foot 4x6 treated lumber as the top beam. Setting them at the ends. I initially did the math wrong for determining height and bought 16 foot 4x4 for the legs. Planned to sink them 18 inches in the ground for anchoring. After catching my mistake (wrong height of a triangle formula. Used it as a 45-45-90. use 22.5 67.5 90 as the angles.) Cut the legs off at 14'. Still anchored them 18" 12 in concrete, 6 in backfill. Its not moving. Cross Braced with 8 foot 2x6. Used deck boards for the climbing wall at the end. I weigh 250 and my buddy who helped with construction weighs about the same. We both used the swings at the same time and the set isn't moving. Kids complain about the little swing set being boring and not being able swing very high. This eliminates that issue. I have zero reservations about the strength of these brackets. I have four boys so if it can be destroyed they will find a way. So far so good.
Cristy Ranae Culler
Sturdy brackets minimize wood working
These brackets are very sturdy and keep you from having to cut much (perhaps any) wood. For me, the 4x4s slipped easily into their holes. I used 10' 4x4s. Because there is wiggle room on the 4x4s, it is possible to bolt them down and have one A-frame be considerably wider or narrower than the 2nd A-frame (assuming you are buying two of these to make a traditional A-frame swing). I put a cross piece between the legs on each side using the same length 2x6 wood at the same distance from the bottom of the legs. That way I knew both A-frames had their legs the same distance apart. I wanted to add the cross brace anyway for a little more reinforcement. I cut the cross brace so the ends had the same angle as the legs. If you didn't use a cross brace, you wouldn't have to cut any wood at all. The 4x6 didn't have as much play, but slid on easily. The 2nd bracket had the weight of the legs pulling on it so I couldn't slide the 4x6 through by hand. A rubber mallet had it easily moving down the 4x6 though. With the 10' legs, it took some effort to stand it up. I tried by myself at first, but eventually my wife helped and we had it standing up. I am glad I went with 10' legs as I wanted that extra height to get a nice big arc for more thrilling swinging. I highly recommend securing the legs into the ground with some method. I went with concrete. I had several people caution me against putting the legs in the ground because they can rot fairly quickly. I used Simpson CBSQ44-SDS2 4x4 holders that let you sink a metal "U" shape in the concrete and then provide a metal plate for the 4X4 to sit on on. They are pricey, but worked out nice. I sank them in the concrete at an angle so the metal plate met the 4x4 legs squarely. Now that the legs are in concrete, the swing set is very stable. It is up to you to decide how long you want the 4x4s for the legs and 4x6 for the main beam. I think 10' is great for the legs (actual height will be a little less due to the angle they are at). 8' wood be OK. If you put the legs in the ground, you would have to subtract that from the height. For the 4x6, I saw a wide range of recommendations from no longer than 8 feet to up to 12 feet. I found several commercially made swingsets/kits that used a 12' 4x6 so I went with 12' and I am glad I did. 12 feet gets used up quickly with a few hanging items. The legs of the A-frame angle out (not just to make the A-shape, but also in the "outside" direction). This makes it so you can hang a swing on the 4x6 right at the bracket and have plenty of side to side room so you don't hit the legs while swinging and you get a little sideways. I put a rope right in the middle of my 4x6 and put all my 240 pounds on the rope. I couldn't see the 4x6 bend at all. That gives me confidence that three kids swinging (even with their dynamic load) would not stress the 12' 4x6. Overall I think these are excellent brackets. They are a little pricey since you have to buy two, but they are built well and make swing construction easy. Edit: over a year later these are still working great. I added some monkey bars next to the swing set and touched up the stain (Behr 3330 stain/paint Redwood color) on the swing when I stained the monkey bars. Picture added.
Ayesha Ashraf
Easily build a very impressive swing set
These brackets make it very easy to build a very sturdy swing set frame. Having just put one together I can share a little advice. I've read that people had to sand down the ends of the wood to fit them into the sleeves. I had one 4x4 that was damp and swollen and wouldn't fit in. I was thinking that I could use a hair dryer to accelerate the drying process. That wasn't true but the hair dryer did provide the solution. Heat up the metal sleeve for ten minutes (until it's hot to the touch), it expands, and problem solved. Assembly order matters. The 4x6 top beam is brutally heavy. Start by attaching the brackets to it. You can then slide the 4x4 legs into the brackets with the beam lying on the ground (top down). If you have a lot of strong help then you can just do all four legs and flip it over. If not so much help, then you want to do two legs and then flip it over with the beam acting as one of three legs. Grab a ladder and prop the legless end of the beam onto the ladder. Then work the two remaining legs into the bracket. I'm probably going to do a 2x4 cross piece on the legs for added stability. You can sister together 2x6s and 2x4s to make the beam and legs but given that they are the sole support for the structure that seems ill advised. Get the 4s and just end it. Less work too. Size matters as well (sorry). I went with a 10' top beam. The brackets eat up 1' on each side. So you have 8' for swings. That is plenty of room for 3 swings and 4 might even work. The brackets can probably handle a 12' top beam but good luck with assembly (see above). I went with 9'+ for the legs. A higher beam means a longer swing distance and more fun. Make sure to get swings with longer chains (mine are 66"). I'm going to put some Thompson's Water Seal on the wood after it dries out a bit. Give it a more finished look. My daughter is going to want some structure to go along with the swings, so there is no rest for the weary, but at least this will distract her for a while. Maybe she'll forget entirely.
Jeff McDaniel
Coolest. Dad. Ever.
Turned a weekend project into four hours. Easy install with the help from a little dishwashing liquid. The kids love it and it's solid as a rock!