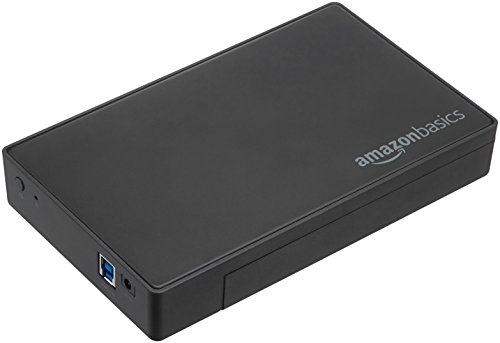
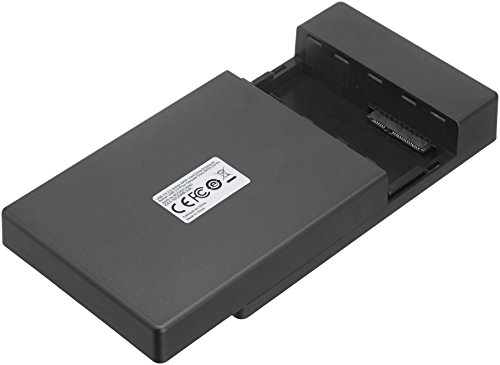
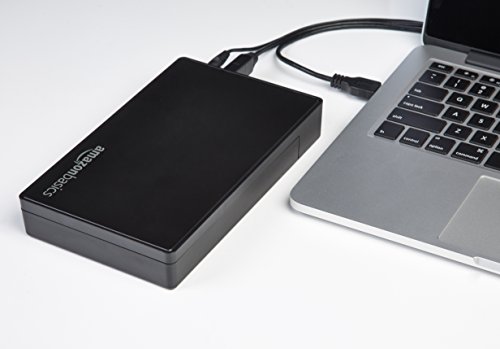
- 3.5-inch hard-drive enclosure supports most 3.5-inch SATA I, SATA II, and SATA III HDDs; hard drive not included
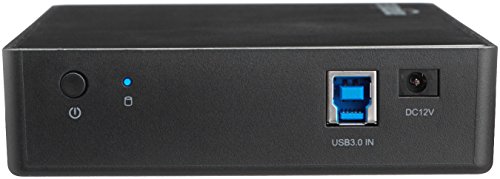
- AC powered; provides DC12V power connection, on/off button, USB port, and LED indicator light; USB 3.0 allows for transfer speeds up to 5 Gbps; backward compatible with USB 2.0
- Hot swappable; Plug & Play installation (no drivers needed); tool-free design—no tools or screws needed for installing an HDD
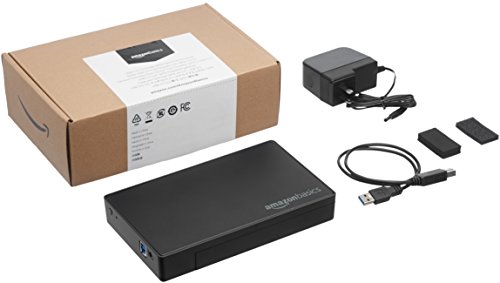
- Smooth inner surface protects against scratches; self-adhesive sponges ensure an optimal fit; includes AC power adapter, USB 3.0 cable, self-adhesive sponges, and user manual
- Compatible with Windows 7, 8, 10 and Mac OS X and above; backed by an AmazonBasics limited one-year warranty. Note : Refer to the PDF attached below in Technical Specification for User Manual
-
Information
-
Twitter
-
Pinterest
-
Youtube
-
Facebook
Betty Straub
If you do backups over your intranet, this is much faster.
I got tired of waiting for Gigabit ethernet to synchronize systems so I decided to try sneaker-netting them via a 3.5" hard drive and USB 3.0. I am able to xfer about 100 GBytes per hour with this on USB3.0. Much better than what I have been doing for backups. The enclosure has a type B USB 3.0 socket. I've used 'standard' (blue) USB 3.0 type A and type C ports with no problems. I agree with comments that this is to use in the office - it is not hardened for portability. But carrying it from room to room works well. Immediately worked on any of several Windows 10 systems. Good purchase - I'll probably buy several more.
Crystal Jae Rains
Great little device
Great little device. This review is the for 2.5 inches size which is average laptop hard drive size. You just put the hard drive inside, plug it up to another computer and in a few seconds you can open up the folders on the hard drive for viewing/uploading/whatever you need to do with them. The charging port on my old laptop finally fried and it was not worth fixing since the machine was really old so I removed the hard drive and slipped it into this little guy right here and it's good to go. You may have to remove the mounting bracket from your hard drive first to get it to fit, but once you do that it should slide in with no trouble.
Nikola Mandov
Legally computer impaired and I managed to use this thing
Listen up guys, I've never even seen the inside of a computer until my electronic porn storage device from 2007 decided to explode. I pulled the HD out after busting the old machine open and ordered this baby. They sent instructions with it which I immediately burned, preferring to try and handle the problem myself. With little to no effort, I managed to plug this thing into my new PC and pull off all my old and extremely important files with literally no training. If your device blows up and you need to pull out the old hard drive, you should strongly consider this to save your very, very valuable belongs.
Jessica Nicholls
Works well. Placed a 2TB WD Green hard drive ...
Works well. Placed a 2TB WD Green hard drive into the enclosure. Benchmarked speeds up to 155 MBps sequential via USB 3.0.
Raveena Kamal
Amazing Price, amazing easy to set up and use.
I installed an existing & formatted HDD in this enclosure in less than 5 minutes. No screws, no cables, 3 steps and I was ready to plug it into my computer USB3 port. Despite the rather limited instructions (which need a magnifying glass to read parts of), I didn't have to do any setup on my computer. Drive was immediately recognized and assigned a drive letter, ready for use.
Vanu Vekaria
About as Plug-and-Play Easy as it Gets
Solid, well-designed quality product. I'm running Windows 7 Pro 64-bit -- on all of my seven computers in the house -- and this is about as plug-and-play easy as it gets. Literally: (1) open plastic enclosure (2) insert 3.5" hard drive (3) slide cover back on (4) plug the AC power adapter into the enclosure (5) connect the USB cable from the enclosure to your computer (6) press the power button on the enclosure to "on" (i.e. "on" is when the button is depressed; "off" is when the button sticks out a little bit). When you're connected to a computer that is on, and the hard drive enclosure power is on, the blue LED light will light up after a few seconds. Windows 7 will automatically find and install the necessary drivers for both the enclosure, and the drive (we're talking maybe 10-20 seconds here). Probably best to be connected to the Internet, just in case Windows needs to find a driver. (If you're using WinDoze 10, I will say a prayer for you -- but the enclosure works for all versions of Windows, from XP to Windows 10). If you are simply moving an existing hard drive -- one that is already in use and has information on it -- to the hard drive enclosure, that's it. You're done. NOW LISTEN CAREFULLY! If you are using a NEW hard drive, you still need to initialize the drive in order for your computer (i.e. Windows) to recognize and use the NEW drive. This applies to whenever a NEW drive is connected to a computer, and has nothing to do with the enclosure! SO, I don't want to read any "the enclosure sucked, the drive was defective, etc." comments due to you not initializing your NEW hard drive. Capisce? Also remember, USB connected hard drives are NOT intended for booting your Windows computer from (if it would even let you try). So, do not install, or attempt to install, your OS onto a drive in an external USB enclosure! I bought six of these, and have already put three into service -- flawlessly. Primarily, I needed an inexpensive way to remove full-to-the-max hard drives from my computers, and still be able to access them when needed. This enclosure does this perfectly! Plus the extra bonus of now being able to connect the drives archived in the external enclosure, via USB, to any other USB equipped computer. A word about Windows XP... Windows XP will only recognize hard drives up to 2 TB in size. If you try using a hard drive larger than 2 TB with Windows XP, it won't be able to see the entire drive. The work-a-round with XP, with drives larger than 2 TB, is to partition the hard drive into multiple volumes of 2 TB or less. DO NOT try to partition a hard drive that already has files on it! You will most likely lose data, and be very, very sorry. As a rule, partitioning a hard drive is something you do with a NEW drive -- and you know why you're doing it! If you don't know why you want or need to partition a hard drive into multiple volumes, then DON'T do it. For most people, you want to create what Windows refers to as a "Simple Volume" (i.e. the entire hard drive is one single volume), when you initialize and format a NEW hard drive. When you initialize and format a NEW hard drive, you will be asked to choose between MBT (Master Boot Record) or GPT (Globally Unique Identifier Partition Table) when you setup the drive. Basically, if your hard drive is 2 TB or less, you should choose MBT. If your hard drive is larger than 2 TB, you should choose GPT. I have been using 1 TB, 2 TB and 4 TB hard drives in this enclosure effortlessly and with no issues whatsoever. Personally, I wouldn't put drives larger than 4 TB in an external, sealed enclosure of this type (i.e. potential heat issues on thicker multiple-platter drives), although larger drives should still work. FWIW, I have even been using one of my enclosures as a means to format new hard drives before installing them into computers. This way, I have my new drive ready-to-go before I remove an existing drive from a computer, and just pop it in to replace the drive I'm removing. Then, the drive I just removed gets transferred to one of these great hard drive enclosures and, just like that, I have an instant archive :) FYI, I'm using these enclosures as a way to archive 4 TB hard drives that I have filled full-to-the-max, so that I can fill-up even more hard drives. I'm working with a lot of video files, and this allows me to easily access files on drives that I have archived to the external enclosure. Finally, heat is just not an issue with this enclosure. My 4 TB Western Digital 5400-RPM drives idle at about 85 degrees Fahrenheit (7200-RPM drives might run a bit warmer) in this enclosure. Even when I perform a complete format, lasting 10-12 hours, the drives never go higher than 100 degrees Fahrenheit -- which is well within the safe temperature zone for hard drives. TIP: If you're using this enclosure for archiving hard drives (e.g. you don't need to access the drive all the time), then just leave it off. You don't have to leave hard drives running unless you're going to be accessing them. And, a drive that's not running generates no heat at all :) Great product at an affordable price.
Kelly Nichole Presley
How much data you are saving. How much external memory such as a flash drive or another computer.
What can I say... I did exactly what it was supposed to do. I am not tech savy at all. I got on youtube to figure out how remove my hard drive from my laptop which is where I even got the idea about the SATA Hard Drive Enclosure in the first place. Anyway I followed the instruction on the hard drive enclosure to save my files and much to my surprise it worked like a charm (the first time). I copied everything from the hard drive. In my case it was about 39gb. Fortunately purchased a 64gb flash drive to save everything on and while it took a full day to save the information it was worth it. Most people are not trying to save everything and the kitchen sink, but I was. Depending on what you're trying to save it may only take a few minutes to a few hours and much less external memory to save your data on. Regardless I am very satisfied with the purchase.
Shazia Khan
Great external HD enclosure!
I had an extra 2.5" laptop drive lying around that I wanted to put to use. I've purchased a variety of drive enclosures before, but this one from Amazon Basics is very easy to use. It assembles easily and my computer recognized the drive the instant I plugged it it. The USB 3.0 speeds are great! Considering how inexpensive this enclosure it, it sure is of high quality. I would definitely recommend getting this for your 2.5" drive.
Jean Chabarria
Simple set up w/huge ROI
This is five stars more for me realizing how important it is to back up your data, but in any event I'm still thrilled with this purchase. I had a couple of older hard drives around the house, all 3.5 inch SATA's, so I picked up this enclosure just to get all the data off of them and be able to have some extra storage handy if needed. Having an extra external drive will be helpful, but what's been really great has been having the chance to back up years of photos we hadn't gotten around to. It's been quite a walk down memory lane all thanks to this enclosure. Good times.
Susan Jordan
Can't be any simpler
The most difficulty I had was salvaging a 3TB HDD from a wonky Toshiba External drive system that does not use screws on the enclosure (you open it once, and never again)... HDD slid right in, added the included foam cushion pad to stabilize the drive inside the enclosure, closed the case, connected the included USB 3.0 cable and the power adapter and it has been up and running since. I like the on-off power button. I have this connected to my Linksys EA9200 router and it is my network media server, which does not see a lot of action. Would be perfect if it included some rubber feet/pads so it does not slide around.