


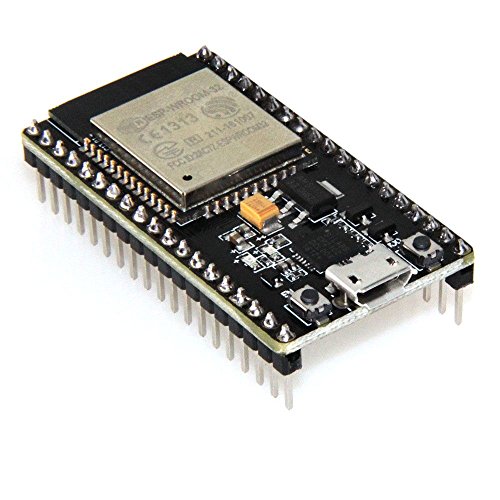
- 2.4GHz Dual Mode WiFi + Bluetooth Development Board
- Ultra-Low power consumption, works perfectly with the Arduino IDE
- Support LWIP protocol, Freertos
- SupportThree Modes: AP, STA, and AP+STA
- ESP32 is a safe, reliable, and scalable to a variety of applications
-
Information
-
Twitter
-
Pinterest
-
Youtube
-
Facebook
Chris Smith
Works great! Only thing that I wish it had was ...
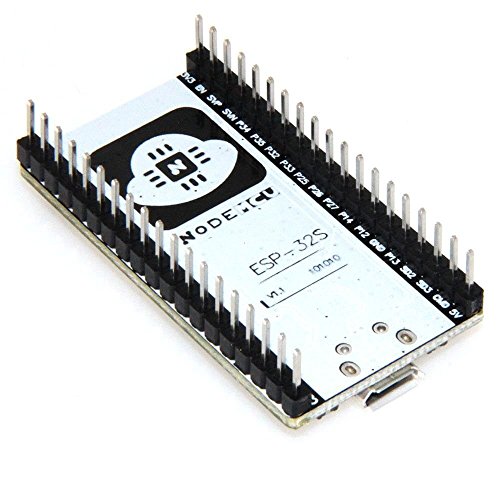
Works great! Only thing that I wish it had was the pin markings on top, but I understand there was limited space (markings are on the bottom). Just to confirm it does fit in a standard breadboard and leaves one row of pins on each side. As for the Arduino IDE install espressif/arduino-esp32 from github and choose Node32s for correct pin mapping.
Dhonna Ricohermozo Rodriguez
HiLetgo Stands Behind Their Products!
We have purchased a lot of these ESP32 dev boards from HiLetgo, since we are working on a prototype of a potential commercial product that uses the ESP32 module...we just aren't ready to go to the bare module yet. Recently we purchased another big batch of these from HiLetgo, but two of the units would not program correctly. We confirmed that all the other boards we had on hand were still programming OK, so we were able to determine that these two boards were bad. We sent an email to HiLetgo through Amazon's feedback system, and after only a few messages back and forth, the two replacement units arrived at our door within a week or so! As a customer, we are very happy to report that HiLetgo stands behind their products, and will do what it takes to correct any issues. We will definitely buy from them again.
Andy M Johnstone
Most powerful Internet connected dev board for the price
Do you need more powerful hardware to control your "thing"? How about dual cores, WiFi, bluetooth, more GPIO? Then buy this board instead of an ESP8266. The ESP8266 took the world by storm and this is it's big brother. Just as easy to use and way more powerful. I used it to drive a clock I designed. I took full advantage of its 36 GPIO pins, WiFi connection to automatically get time with no user input, hardware timers for accurate timing, dual cores for separating functionality, and PWM for setting brightness. This thing is a workhorse and I can't believe it's so cheap. If you're reaching the limits of the ESP8266, it's time to upgrade to this bad boy.
Justin Skaggs
it looks like it was stuck "downloading"
Honestly not as "plug and play" as most people expect their Arduino type boards to be, but only took about 5 minutes to get my first sketches uploaded and was scanning the WiFi around me (and Bluetooth!) and printing the results via the serial port. I did run into a snag when I ran the "Get.exe" program from the link above, it looks like it was stuck "downloading" .. but no network traffic was flowing, so I closed and opened again, same thing... I got past this by hitting the Space Bar. (other keys might work?) and had to do that once again, not sure if that was just my install, but something to note! The item I received (6/22/2018) did not have the pinouts printed on the bottom, but when you're breadboarding.. I find it easier to use the picture/schematic provided anyways.
Maria Vallejo
Only a fraction of its potential has been unlocked!
This board is really neat! I'm currently using it as the brains of a little 2-servo robot, taking commands over port 80 from an ESP8266 Remote. So far Bluetooth and AnalogWrite() are not yet implemented in the Arduino Library, but PWM is pretty easy using ledcWrite() and its associated functions. I downloaded the Arduino library from GitHub /espressif/arduino-esp32, copied the library into Arduino/hardware/espressif/esp32/, and then ran a script in the /tools folder to download a binary blob from Espressif. As stated by Joey, I set the board to Node32s in the IDE and got the correct pinout, but I suspect most of the choices will work, because this board follows the standard Devkit pinout. There is a nice picture at the bottom of the README on GitHub. There are 2 buttons. Just like the NodeMCU, one button works as Reset and the other is tied to GPIO0 for bootloading or custom functions. There is a blue LED attached to GPIO2. There is also a red LED that I believe is just a power indicator.
Nunik Milagros Bekasi
Great addition to your IoT tool kit, this is not a HUZZAH, An ESP8266 all grown up
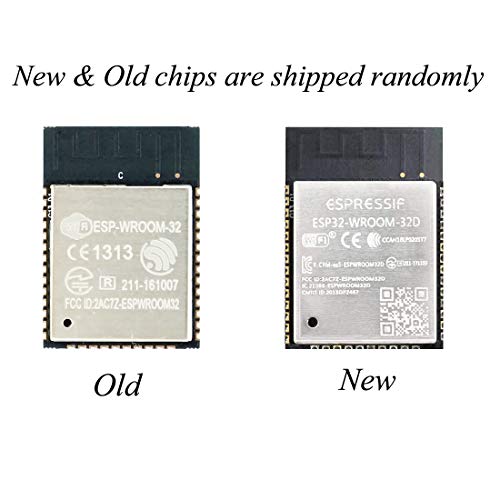
I received a HiLetgo ESP32 board on Dec 31 2017. They are packaged quite well securely which I guess qualifies as "unfriendly" but better safe than sorry with these little gadgets. If you use Arduino IDE you will have to install the board library for this hardware using either git or downloading and manually extracting the zip file. If you ever dabbled with the little sister of this one (ESP8266) you should be able to get this done, although it is not quite as easy (no board manager as of 12/31/2017). After about 30 minutes setup I was off and running. Currently running a burn in test, requesting a page repeatedly. No errors and connects to the network fine so the fundamentals of this board appear good after about 18 hrs of continuous operation. In the past I spent a lot of time trying to interface one of the tiny ESP8266 modules with an Arduino, even with logic level converters in place and things communicating the whole thing feels rickety. The all in one ESP8266 modules are nicer but lack GPIO for any heavy lifting. GPIO wise the ESP32 gets closer to an Arduino UNO board than the ESP8266. Great for remote sensor monitoring/logging, display panels. The Adafruit HUZZAH32 boards are a little more feature rich and more expensive. Unless you use the specific features like battery charging these boards will be a dominant player IoT tool kit, either way a great addition.
Parminder Brar
Fits standard breadboard, works right out of the box
Love that it comes complete with a sample app already installed that blinks the LED and outputs to the Serial Port so you can just plug it into your USB socket and off it goes! Great to see that it fits a standard breadboard and also thoughtful to include a printout of the pinout as they aren't visible on top of the board itself. Looking forward to migrating some ESP8266 projects that need a little more horsepower and flexibility.
Bhes Raj Baral
works great. Flashing from the Arduino IDE is automatic - ...
Fits standard breadboard, works great. Flashing from the Arduino IDE is automatic - you don't have to press any buttons or move switches or jumpers on the board. Highly recommended. Follow instruction on the net for installing ESP32 extensions into the Arduino IDE and the SI Labs CP210X USB to serial drivers, then select Node32s as the board type. Only negative so far is that the pin labels are on the bottom of the board where they are useless. I printed out a diagram of the pinouts and use that. It is a bit painful to have to count down the rows to find the right pin, but it appears that to shrink the board down to where it fits a standard breadboard there is no room left for the pin labels. I would choose standard breadboard size over labels any day.
Jay Mark Pagurayan
Nice well-made board
Nice well-made board. No physical defects, no problem connecting to my wifi network and communicating with websites. Still haven't been able to get bluetooth working (other devices can see it but cannot pair with it). Programming with Arduino IDE works fine right out of the box, using Node32s as the Board selection - this took a while to figure out without documentation. To reference GPIO pins in code use just the number, for example "digitalWrite(13, HIGH)" sets GPIO13 high. The built-in LED is attached to GPIO2. For pinouts see attached image, which I found helpful since the pin labels are on the underside of the board.
Jerrid D Lindsay
Good module with WiFi/BLE built in
Decent ESP-WROOM-32 dev board, uses the same CP210X drivers as my other ESP8266 boards so it worked right away. The Arduino IDE has no board managers for it, so I had to install them manually via the first GitHub link provided in the product description, took a couple minutes and all was up and running. Compact design has nothing sticking out over the board and does allow the outer pins on a breadboard to be used. However, you do lose space for the pinout markings on top of the module, instead they are on the bottom. It's also a little odd that GPIO6-11 are broken out, as they cannot be used.