


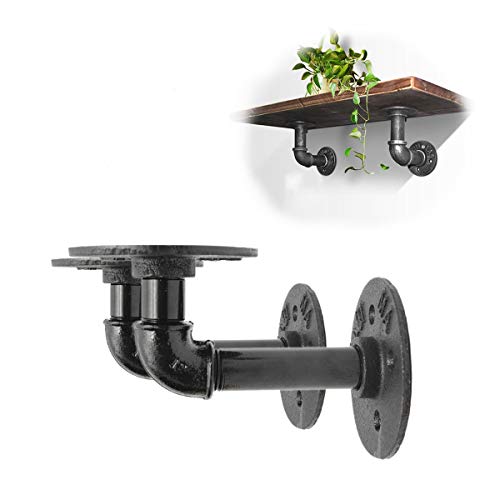
- SHELF BRACKETS STANDARD: PIPE Flange Diameter- 80mm/3.1"; Short arm: 65mm/2.5"; Long arm: 150mm/5.9"(Including flange and elbow)
- PACKAGE INCLUDED-2x Pipe Shelf Bracket(Wood plank is Not included)
- PIPE SHELVING APPLICATION-Fix a wooden board with floor flange, then fix the iron shelf bracket to the wall with screws and screw holder,you can DIY something as you like to suit your decor.
- INDUSTRIAL SHELVES NO-SWEAT INSTALLATION-Get those pipe shelves up with ease. Work it like a pro using basic DIY tools!
- WHAT IF I DON’T LIKE-If you are not completely satisfied with your purchase for ANY reason, simple return Iron Pipe Bracket to us and you will receive 100% refund OR RESEND, no questions asked.
-
Information
-
Twitter
-
Pinterest
-
Youtube
-
Facebook
Maria Vallejo
GREAT for natural cat-tree!
Now that I finally used the brackets, I want more!! I'm making a cat tree using natural burl wood -- but only bought 2. Here's how it looks so far. The brackets are really solid .. and look great. I just wish they were less expensive!
Rashmila Karki
Great quality! Super heavy duty
I wanted to redo my bathroom, but was on a budget. So I threw some paint on the wall, and DIYd my own shelf. Great quality! Super heavy duty! Easy to install
MA RB HY
Great industrial shelves- perfect for my bathroom!
Love these! They are straight black in color and very sturdy. I used them for my bathroom shelves and they are beauriful. If you’re looking for an industrial look for shelves look no further. I should note that you will want narrower wood shelves to drill these into- too wide and the weight may be unevenly distributed for these little fellas. Overall love and recommend!
Abdul Rashid
Quality item that looks great
These are high-quality metal parts that are pre-painted and not greasy at all. Easy to install
Crystal Huey
love these pipes
Bitter sweet that they can provide these pipes cheaper than we can buy them a la carte. To buy these pieces individually it will cost close to $40 (4 flanges, two 1.5" pipes, and two 2-3' pipes). These do not have any oil residue on them like the galvanized pipes do in the store. They are clean and are either powder-coated or painted (some of them were a little chipped revealing the galvanized pipe beneath). My only gripe is that after they are coated and prepped some threads cannot be screwed in as tight as others, hence making some mounts taller/longer than the other. This can be avoided by not screwing them together all the way but could make for a loose shelf.
Jamie Elkins Taylor
Nice
Beautiful! I got my rustic industrial shelves . Love it.
Althea Montano Tuazan
Form and function
Work and look great! Everything I needed was included. Hint, find a stud if you can. Let him install these cute brackets for you. Just kidding! The wall stud, silly!
Ben Fredj Sahar
These are nice and sturdy and look great too
Finally a bracket that comes with the hardware too. These are nice and sturdy and look great too. I used them long ways up but you can turn them to make them to make them look longer outwards. They look great near all my paintings which are in my office/gallery. They are very sturdy and I imagine with the good hardware it comes with it could hold quite a bit a weight. I am sure anyone looking for this kind of style will like these and for the price you really can't go wrong.
Travis J Strachan
As advertised
The shelves I made using these brackets turned out really nicely. One thing worth noting is that each bracket is 5 pieces that screw together. This is nice because you can adjust the length and screw hole positions, but it also makes it a little tricky to make each bracket the exact same length. Also, one of the pieces I received had no threading so it would not screw to the rest of the bracket. I sent an email to the seller with a photo of the defective piece and had a replacement within a few days. I was very satisfied with the way they handled this issue and would certainly order from them again.
Ester Jamisola
As expected
I was pretty hesitant about these but it actually worked out pretty well. I was worried I wouldn't be able to line them up on the wood right or be able to hang them straight. Plus I didn't like that it didn't come with the wood. However once I realized I had some scrap wood left over and some stain I got over it and went for it. Toake sure the pipes were lined up even on the board, I laid the board on the ground and pushed it up against the wall and drilled the pipe into the wood with the ends of the pipe against the door. This made sure the pipes were in line on the board. Then I held the board on the the wall with one hand with a level on the top to make sure it wasn't at an amgle. Then I used a pencil to trace circles in the nail hole of the pipes. I was then able to take the board away to drill holes and put the anchors in the wall before putting the shelf back up and adding the nails. I'm sure there is an easier way but this worked for me. However I did have to hang them higher than I wanted because my boards were 10 1/2 inches deep and that turned out to be way to wide. I should have gone with 8 or 9 inches. But putting them up higher made them seem a little narrower than they really were.