


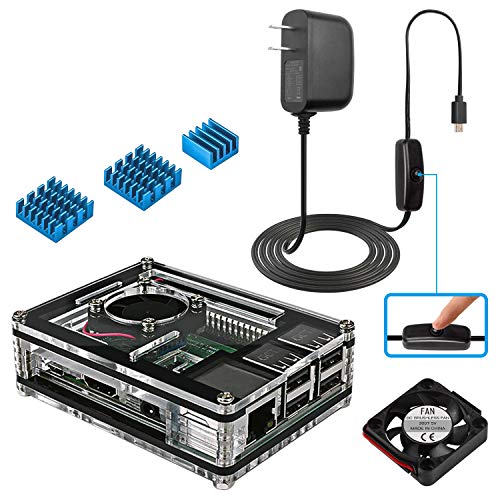
- Updated Version(208/11/30): 5V/3A Power Supply for raspberry pi 3b+ /raspberry pi 3 b/raspberry pi 2.
- For avoid to block Wifi/Bluetooth signal of raspberry pi, case was made of acrylic but not metal
- Case with raspberry pi fan and 3 pcs Heatsinks for Quick cooling the CPU/LAN/RAM
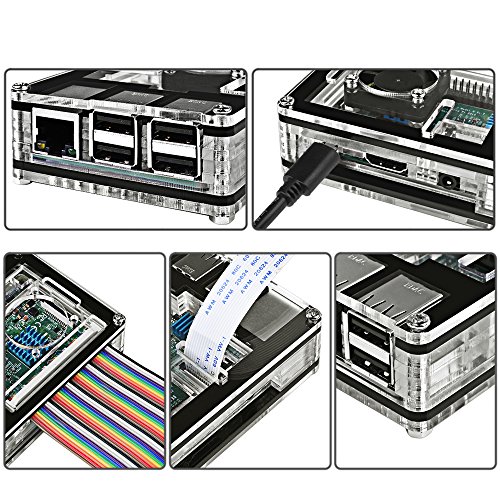
- Each accurate port can perfectly connect your output devices. Specially, this rpi case let you easier to insert/remove SD card
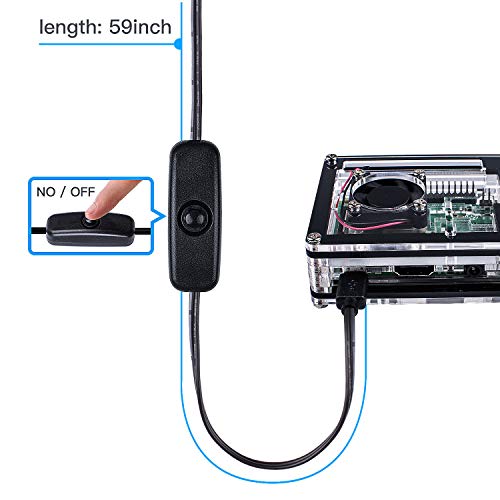
- 1.5m/59in Micro USB cable--Easy to control pi charging with On/Off switch; Stable 3A to avoid pi reboot by insufficient power supply
-
Information
-
Twitter
-
Pinterest
-
Youtube
-
Facebook
Steve Morrin
It was easy to put together and pieces were not broken
I have just started building retropies for fun and was looking for something that stood out, but wasn't a copy of an old console and a little more sturdy. This guy fit the guidelines. I was able to assemble it quickly, the package included instructions, unlike a previous purchase from another case maker. It fit great under my tv and he hint of white works really well with my Xbox 360 controller.
Steven Williamson
Fan is very effective and super quiet
I got this case because I did not want to worry about overheating issues with RPi3 and the case looked cool and techie. I ran a CPU stress program that loads every core at 100% continuously, and the fan sure makes a huge difference. Fan off = overtemp warning/clock throttling (CPU temp > 80C), 3.3V = 66C, 5V = 60C. With Pi doing nothing: fan off = 61C, 3.3V = 46C, 5V = 42C. (Chip temp measured with command /opt/vc/bin/vcgencmd measure_temp) It comes with stick on aluminum heatsinks for 3 internal chips that get the hottest. I should have measured the internal temp with and without heatsinks just to see how big a difference they make, but had stuck them on already. The blue anodized color looks cool, they fit perfectly, and the quality looks good. The fan has 2 connectors you can hook to either 3.3V or 5V pins of the RPi's 40-pin IO port. The fan is completely silent when connected to 3.3V but effective enough to prevent overheating at 100% CPU. When connected to 5V, you can definitely hear the fan and it has a slight whining sound. The AC adapter says rated for 2.5A. I'll update this review with test results when my load test equipment arrives. It's working perfectly. I like how the cable is captive to the adapter (hardwired with no connector). This means no added resistance from an extra connector. It means you cannot change the cable but the length is plenty long enough. The inline switch is quite handy so you don't stress the RPi power connector from plugging/unplugging. Likes: cool looking case, effective and quiet fan, rubber feet, feels sturdy and a little bit heavy, slot for 40-pin connector access (both on top and on side), slots for flex cables for camera and LCD displays Dislikes: kind of a pain to assemble with so many stacking parts but the illustrated manual helps, uses up the only 3.3V pin of the RPi IO connector (but you can always solder the wires if you also need 3.3V for external device)
Jose Luis Lopez
Exceeded Expectations. Precise Cut-Outs for Ports!
If you think this looks awesome in the pictures, just wait until you get it assembled with your PI inside! This precisely cut case far exceeded my expectations, this is absolutely superb quality! I found the instructions for assembly easy to follow (pictures for everything!) and while it is still a bit of a challenge to keep everything aligned during assembly, once done, you'll love it! This is a heavy duty case that gives great protection for your Raspberry PI. Three heat sinks (versus two in other similar products) provide cooling for the three most crucial chips on the board. The fan which keeps the main CPU nice and cool can be run in either 3.5 or 5 volt mode (I have mine set to 5v) and is super, super quiet. It also helps to circulate air throughout the entire case which enhances heat dissipation across the entire board. This is a well thought out and engineered case, right down to the four rubber feet on the bottom that keep the case elevated for air circulation and to prevent slippage (holds well to almost any flat surface). The on/off switch is a click type switch not a wafer style (which I really like). It produces an audible "click" when pressed so you know that you have either positively turned it off or on. I like this case so much that I have ordered a second one for my other Raspberry.
Oshi Amarasinghe
Great customer service. Above and beyond expectations!
Excellent pieces of protection with a cooling fan. Extra hardware was sent except for cap screws. One cap screw wouldn't thread on the screw but, the other three went on without any problems. Contacted seller, they were willing to make it right, even though it was just a small unnoticeable issue. I informed them not to worry about it because it wasn't that big of a deal for what they would have to do, to make it right. The case does everything I expected it to, it helps to protect my pi 3 B+ and, keeps running on the cooler side. So, a few days ago imagine my shock and surprise when the seller went above and beyond anytjing I would have expected and sent me more than what my issue was. I find myself ready to purchase another Raspberry Pi, just so I can order another kit from a seller that demonstrates a willingness to truly take care of their customers. Thanks again for going above and beyond what was expected! Will definitley order from seller again. Thank you!
Seth Wall
This is a great little pack
This is a great little pack. For the price, you get a great assortment of items. Separately, the items would cost a lot more than they do in this pack. The case looks snazzy, and I like having active cooling. The fan is quiet, or at least it is quieter than my printers. Putting the case together is a bit challenging, since it is made up of separate layers. Though, once you have it together, it is great! I love the power supply! I love being able to turn off my Pi, without unplugging the cord. It feels much more streamlined, compared to having to plug in, and unplug the cord each time. It seems like it would cause less wear and tear on the Pi's power port. Though, this is mostly an issue for people who actually turn off their Pi. If you are just going to keep it running, then this feature isn't so important. The heatsinks are a pretty blue, and seem to dissipate heat satisfactorily. One note, put the bottom heat sink on after putting the case together. Otherwise, it may rub against the case, and possibly put stress on the solder joints of the chip. I can't say whether or not this could be an issue. I couldn't get the heatsink off, so I filed the edges of the hole, so that it would fit comfortably. This was my own fault, I don't fault the case. I liked this pack well enough that I bought two more. So, I think you could say that I recommend it. :-)
Heather England
A clever design leads to a great value
After deciding to take the plunge and embrace the retro-gaming emulation scene provided by the Raspberry Pi, I found myself in need of a good inexpensive case for it. I was looking for something with an included power supply, and that brought me to this case by Miuzei. This case has a lot of bang for your buck. It comes with the case, three heat sinks, a fan and a 2.5V power supply. The heat sinks and fan are essential if you intend to overclock your pi. All of that for such a low price seems almost too good to be true. I think the cost savings come in the form of the ingenious layered design of the case. The case is made of specially cut clear acrylic sheets stacked in layers. There is a bit of trim on the case, in this case, white, but a black version is also available. An added bonus is that, aside from the colored trim, it’s a clear case, meaning that you can see into it and your pi. If you like that sort of aesthetic, this case has some coolness factor going for it. Each layer that makes up the case is cut specialty cut to contour around the pi. The sheets are thick enough that they are unlikely to bend easily, giving the assembled case good durability and strength. The top of the case has cutouts for the fan as well as slots above the ports on the Pi so that the case can still be used with various things plugged in. Assembly is simple and the instructions are very clear, in case you mix up your part order. The layered stacking approach certainly affects the price of this case as cutting plexiglass layers is less costly to produce than molded plastic or metal. The cost savings undoubtedly allowed for the addition of the power cord, fans and heat sink while still keeping the overall price low. My only very minor complaint is that the case uses long screw bolts to hold it together. This by itself is not a problem, but I found that I had to assemble the case with the nuts on the top of the case instead of the screw heads because the screws were a tiny bit too long to work comfortably with the provided rubber feet. I put it together with the nuts down the first time and was concerned that I might scratch the surface the Pi was sitting on. Flipping them over solved the problem. Beyond this, I unreservedly recommend this case. Sure, you can get nicer more flashy cases for your pi, but if you’re on a budget and need a power supply, this is a great, quality option.
Wint Sandar
Put the heatsinks on the correct chips....
Very nice case, with an engineering caveat and a QC caveat. QC caveat - one of the short posts wasn' threaded on the inside. I tried forcing the bolt, but that didn't work. However the other three hold the RPi in place just fine. Engineering caveat - on the RPi 3B+, one of the heatsinks comes close enough to the fan that a mounting bolt hits it. I had to place that bolt upside down to get clearance. NOTE: this wouldn't be an issue with a model 3 or model 2, since the chips that need heatsinks are in different places. It's just the 3B+. EDIT: I put the heatsink on the wrong chip, and that's why I had the clearance issue. The LAN chip near the USB ports should get the smaller heatsink, not the chip with the raspberry logo on it. My bad. I don't consider the unthreaded post to be Miuzei's fault, but rather a supplier's, so I'm bumping my rating up to 5 stars. Last comment: the instructions say to put on the heatsinks AFTER mounting the RPi to the bottom plate of the case. This is important, to make sure the bottom heatsink clears the cutout in the case.
Ava B Maistry
but if you just slow down and look a the detailed pictures of each step you will be fine. A big plus the power cords has a ...
The Raspberry PI case kit has everything you need to get started. The heat sink modules fit perfectly on their spots with a self sticking tape. Be sure to read the directions very carefully because the parts are delicate. At first I thought the directions very vague, but if you just slow down and look a the detailed pictures of each step you will be fine. A big plus the power cords has a on/off switch, a very important feature if you know anything about programing and using your raspberry PI. To complete the package you get a cooling fan. Once I figured out how to plug the fan in correctly it worked perfectly and I could not hear a sound with it on high. Overall a very good package at a pretty good price to get started having fun with your new mini computer the raspberry PI.
Odunola Oladunni-Afolabi
Comes with GOOD instructions!
I bought this knowing that it may be confusing to assemble; I've purchased a similar product in the past and the instructions were non-existent. BUT... this product comes with instructions with images. I've bought 6 of these now, two for home and four for work. I especially like the case fan. However, I don't like that the instructions recommend you orient the fan such that it pushed air into the case. Instead, I highly recommend you mount the fan with the sticker side of the fan facing upward/outward from the case. This will draw the air into the case through other openings and push the air out through the fan. The benefit is less dust will accumulate on the core's heatsink.
Angie Parker-Brown
Awesome little case!
I actually came on to give a slightly less great review until I decided to look at the photos posted by another reviewer and took another look at my case, I'd flipped around one little piece! Everything fit together almost perfectly; however, I wasn't able to plug the power cable in because of the piece I'd switched around. I had it right the first time, but realized I'd forgotten to take the film off one piece and I guess I wasn't paying enough attention after. I used my Dremel to make room for the power cable--it works fine even with that switched the wrong way. I plan on setting up a couple more Pi's with RetroPie as gifts for Christmas for a couple people I know would love them, I will be using this case! There is one shortcoming, the little rubber pads aren't useful because the screws come out too far, they might work if you put the screws in from the bottom with the nuts on the top. Overall, that's the only real issue (well, that, and the film is hard to get off each piece!). The power cable has a button to turn it off and on, the overall feel is very solid (both the power-cable's power switch and the case overall. I highly recommend it. Just pay attention to how you're putting things together! Don't do it if you're preoccupied or tired ;). Hint: To keep things together a little better, use two screws to help align the case as you put it together. When you finish, put in the other two screws from the opposite side and then move the two you used to align it over to the other side as well. It helps a bit.