

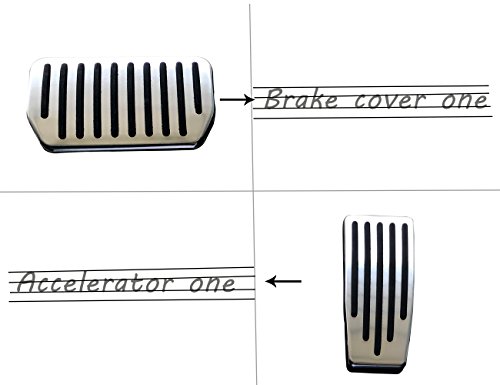
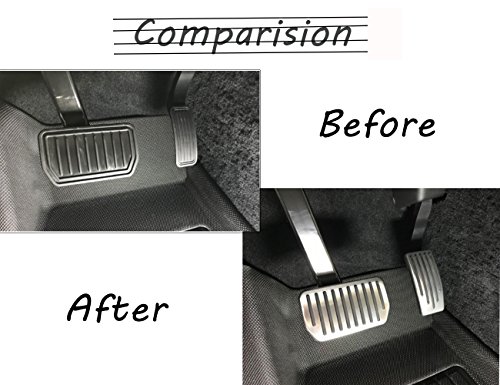
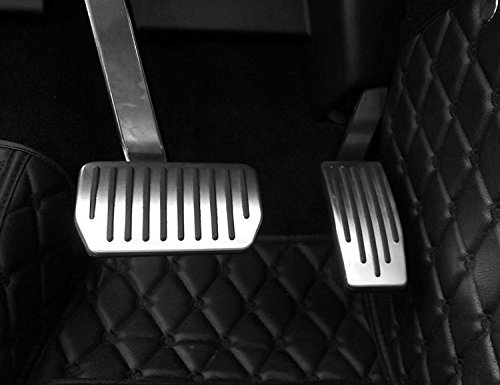
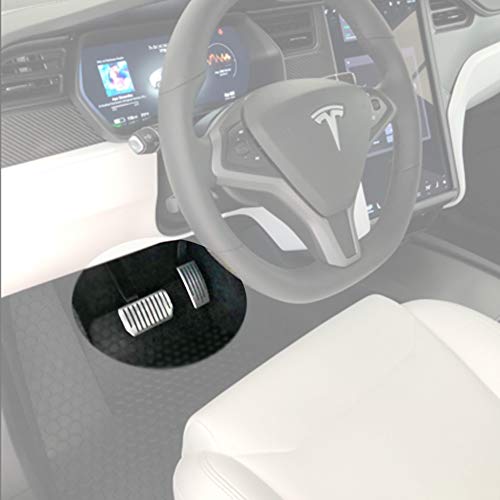
- Enhance the style and appearance of your standard Model S or Model X with the Performance Pedal Set
- Enlarge the area of the original Foot Pedal of your Tesla
- Non-slip surface design, safe for driving and strengthen the friction coefficient
- Customized for Tesla, and Model S and Model X are generic,suitable size
- Easy installation, no drilling or welding required
-
Information
-
Twitter
-
Pinterest
-
Youtube
-
Facebook
Océane Beauregard
Looks great, feels great, small price to pay for huge improvement!
These went on fairly easily, and made a massive improvement in visual appeal. I didn't drive the car immediately after installing these, and they felt so natural on the first drive that I had totally forgotten that I had put them in. Upon closer attention, the go pedal definitely feels more substantial. These arrived in a much more compact package than I expected, really no frills in the packaging. However, reading the reviews, you will have all the info you need to install these. My process took less than 15 min, including the time to fill a bucket part way with hot water and walk down to the garage. 1. Fill bucket with enough hot water to submerge pedals. 2. Place each pedal into its own ziploc bag. Leave the top of the bag open, and submerge the bag slowly until the water starts to get close to the top, then seal the bag. This allows the bag to stay submerged in the hot water to warm the rubber, and keeps the pedal dry for when you want to put it on. 3. Remove the existing brake pedal cover. Remove the new brake pedal cover from the bag/water and place one "vertical" side over the brake pedal. Make sure both corners inside the new pedal cover are over the edges of the brake pedal, then slowly "peel" the inside lip of the pedal cover over the edge of the brake pedal. 4. Repeat the process for the go pedal. This pedal does not need to be removed first, but the positioning makes it a bit more awkward. I started with the bottom left and worked my way around. Finger strength definitely is a plus here.
Watonia Downing
No Sweat at all! looks GREAT! Went on easily but there's a trick. Read below:
So based on the reviews about how hard these are to install, I put it off for a week or so until I had an afternoon to make it happen. I took them out of the packaging and left them in the sun for an hour until they were nice and hot. I pulled the car out of the garage ( or rather the car pulled itself out of the garage (GOTTA love Teslas...)) and removed the brake pedal pad. I decide to start with that one since everyone said that one was easy. True to the remarks, it went on with just my fingers. I then prepared myself and my psyche to expect a challenge on installing the accelerator pedal. To my absolute surprise and delight it,too went on with just my fingers! They both fit nice and snug, look awesome and were simple to install. It literally took less than 5 minutes to install these. The trick is to let them soak up a lot of sun so that they are nice and pliable before attempting to install. Great product. Highly recommend! 2 MONTH UPDATE: So it has been 2 months and these pedals are holding up nicely! No signs of wear and ZERO problems. I would definitely buy them again.
Ratnesh Jain
EASY TO INSTALL compared to many aftermarket pedal covers
Very close replica of OEM. EASY TO INSTALL compared to many aftermarket pedal covers. Brake pedal installs like butter. Accelerator pedal (NOT GAS PEDAL) takes a little bit of finesse to get on. Start at the bottom, get it seated fully on the bottom then use your finger tips to stretch the top corner farthest away from you over the corner, then do the top corner nearest to you. You have to have reasonable hand/finger strength to get this seated properly. Your finger tips will be sore for a few hours afterward, but no blood will be spilled. If you are elderly, arthritic, or have below average hand/finger strength you will need to have someone else install the accelerator pedal. Over all an absolutely fabulous deal at 1/3 the price of OEM. Looks smashing!
Eclipse Oya Vault
Soak in almost boiling water for a nearly effortless install
These look fantastic on my new 2018 Model S. Highly recommended. The installation was initially difficult until I came back here and read some reviews. The hot water trick is the ticket. I got a pot of water to ALMOST the boiling point and then poured the water over the covers. I let them soak in a dish for about 5 minutes. I then took out the accelerator cover (be careful, it will be HOT) and let the brake continue to soak. This time the accelerator went on in less than 60 seconds. I went back and grabbed the still soaking brake cover and it went on just as easily. 5 minutes of soak and 90 seconds to install both.
Jacob Martinez
Tough install but worth it
Very nice pedal covers, really improve the looks of the drivers side foot well. The accelerator cover is VERY difficult to put on, but once it's on, I don't think it will come off. One thing I didn't expect is that it makes the accelerator pedal feel more substantial, more like a normal gas pedal. You don't really notice how small the stock pedal is until you look at it. The cover adds just enough bulk to make it more comfortable on my foot.
Tayona Bagdavadze
Brake pedal was easy. Remove the original
Unlike others, had no difficulty installing. Trick is to place in hot water and then apply immediately. Brake pedal was easy. Remove the original, and slip it on. I agree that the accelerator is harder but I got both done in 10 minutes or less. Did not use silicone or any other lubricant. Would help if you had a flat metal tool to pry the rubber over the pedal (like the tool you use to replace the inner tube on a bicycle tire).
Kelly Johnson
Works for the Model 3
Got it for the model 3 and it works well. The break pedal is larger as other reviews stated, but it isn't loose in a way that it would move around (you won't notice is doesn't fit snug in any normal circumstance). The accelerator pedal fits snug, but I was able to get it on without heating it (I just stretched out the sides with my hands and then applied it over the pedal). One star off because the pedal has some visible residue on the accelerator pedal that I am not sure I will be able to remove yet. UDPATE: The residue was removed by using some acetone and I have no issues with this product for the Model 3
Grace Rogers
Best possible
I have had these on for a few months. Look and feel great. No clue how the OEM part could be any better quality han these. The OEM part is 3 times the price ...but that includes installation. So if you are up for 15 minutes of installation frustration get these. If that is too much than go for the OEM.
Chrissie Phillips
Very good fit
Have to agree with others that it's real tricky to put these on and extremely painful, particularly the gas pedal. The brake one slips on without too much work. This time around, I figured out a better way to deal with the gas one. I fixed one side of rubber padding and instead of lifting the other side completely (which in turn unlatches the one that you just fixed), I just kept fixing small portions by moving my fingers underneath the padding. This way the side that is fixed stays intact and one you're working on will start getting latched on few millimeters a time. It might take a few mins more to lay it on fully, but it's less of a hassle and almost certainly less painful. Hopefully, this trick will help someone
Youcef Aid
once they're on they're awesome. real aluminum and non-slip rubber strips
okay so i'm pretty sure most of these "performance style" pedal covers perform pretty much the same (except for the one where they dont' actually use rubber strips on the pedals for non-slip... i forget which one that one is.. ). So what it comes down to is - "how is the installation process?" And comments about that are all over the board as you probably already know. So here is my .02: I'm pretty sure most of the pedals are going to be similar in difficulty or ease depending how you look at it. That is needed so that when they're on they perform well (and don't slip) and feel like the original pedals. Most peopel say to heat them up before hand so the rubber is softer and you csn manuever it better to get the pedals on. A lot of people say to put this corner or that side on first and then stretch the opposite side to get them on easiest. Here is the reality. Your fingers are going to hurt afterwards (the rubbing them raw feeling) and it wil last for a day or two. So #1 you may want to use glvoes that protect your skin but still allow you to grip and feel the rubbrer edges of the pedal grips. I didn't have such gloves during my install. #2 - the heating is correct but it's not going to help much because they're going to cool down easily by the time you can get these puppioes on. It's not going to go on the first or second or third try - it just isn't. now.. I didn't use soapy water like some people said - and that's because when I used soapy water to put on new motorcycle grips - it ended up making my motorcycle grips always slippy slidy which was horrible - i didn't want to risk these pedal covers being slippy-slidy while i drove. SO.. maybe it installs much easier with soapy water on the rubber - it certainly did when somebody suggested i do this when i installed new motorcycle handle grips.. but be aware of potential undesired results if you do that.... So what i found worked the best and most quickly once i figure it out was to start with one "corner" or "end" of the rubber seal - and just get that in correctly while using my finger to trace all the way around the rubber seal of the cover... and slide my finger around to guide the rubber seal all teh way around. You will fail and have to back track a few times. and you will have to "bend" the rubbrer edges way out to stretch them at certain points to keep the edge guiding correctly as you go at times. But concentrating on going around along the edge all the way around seemed to work best and most reliably for me. The brake pedal was easier because you can take the brake pedal cover (the original one) off. The Accelerator pedal you can't so that is where you're going to spend the most time. Good luck. Once they're on they're fantastic. I don't think it'll matter which pedal you select (except the one with fake rubber strips).